Very simple crochet roses. Knitted clothes with crochet roses Flat roses crochet patterns with a description
Crocheted flowers are one of the favorite themes of needlewomen, because with the help of such a decorative element you can transform a lot of things, from clothes to interior items. Knitted rose is the queen of flowers not only in nature, but also in crochet needlework. There are just an incredible amount of crochet roses, perhaps this majestic flower won the heart of more than one noble craftswoman!
A knitted rose is a flower that will always be fragrant and will never wither, which is why it is good as a decoration for hats, scarves, blouses and even bags. Moreover, they use crocheted roses and independently - as exquisite women's brooches, bright children's hair clips, to say nothing - they create luxurious necklaces and bracelets from roses.

Knitting roses is available even to beginners who have just become familiar with the crochet. In order to start making a decorative rose, you can use any yarn at your disposal (iris, cotton, acrylic, linen, wool, bamboo), as well as a hook that is suitable in size to the thickness of the thread. Depending on the choice of yarn colors, roses can be made bright, or, conversely, pastel, or even experiment with a combination of colors.

As for how to crochet roses, there are only two of them:
- knitting a long lace strip, which is later twisted into a rose;
- knitting individual elements of a rose (middle, petals, cups, buds), gathering into a flower with a needle.
The choice of knitting always remains with the craftswoman. Try to crochet your first flower, and we guarantee you will be surprised how elegant and very realistic roses you can crochet with your own hands.
We have prepared two step-by-step lessons on crocheting roses in both techniques (with a whole fabric and by elements).
A simple master class on knitting a rose with one openwork strip

Despite the fact that knitting a whole flower is considered easier compared to making roses by elements, the end result pleases needlewomen no less - the rose turns out so lush, you can’t take your eyes off!
To make such a rose, you need:
- viscose yarn of two contrasting colors of medium thickness (we have deep purple and pale lilac);
- hook number 2;
- thread with a needle, scissors.
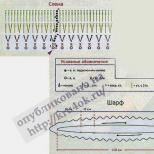
Knitting pattern:

Explanation of abbreviations found in the text:
- VP - air loop;
- runway - runway lift;
- RLS or Art. b / n - single crochet;
- SSN or Art. s / n - double crochet;
- C2H - Art. with 2 crochets;
- PS - half-column;
- PR - previous row;
- SS - connection column.
Work description:
We collect the base chain for 48 VP.

Row number 1: we count 5 VP from the hook, insert the hook into the sixth, knitting 1 CCH.

We knit another VP.

On the base chain, we skip 2 VPs, in the third we knit: 1 CCH + 2 VP + 1 CCH. 
We continue to knit with rapports to the end of the row: 1 VP + skipping two VPs of the warp-chain + into the third VP: 1 CCH + 2 VP + 1 CCH.

Row number 2: raise 3 runways as the end of the first row.

We turn the knitting over, we knit 1 CCH into an arch of 2 VP PR. 
Then we knit 2 VP + 2 CCH in the same arch.

We continue to knit a series of repeating combinations: 1 VP, in the next. we knit an arch of 2 VP PR 2 CCH + 2 VP + 2 CCH. Repeat until the end of the row.

On the last two loops of the second row, it is necessary to attach a lilac thread.

Row number 3: raise 3 runways. 
Flip knitting - we knit 3 CCHs in an arch of 2 VP PR. 
Then we knit 1 SS into the arch from the 1st VP PR.


Following. we knit the arch already 8 CCH + 1 CC into the arch from the 1st VP PR. Repeat the rapport 3 more times, in total you should get 4 fans of 8 tbsp. s / n. 
In the next arch we knit 10 CCH + 1 CC into the arch from the 1st VP PR. We repeat 5 such rapports, only 6 fans per 10 s / n columns. SS. We cut the thread. The openwork strip for the rose is ready.

We turn it into a spiral.

From the inside, we sew all the layers of the flower with a needle to securely fix its shape.

The rose is ready!

Keep in mind that the side of the strip (front or back) matters in the direction of spiral folding - depending on the selected side, rose petals can be either concave inside the flower, or, conversely, convex, more open. 
The final stage is decorating the rose. You can tie a green leaf to it, you can decorate it with glass beads or rhinestones, it all depends on your imagination. With a ready-made rose of this type, you can decorate any items from the wardrobe (especially for children!), As well as decorate interior items in an original way (vases, paintings, photo frames, etc.).

Knitting a three-dimensional rose from individual elements: a step-by-step lesson for advanced craftswomen

Crochet voluminous roses are truly magnificent - they can really be easily confused with real flowers! True, it takes a lot of time to make them, but all efforts will pay off with interest - such hand-made is highly valued!
Let's look in detail:

A voluminous rose is knitted from separate elements: the middle, three inner and outer petals, a calyx and three to six green leaves. So, let's start knitting the components of the flower.
The middle of a rose
Schematic drawing

Knitting:
We collect a chain of 10 VPs, close the ring with the help of the SS.
Row number 1: 2 VP + 15 dc in the middle of the circle from the base, 1 sl-st.
Row number 2: 2 VP + 2 dc in each loop of the PR, 1 sl-st.
Rows No. 3-4: 2 VP + 1 SSN in each loop of the PR, 1 SS.
Row number 5: 2 VP + 1 dc in each 2nd loop of PR, 1 sl-st.
Row number 6: 1 VP + 1 sc in each loop of the PR, 1 sl-st.
Row number 7: 1 VP + 1 sc in each loop of the PR, 1 sl-st.
Row number 8: 1 VP + 1 RLS, then we knit in rapports: 4 CCHs in one loop + 1 RLS, we finish the SS.
In addition to the middle, we knit a bud, it is necessary so that the center of the rose does not shine through and the filler is not visible through it.
We collect a chain of 21 VP
Row number 1: we skip two VP chains, from the 3rd we knit 19 sc.
Row No. 2: 2 VP + 1 CCH + 2 C2H + 1 CCH + 1 CC + 1 CCH + 3 C2H + 1 CCH + 1 CC + 1 CCH + 6 C2H + 1 CCH + 1 CC. Inner rose petal (3 pcs. )
Scheme:

We collect a chain of 9 VP. We knit in turning rows.
Row number 1: we count two VP chains, starting from the 3rd we knit 7 sc to the end of the row.
Row number 2: in the 1st loop of the row we knit 2 VP + 1 CCH, in each next loop - 2 CCH to the end of the row.
Row number 3: 2 VP, then - 7 rapports: 2 CCH in one loop + 1 CCH in the next loop, last loop - 2 CCH.
Row 4: Ch 2, 1 dc in each st to end of row.
Row number 5: 2 VP + 3 CCH, 4 rapports: skipping one loop + knitting 4 CCH.
Row number 6: 2 VP + 3 CCH, 4 rapports: skipping one loop + knitting 3 CCH.
Row number 7: 2 VP + 1 CCH in each loop of the PR.
Row number 8: 1 VP, 6 rapports: 2 CCH in one loop, then - 2 RLS, 6 rapports: 2 CCH in one loop. SS. We cut the thread.
Outer petal (3 pcs.)
Scheme:
The initial chain and the first 7 rows are knitted in the same way as knitting the inner petal.
Row number 8: turn the work, raise 1 VP, 2 CCH in one loop, knit rapport three times (2 C2H in one loop), then knit 2 CCH in one loop, 2 PS with a crochet in one loop, 2 RLS, 2 PS with a crochet in one loop, 2 CCH in one loop, then again we knit a rapport three times (2 C2H in one loop), we finish with 2 CCH in one loop and SS.
Cup (green yarn)
Scheme:
We knit a chain of 7 VPs, close in a circle with the help of the SS, knit in a circle.
Row number 1: 1 VP + 9 PS with a crochet in the middle of the circle. SS.
Row number 2: 1 VP, 4 rapports (2 PS s / n in one loop + 1 PS s / n), 2 PS s / n in one loop. SS.
Row number 3: 5 rapports (8 VP, starting from the 3rd loop from the hook we knit: 3 RLS + 3 PS s / n + 3 SS).
Leaflet (6 pieces).
Scheme:
We collect a chain of 14 VP.
Row number 1: in the 3rd loop - 1 RLS, then we knit 2 PS s / n, 6 CCH, 1 PS s / n, 2 RLS.
Row number 2: turn knitting, knit 1 VP + 1 sc + 2 dc in 1-well loop + 2 dc in one loop + 1 dc2n + 2 dc in 1-well loop + 2 dc + 2 dc in 1-well loop + 1 sc + 2 sl-st + 1 sc in the penultimate loop.
Row number 3: knit in a circle: 2 sl-st + 1 sc + 2 dc in 1-well loop + 2 dc + 2 dc in 1-well loop + 1 dc2n + 2 dc in 1-well loop + 2 dc in 1-well loop + 1 sc + 1 sl-st.
Row number 4: turn the work, knit 1 VP + 1 RLS + 2 PS s / n in 1-well loop + 2 CCH in 1-well loop + 2 CCH in 1-well loop + 2 CCH + 2 CCH in 1-well loop + 1 PS s / n + 2 PS s / n in 1-well loop + 6 RLS + 1 VP + 1 PS s / n.
We knit row No. 5 in a circular pattern: 1 VP + 6 RLS + 2 PS s / n in 1-well loop + 2 CCH + 2 CCH in 1-well loop + 2 CCH in 1-well loop + 2 PS s / n in 1- well, a loop + 1 sc + 2 ss.
Tie the leaves in a circle with a “crustacean step”, stretch a thin wire along the edge so that the sheet keeps its shape. We collect three leaves in a branch.
Assembly
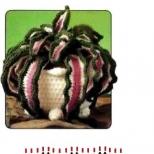
Once all the elements of the rose are ready, we proceed to assemble the flower. As a trunk, you can use a cable or thick wire covered with masking tape. We fill the connected middle of the rose with filler, attach the inner petals to it with an overlap, followed by the outer ones. We put the middle on the trunk, attach a bud inside it, then the middle, sew a cup under it. We wrap the trunk with a green thread, tying the leaves at the desired height and distance in parallel. The rose is ready! From these roses you can make a rich bouquet and decorate your favorite vase with them. They are also good as an original gift for mom or a close friend.
Video tutorials on crochet roses
Roses are very popular in crochet needlework, therefore, for greater clarity, we suggest that you familiarize yourself with detailed video tutorials on knitting them. Get inspired and improvise!
Good afternoon, today I will tell you what are the ways to crochet a rose. You will see how easy it really is - even for beginners, and even for children in their first year of learning to crochet. All flowers fit very simply. In the article you can find many patterns for knitted flowers. And in this article there will be patterns and crochet lessons for roses - in bud or blossoming. Immediately all the techniques and methods will become clear and easy for you to perform.
So let's get started.
How to crochet a rose.
DIRECT LACE method.
These are the roses we will knit now. And this work is suitable for the most beginner crochet masters - for children of primary school age. That is, the master class is suitable for leaders of children's circles "Skillful Hands".
It is enough to learn how to knit - a chain of air, master a single crochet and a double crochet.
You can decorate a greeting card with such crochet roses. A good craft for my mother's holiday on March 8. Or decorate a hair band with a rose. Or crochet a gift basket, starch and decorate with a rose, as in the photo below.


Your knitted lace ribbon doesn't have to be straight.- it can twist itself into a spiral, or a circle. So even better.
This will happen by itself if you are in the second row (the row that immediately goes on top of the air loops) to knit more than one column into one air loop. Either in each air 2 columns, or through 1 air 2 columns, or through 2 airs. The more often you make an extra additional column, the more your lace twists.. And then the crochet rose will be easier to twist into a flower.

You can knit a simple openwork strip with holes: 1 column + 1 air, 1 column + 1 air, etc. By itself, this series will be in the form of a straight line. But he begins to spiral into a spiral when the next in the third row in each hole of the openwork we will knit a lot of double crochets (in this case, 6 columns in each arch - along the edges with one crochet, and 4 central ones with two crochets)

And if in such lace you make more rows up- and as a result you get a wide strip of lace, you can fold more lush crochet roses, as in the photo below. Additional rows - will give the rose the depth of the petals. You can put such a crochet rose on a strong wire leg, tie green oval leaves to it and assemble a beautiful knitted bouquet for a vase.

The essence of the whole work is simple - we knit an already wide ribbon of lace with an edge in the form of rounded arcs. And then we twist this lace with a roll. It turns out a rose. The green part can be immediately included in the ribbon knitting pattern. That is, start knitting a green ribbon and only then continue with red threads.

You must understand one thing. The scheme of knitting such a lace may be arbitrary. You can take this scheme - as a piece from the scheme of any round napkin. Here, take a round knitting pattern and erase the extra rows there - what is left can serve as a rose pattern.
Here it is = a piece of the usual napkin scheme. But if we tie it like a ribbon. And roll it into a roll, we get a crochet rose.

Here in the photo below is a rose and a scheme - also similar to part of a napkin scheme.

And even a straight (not round) lace pattern can become a rose if it is rolled up. The main thing is that this straight lace should have a WAVY EDGE. So that when twisted into a roll, these semicircular edges look like petals.
In the photo and diagram below, we just see a crochet rose crocheted from a straight ribbon of wide lace.

Rose with petals of different widths.
You can also make each petal arch on your lace ribbon a LITTLE BIGGER than the previous one. Then your marginal rose petals will be larger and wider than the central inner petals of the bud.
Here's how it's done on the rose in the photo below. And this principle is also visible in the diagram. Petals contain more and more columns.

Crochet rose on a green shamrock.
Below we see small roses that lie on green leaves. The rose itself is knitted simply (diagram below).

The green shamrock is also quite easy to knit. First, we knit a chain of 7 loops, one for lifting, and along this chain we return back with connecting posts. And now, having returned, we make another chain of 7 airs and again turn around from its tip and walk along it back next to the connecting posts (crosses in the diagram). And when we return, we make another, third, chain of 7 airs - we also return along it with a row of connecting posts. And then we tie each of the three sticks with columns with one and two crochets (as shown in the diagram). When all three leaves are knitted - they can be decorated - add a strapping of cloves (red row in the diagram below).

Of course, nothing prevents us from tying the leaves individually, and then collecting them into a trefoil. And the scheme of the leaflet can be completely different.
For example, this one. All according to your taste and intention. And here is a diagram of a beautiful leaflet with a scalloped edge for a rose crochet.

And you can do even more interesting. You can tie a shamrock (or a multi-leaf, it doesn’t matter) directly on the same chain on which we knitted a petal twist. As we see it in the photo below.

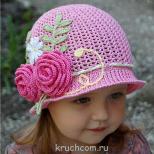
A rose made using this technique can become an applique decoration for a children's knitted hat (as in the photo below).

Petal method
Crochet a rose.
But these roses are made from individual round petals. Look carefully, the photo shows it perfectly.


Below you see a crochet rose that is made up of round petals. Like a living rose in nature. To twist such a rose, you need to tie several round petals. It is desirable that the petals be two or three different shades of red. So the rose will turn dark in the middle of the bud and will gradually lighten towards its edges - and look like a natural one.

Below is a diagram where we see how each petal of such a rose is crocheted. There is also a sepal diagram (pentagonal diagram in the figure below). And how the leaf is knitted.
And also given a knitting and folding pattern for a folded bud - an asymmetrical circle in the lower left corner of the picture below.

With this technique of round petals, you can make roses of large sizes. The petals can be curved or straight. The buds can be closed or lush, depending on how you wrap the rose flower.


If on the last rows of the circle to make a decrease in loops in a row. Then the edges of such round petals will begin to wrap themselves. And we will get rounded even lapels-bends on each rose petal. As in the photo below.

You can also make your own design additions to this rose knitting technique. For example use threads of two or three colors in (as in the left photo below), where border each petal is tied first with columns of pink threads, and then one more circle with columns of red threads.
And yet (as in the right photo below) you can add in the middle of each round petal - sharp notch. This form of petals is found on some varieties of roses. Why not crochet it.

These are the recommendations for creating a crochet rose I can give. All methods and all patterns of knitting roses fit in just 2 techniques. Either this is a long lace, which was then twisted into a rose, or these are round petals, which were then collected into a rose. Chashelozh and green leaves can be knitted in different ways and patterns. Everything is up to you.
Choose a technique that is closer to you and create your own crochet rose.
Good luck with your work.
Olga Klishevskaya, specially for the site.
Hello, inhabitants of the Country of Mothers!
Today I want to show you beautiful voluminous crochet roses. And maybe someone wants to knit such roses, and I'll tell you how to do it. I want to apologize right away for the quality of some photos (I took them late at night, putting the children to bed)
I saw these roses and just fell in love. Schemes from some Chinese site.
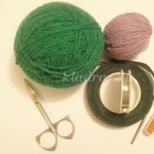
So, you will need:
-yarn, I also have PELICAN (Vita Cotton). Composition: 100% double mercerized cotton. The length of the thread is 330 m. The weight of the skein is 50 gr. and COCO (Vita Cotton). Composition: 100% mercerized cotton. The length of the thread is 240 m. The weight of the skein is 50 gr.
-hook, I have number 1.7
-wire- thinner so that it bends well, and thick for the stem, it should not bend under the weight of the rose.
- florenta Green colour
- glue, I used Moment, universal gel
- synthetic winterizer, a small amount of
- beads or half beads, for dew drops
- a vessel where your rose will live, I have a small glass vase and decorative pebbles.
Girls, at the request of the copyright holder, I deleted the schemes. I leave only my photos of the petals. If desired, the schemes can be found in the public domain on the network. Many have copied this post into liveinternet diaries.
We knit three small petals. We make the initial circle of air loops as small as possible so that the hole is almost invisible. We hide the initial thread, at the end we leave the thread more authentic, so that later there is something to sew the rose.
We knit the following petals in a larger size in the amount of also three pieces, according to the same principle.
Then a slightly larger 4 petals.
And the largest petals - 5 pieces.
Then we knit a bud, we will sew petals to it. Here, the initial ring of air loops should be larger so that a hole remains, where we will then insert the wire stem. The bud needs to be tightly stuffed with synthetic winterizer.
Now we will sew the petals on the bud. Remember that the hole for the stem should be at the bottom. We will sew in layers, according to the number of petals of different sizes - that is, there will be four layers. You need to sew them like this. First we sew half of the petal, then the half of the second petal, then we sew the second half of the first petal onto the second petal. And so in a circle all three petals. It should turn out like this.
The remaining petals are sewn according to the same principle. Just try on first, see that the petals fit beautifully. In the end it should look like this.
Now stems and leaves. We cut the thin wire into pieces: two smaller ones and one larger one. We knit leaves of a suitable shape. There are many schemes of different leaves on the Internet, choose what you like, I will not focus here. Leaves need two more and four smaller. Those two pieces of wire that are smaller are wrapped with florentine. Then we begin to wrap the one that is larger and in the process we wind the small stems crosswise several times to the large one, as in the photo.
Then glue the leaves to the stems. We take a thick wire for the main stem and also wrap it with florentine, winding a branch with leaves in the process, according to the same principle - crosswise. The sepals were knitted without a pattern, a circle with single crochets, up to 30 loops, then each leaf individually - at the base of 6 loops, in every third row we decrease 1 loop. Be sure to leave a hole in the middle for the stem. Then we put the sepals on the stem, smear the tip of the stem thickly with glue and stick it into the rosette, trying to push it away. Move the sepal to the rose and glue it.

Four years ago, my acquaintance with Irish lace began with this rose. Perhaps on the Internet there is already a knitting master class, or maybe a diagram for this flower. But then I knitted already knitted, and I didn’t have a pattern. Today I post a step-by-step photo of this rose, how I knitted.
This simple, at first glance, motif is suitable for knitting using the Irish lace technique, not only a model of a blouse, but also a tunic, and possibly a dress.
1. We collect 6 air loops
2. One lifting loop, a row of single crochets
3. We do not turn the work over, but continue to knit in a circle
4. 3 lifting loops. 1 st.s 1n, ch and so on in a circle.
So that knitting does not tighten in a circle (shown in the figure), we knit on the rounding
two sts with 1n from 1 voz.p
5. In a circle we knit 2 rows of st.b.n. This is the center of the rose.
6. Visually divide our oval in half and knit 12 st.s 1n, after 1 voz.p, alternating - 1st.sn, voz.p
7. Turn knitting over and knit 1 row of st.b.n.
8. Starting to knit the 2nd row, we make 1 lifting loop, skip 1 loop and knit further st. b.n.,
9. We do not knit to the end of 5 loops. We return next row st.b.n.
We knit the next row as the previous one, with decreases. And so we knit 8 rows.
Here's what we got. Not very pretty, corners are visible. Now we need to smooth them out.
10. We knit a row of st.b.n to the very end, that is, we go down to the first row. The first petal is ready.
12. We knit a number of st.b.n.
13. We do not knit the next row to the end of 3 loops
14. We return back - we also do not knit the 2nd row to the end of the 3rd loop.
15. And thus, with shortened rows, we knit 7 rows of st.b.n.
Then, as with the first petal, we smooth the edges by knitting the 7th row, going down to the lattice.
We knit the 8th row, going down to the lattice from the other edge.
16. But here you need to knit a little lower, going down to the middle of the flower.
17. The next row we knit a lattice from st.s 1n, voz p through 1 voz.p from the middle of the flower to the middle
on the other hand.
20. All petals are knitted without breaking the thread. Here's what should happen.
21. Now let's give some emphasis to the edges. Tie the edges of the rose with a crustacean step.
22. This is the wrong side.
23. And this is how a rose will look like if you tie a middle step around it. But that's another story.
The second MK of a flat rose.
Here are several options for a flat rose


The third MK of a flat rose (openwork) from here
Made a small MK. Cast on 95 stitches. The number of loops depends on the size of the rose.
Then we count 12-13 loops and close in a circle.
Then we make 25-26 double crochets in a circle, and continue to make columns after the circle, capturing the chain, about 17 more tbsp.
We count 6 columns from the bottom turn, in the 7th we make a single crochet, thus connecting the petals.
In the same way, we make the following petals, gradually twisting around the middle.
Depending on the thickness of the thread, you can change the number of loops and columns. You can make the petals longer. I got these roses.
The fourth MK of a flat rose in a different technique


The fifth MK of a flat openwork rose. Description and author of the idea: Olga Masagutova and Miroslava Gorokhovich

I cast on a chain of 20 loops, then one half-column, and then 2 double crochets in each loop, it turns out such a curl.
She tied it around with a crustacean step, attaching it in one place to make a figure like a nine.
Then she turned inside out and, stretching the loops, reached the right place where the petal would begin and knitted a chain of so many loops that it was enough for half of this figure in a circle, knitted 2-3 air loops, attached, turned and began to knit stitches on the chain with two crochets until it has filled all the space to the beginning of the chain.
Joined the first figure. Then, with a thread of a different color, she tied this row with a crustacean step, where she broke the thread.
I returned to the beginning, advanced to the right place and again the chain. Then there are again columns on it, breaking them by the number of crochets into two petals, as it were: I have a third - one petal, then another ... Turn again.
Now the chain to the place where the petals are separated, then the second to the right place. Columns with two, and in some places with three crochets, as you like, so that the edge of the petal is wavy. Each row was tied with a different thread. The main thread does not break, because all the time you return to the place where you left, and cut off a different color each time. When moving, the petals move apart, I imperceptibly sewed them to each other from the inside so that they would not diverge. Due to the crayfish step, this is not visible ... Petals can be made in different ways, as fantasy tells ... You can add a small one at the top. I have almost all roses different ...
The leaves are very simple. A chain of 16 air loops, on it are columns with 3, 2, 1 yarns on one side and the same yarns, alternating with one air loop, on the other. Then everything is tied with a crustacean step.


Sixth MK. Video-MK flat roses from Tatyana Litke
The seventh MK of flat roses. Another option, unusual.


Eighth MK. Another rose in a flat version.


Ninth MK
I bring to your attention a blue rose - this is an element of Irish lace, which is very easy to knit. You can also tie it in green, then you get a leaf. 


Tenth MK presents stylized roses (from Doublet magazine)


The twelfth MK "Roses of the Macintosh"
MK of talented needlewoman Svetlana Tomina
Variations on a theme


Rows 6-8 are knitted in the round.
We finished the bud rosette
other rows are rotatable
9th row 1 ch, 9 sc.
10 row, 4 ch * 1 sbn 1 ch * repeat 10 times, 2 sbn with a common top, the base of the last one through one loop from the penultimate one (reduction of the loin mesh)
11 - 1 ch, 24 sc
12 - ch 1, 15 sb, 2 sb knit together (reduce 1 at the end of the row)
13 - ch 1, 13 sb, 2 sb knit together (reduce 1 at the end of the row)
14 - ch 1, 10 sb, 2 sb knit together (reduce 1 at the end of the row)
15 - ch 1, 9 sb, 2 sb knit together (reduce 1 at the end of the row)
16 - ch 1, 5 sb, 2 sb knit together (reduce 1 at the end of the row)
17 - ch 1, 4 sb, 2 sb knit together (reduce 1 at the end of the row)
in these rows, we smoothly reduced the loops on the right and sharply on the left, not knitting the row and cutting 2 loops before the last
18 - 3 ch, * 1 ch, s1n * repeat 14 times.
19 row 1 ch 30 sc
20 - 26 row - see above only on the right side of the reduction, not knitting 2 loops to the extreme, on the left 1 loop
Now we are on the front side, so we tie it with single crochets across the face to the rosette of the bud. Again we turn and knit a loin mesh 1x1 for 32 double crochets. as a result, the bud is tied with fillets. Now we divide 60 loops (2 loops will go as lifting loops and will not be taken into account, 30 cells x 2 \u003d 60) by the number of petals we need, and just as we knitted the bud in rotary rows, we evenly knit the outer petals. The last row of the petal should always be purl, so that later you can tie the sc to the base of the petal in the face and start a new one. I got 6 rows per petal. After all the petals are tied, we tie the whole flower sc
By the way, if you are in doubt about the number of loops, just print the main piece of the rose and apply it to it, I knitted like that
The scheme of the first 6 rows, no explanation is needed here. Rows 6-8 are knitted in the round.

7 r - 32 sbn - we tie the fillet net with single crochets.
8 row - 1 ch, 8 sbn, 2 sbn in one arch of the previous row, 1 sbn, 2 sbn in one arch of the previous row, 12 sbn, 2 sbn in one arch of the previous row, 1 sbn, 2 sbn in one arch of the previous row, 6 sc, connecting column:

9th row 1 ch, 9 sc. (this photo turned out to be cloudy, I will rearrange it later)
If we only need a bud, then we continue to tie it with single crochets to give clear contours.

Again we turn and knit a loin mesh 1x1 for 32 double crochets. as a result, the bud is tied with fillets. Now we divide 60 loops (2 loops will go as lifting loops and will not be taken into account, 30 cells x 2 = 60) by the number of petals we need, and, just as we knitted the bud in rotary rows, we evenly knit the outer petals. The last row of the petal should always be purl, so that later you can tie the sc to the base of the petal in the face and start a new one. I got 6 rows per petal. After all the petals are tied, we tie the entire flower with sc to smooth the corners