Why is the light bulb not getting out of the socket. Possible options for how to unscrew the bulb base from the cartridge
One of the main components of a chandelier or lamp is an electric cartridge, through which not only the fixation of the light bulb and the transfer of current to it, but also the fastening of the ceiling and other elements to control the light source is carried out.
The design of the product consists of the following elements:
- body of cylindrical configuration;
- internal threaded sleeve;
- ceramic insert;
- a pair of brass or copper contacts;
- bottom;
- fasteners.
The design of the body of the product eliminates the possibility of electric shock when screwing in the light bulb. This is due to the fact that when the central contacts come into contact, the base is inside the cartridge.
Types of cartridges
Structurally, there are several types of them according to the method of fastening light bulbs:
- Screw threaded(Incandescent bulb twists inward). Suitable for standard incandescent lamps.
- Pin(fastening is carried out by means of fastening tabs or pins located on the outer surface of the product). Used for fluorescent, halogen and.
The material used to make the case is:

The principle of operation of all cartridges is identical, the differences are only in size and design. All products are designed for operation in the mains 220V.
There are the following types of them (the value “E” with a number is used for designation, where the number corresponds to the diameter of the sleeve):
- E5 and E10. They are rarely used due to the consumption of a considerable amount of current with little light output.
- E14. The product is small in size, used with decorative lamps, the so-called "minions", of identical diameter. Their power does not exceed 60 watts.
- E27. The most commonly used threaded socket designed for use with conventional, fluorescent, LED and halogen lamps.
- E40. This type is designed for street lighting, where powerful lamps of large sizes are used.
Cartridge selection
When choosing this product, first of all, you should give preference to a well-known and proven brand.
To avoid difficulties with fastening, the design of the new cartridge must match the type of product previously used in the chandelier. It is better to give the advantage to a ceramic product due to its reliability during operation.
Basic selection requirements:
- the power of the lamp to be connected;
- diameter corresponding to the type of cartridge;
- marking;
- parameters: dimensions, power;
- the price should not be too low.
The cost depends on many factors, in particular on the type of product and its manufacturer. Today the market provides the consumer with a wide choice of both Russian and imported brands.
The price range is quite large:
- Type E27:
- domestic production - 25 rubles;
- China - 45 rubles;
- Italy - 130 rubles.
- Type E14:
- domestic production - 20 rubles;
- China - 20 rubles;
- Italy - 90 rubles.
- For halogen lamps:
- domestic production - 15 rubles;
- China - 30 rubles;
- Italy - 150 rubles.

How to change the cartridge in the chandelier
Replacing the product is not difficult and does not require experience in the field of electrics, however, it requires caution and compliance with all rules and recommendations.
Reasons for replacement
First of all, the need to change the product is indicated by the fact that the lamp does not glow when the switch is activated. This is due to rusting of the sleeve or center contact. As a rule, cleaning does not give a positive effect.
Replacement is required if:
- The presence of cracks and other defects on the outer part of the body;
- When the internal elements come into contact, a short circuit occurs.
- Exit from working state.
- The service life is 5 years.
Necessary materials and tools
In the process of work you will need:
- replacement item;
- terminal blocks for connecting electrical wires;
- indicator mini-tester (screwdriver);
- insulating tape;
- construction knife with replaceable blades.

Step by step replacement guide
Replacing the cartridge in the ceiling lamp is performed in the following sequence:


They place the chandelier on a table or other convenient plane, disassemble it by removing all the shades and unscrewing the light bulbs so as not to break
Checking work
After fixing the chandelier to the ceiling, a lamp is screwed into the cartridge and an electric current is supplied. If the replacement work is done correctly and all contacts are connected, the lamp will glow.
If, after replacing the product, any problems are found (flashing of the lamp or its burnout), their causes should be found. Alternatively, it may be an incorrect connection of the current-carrying wires.
- Perform replacement without de-energizing the room, is strictly prohibited, often this leads to tragic consequences.
- If problems are found in the main it is necessary to make a complete or partial replacement of it.
- Sometimes cartridges initially have branch wires, so when connecting different types of wire, for example, aluminum acts as the main one, and copper comes from the lighting fixture, it is advisable to use special terminal blocks for connection. If there are none, the wires should be connected, twisted and covered with insulating tape.
- Before removing the chandelier, you should remember or sketch the wiring diagram to prevent misconnection.
- If the reason for removing the ceiling light is a cartridge that has gone out of tune, you can try to repair it. Often, brass plates move away, oxidize or rust. In this case, they can be cleaned with a sandpaper. You should also inspect the contact fasteners under the ceramic insert. If necessary, they are cleaned and twisted. After a thorough inspection, the cartridge is assembled and the lamp is screwed into it, the ends of the lamp wires are placed in the carrier. The result of a properly carried out repair will be the emission of light by the lamp.
- Sometimes it is not possible to remove the incandescent lamp from the cartridge - the base is jammed, and when the lamp is unscrewed, only the glass bulb is removed. So that in the future the cartridge can be used in other chandeliers, it is necessary to unscrew the cylindrical element of the product body, holding it by the lower part. If these manipulations do not give a positive result, the base is allowed to be unscrewed with pliers, taking its edge and turning it in the cartridge.
The most common breakdown of fixtures is the burnout of lamps. First of all, this is characteristic of cheap incandescent lamps, but even high-quality fluorescent and LED lamps fail over time. Such a malfunction is easy to detect and fix, but it is more difficult to deal with a cartridge breakdown. We will tell you why it can occur, how to diagnose a malfunction and how to change a cartridge in a chandelier.
Main reasons for replacement
It is worth noting that the replacement of the cartridge is not always associated with the repair of the chandelier. Sometimes it is necessary to change the type of socket to be able to work with certain types of lamps or to improve the aesthetics of the luminaire.
The technical indications for replacement are the following:
- flickering of light that does not go away after replacing the lamp with a similar one;
- hum or crackle in the included chandelier;
- the smell of burning;
- complete failure when current is no longer supplied to the lamp.
The most common cause of these breakdowns is a manufacturing defect. Power surges in the household network, temperature fluctuations, high air humidity can also significantly reduce the life of the lamp.
Often, malfunctions occur due to overload, when a lamp is installed in the cartridge, the power of which exceeds the maximum allowable for this type of cartridge.
Necessary tools and materials
The list of materials and tools depends on the design of a particular lamp. The minimum set includes:
- screwdriver;
- pliers;
- stationery knife;
- insulating tape.
For a more professional performance of work, a screwdriver with interchangeable bits or even a screwdriver, a soldering iron with solder and flux, heat shrink tubes, and terminal blocks are useful.
Sealant or gel adhesive may be required to seal the cover.
Step-by-step instructions for replacing the cartridge
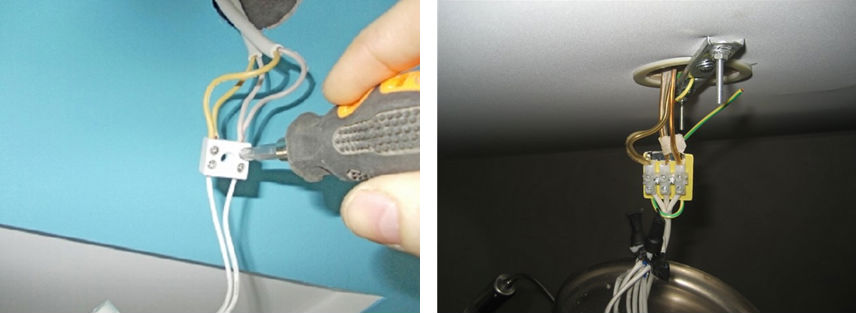
The chandelier is dismantled from the ceiling, while observing the safety rules listed below. For dismantling, it is usually sufficient to remove the device from the hook or mounting plate and disconnect the wires. The wires connected by twisting are disconnected manually or with pliers, but the terminal blocks will have to be loosened with a screwdriver. Then I do the following:
- Unscrew the lamps from all cartridges, remove the shades and other fragile parts.
- Unscrew the top of the cartridge by turning it counterclockwise. Depending on the model of the chandelier, it may be necessary to hold the lower part with pliers or to remove the contacts first.
- Take out the ceramic base of the cartridge, remove the wires or terminals from its contacts.
- Disassemble the new cartridge. Connect its central contact to the "phase", and the side contact to "zero".
- The base of the new cartridge is mounted on the chandelier and the upper part is screwed onto it.
- Assemble the chandelier in reverse order.
This completes the replacement of the cartridge. Now it remains only to return the lamp to the ceiling and connect the wires, carefully insulating the joints.
Precautionary measures
Before carrying out any work, the chandelier must be de-energized. At the same time, it is not enough just to change the position of the switch - it is better to protect yourself from all accidents by unscrewing the plugs or turning off the safety toggle switch.
Do not start dismantling the chandelier immediately after turning it off - the lamps must cool completely.
Take special care when working with glass and ceramic parts to avoid injury from broken pieces. Thick work gloves come in handy here. If dismantling and installation of the luminaire is carried out on a ceiling covered with plaster, put on safety goggles. But most importantly - do not save electrical tape, exclude any possibility of a short circuit both between the wires and one of the wires on the chandelier body.
Replacing a cartridge in a chandelier is a relatively simple procedure that requires care, accuracy and caution from the performer. If you follow the instructions and observe all safety measures, then there will be no problems.
Types, device, connection and repair
- this is an installation electrical product that serves for detachable connection of light bulbs and other artificial light sources to electrical wiring.
An electric cartridge is an integral part of any lamp or chandelier and often performs the task of not only transmitting electric current, but also holding a lampshade, ceiling lamp, other aesthetic items and lighting control devices.
Types, marking and technical characteristics
electric chucks
All electric cartridges, according to the principle of operation, are arranged in the same way and differ only in overall dimensions, the material from which they are made and design.
The body of the electric cartridge is usually marked with its technical characteristics. If they are not specified, then you can find them in the table according to the connecting dimensions of the lamp base.
Table of types of popular electric cartridges
for connecting artificial light sources to the network
According to the method of connecting lamp bases, electric cartridges are produced in two varieties: screw type E series and pin type G series.
Electric threaded lampholders are subject to GOST R IEC 60238-99, according to which there are three types of lampholders for the 220 V network. E14 - in everyday life referred to as a minion, E27 and E40 - for street lamps.
GOST R IEC 60400-99 applies to pin lampholders, which normalizes the technical requirements for lampholders of the type: G4, G5.3, G6.35, G8, GR8, G10, GU10, G10q, GR10q, GX10q, GY10q, G13, G20, GX23, G24, GX24, GY24, G32, GX32, GY32, GX53, 2G7, 2G11, 2G13, Fa6, Fa8 and R17d, designed to work on a 220 V network. It should be noted that in the marking of pin cartridges, the number indicates the distance in the cartridge between contact holes for installing lamp pins.
As you can see, according to GOST, the range of electric cartridges is quite wide, so the table lists only popular types that are most often installed in chandeliers and lamps for indoor and outdoor lighting.
| Types and types of popular electrical cartridges for connecting artificial light sources | ||||
|---|---|---|---|---|
| Marking | Appearance | Load current, A | Power, no more than, W | Purpose |
| E14 |  |
2 | 440 | Edison round thread cartridge ∅14 mm, which is popularly called "Mignon". Designed for low power LED and incandescent lamps |
| E27 |  |
4 | 880 | Cartridge with Edison round thread ∅27 mm, which until recently was installed in almost all lamps. Currently being superseded by E14 |
| E40 |  |
16 | 3500 | Ceramic cartridge with Edison round thread ∅40 mm. Designed for installation in high power outdoor lighting fixtures |
| G4-G10 |  |
5 | 60 | G4, G5.3, G6.35, G8, G10 plug-in sockets are usually installed in luminaires for connecting small-sized low-power halogen and LED lamps. The number after the letter G indicates the distance between the contacts of the cartridge |
| G9 |  |
5 | 60 | The contacts in the G9 cartridge are made in the form of grooves designed for connecting halogen and LED lamps, having a base with flat contacts in the form of a loop |
| GU10 | 5 | 50 | The GU10 pin insert chuck is similar in application to the G4-G10 with a pin spacing of 10mm. Its peculiarity is the increased diameter of the pins of the lamp base at the ends, due to which the base is installed in the cartridge with a clockwise rotation and is securely fixed. | |
| G13 |  |
4 | 80 | The G13 plug socket is designed for connecting linear fluorescent and LED lamps. Its distinctive feature is the paired application and the need, after installing the lamp in the slot of the cartridge, to turn it around the axis by 90 ° |
| GX23 | 2 | 75 | GX23 male plug-in socket for connecting U-shaped fluorescent and cylindrical LED lamps | |
| G24 |  |
2 | 75 | G24 male plug-in four-pin socket is intended for connection of U-shaped fluorescent and cylindrical LED lamps. The number 24 indicates the distance between opposite pins diagonally |
| 2G7 | 2 | 50 | 2G7 male plug-in four-pin socket is designed for connecting U-shaped fluorescent and cylindrical LED lamps | |
| GX53 |  |
5 | 50 | The modern GX53 pin chuck is similar in design to the GU10 with a pin spacing of 53mm. Its peculiarity is its small thickness, which is important for the installation of LED lamps in stretch and suspended ceilings. |
In the table, the maximum load current and the power of the connected lamps are for reference and depend on the material from which the cartridge is made. For example, ceramic cartridges, unlike plastic ones, can withstand more current and allow more powerful lamps to be connected.
In Chinese chandeliers, there are non-standard electric cartridges E27, designed to screw in two, three or more light bulbs at once.

The cartridge for three light bulbs is arranged, and is connected as follows. There are holes in the contact plates, and you can connect wires to them with M3 screws and nuts, if you have a soldering iron on hand, you can connect the wires to the plates by soldering. The red arrow indicates the plate to which the phase wire must be connected. The neutral wire is connected to the direction of the blue arrow. The dotted blue line shows the connection between the pins. This jumper can be omitted, since the plates will be connected to each other through the base of the screwed-in light bulb, in the photo there is a green line. But then, if the right light bulb is not screwed in, then the supply voltage will not be supplied to the left light bulb either.
The device and principle of operation of the electric cartridge
Let's consider the device of an electric cartridge using the example of the widely used Edison E-series threaded cartridges.
The cartridge consists of three main parts. The outer cylindrical body, in which the threaded sleeve with Edison thread is fixed, the bottom and the ceramic insert. To transfer current from suitable conductors to the bulb base, there are 2 brass contacts and threaded mounting strips.

In front of you in the photo is the E27 cartridge, completely disassembled into its component parts.

The photo clearly shows how the brass contacts touch the bulb base. On the right, the photo shows how current is transferred when brass contacts are attached to a ceramic insert.
In ancient times, when payment for electricity was taken for the number of light bulbs and sockets in an apartment, a device was widely used, popularly known as a “swindler”.

An adapter cartridge, which you see in the photo, was screwed into the electric cartridge. On the one hand, it has an external thread like a light bulb, and on the other, an internal thread, like an ordinary cartridge. In this crook two brass tubes were mounted, as in a socket. The crook allowed you to connect any electrical appliances to the chandelier. Such a crook can also be made from an ordinary electric cartridge.
Methods for attaching electric cartridges
in chandeliers and lamps
When replacing or repairing faulty electrical cartridges in chandeliers and lamps, they have to be removed. To do this, you need to know how the cartridge is attached to the base of the chandelier.
The cartridge is fastened in chandeliers and lamps, as a rule, by the bottom. There is a thread in the hole for entering the wire into the cartridge. E14 has M10 × 1. E27 can have one of three: M10x1, M13x1 or M16x1. Luminaires are suspended directly on the electric wire and on a metal tube of any length and shape with a threaded end.
Fixing an electric cartridge in a lamp
for the lead wire
Mounting the cartridge on the current-carrying wire without its additional fastening is not allowed. A plastic sleeve is screwed into the bottom with a hole in the center for the passage of an electric wire, in which a fixing plastic screw is provided.

After connecting the wires to the contacts of the cartridge and assembling it, the wire is clamped with a plastic screw. Often, decorative elements of lamps and parts for attaching the ceiling are also fixed with a sleeve. Thus, the reliability of the connection of the electric cartridge, the suspension of the lamp and the fastening of the ceiling is ensured. Photo report on how I attached the cartridge to the lead wire when making a wall lamp for the hallway. The wire is used special with increased mechanical strength.
Fixing an electric cartridge in a chandelier on a tube
Mounting an electric cartridge on a metal tube is the most common, as it allows you to hang heavy ceiling lamps and gives scope for design imagination. He often screws additional nuts onto the tube and with the help of them, any fittings of chandeliers, decorative caps, and ceiling lamps themselves are attached directly to the tube. The entire load is already carried not by an electric cartridge, but by a metal tube. The wire for connecting the cartridge is passed inside the tube.

There are electric cartridges, which have a thread on the outer part of the cylindrical body, on which you can screw the lampshade ring and use it to fix the ceiling or other design element and the direction of the light flux.
Mounting the electric chuck with a sleeve
In table lamps and wall lights, electrical sockets are often secured with metal or plastic tubular grommets to sheet metal parts. This method of fastening expands the possibilities of luminaire designers, since it is enough to drill a hole in any place of a part made of sheet material and fix the cartridge with a sleeve.

Repeatedly it was necessary to repair lamps with such a fastening of an electric cartridge with plastic bushings due to its deformation. From heating with an incandescent bulb, the plastic was deformed, and the electric cartridge began to hang out.
Replaced the melted metal bushing. I took from a variable resistor type SP1, SP3. They have an M12x1 mounting thread. Please note that the thread may be different. The fact is that the connecting thread of the E27 cartridges is not standardized, and each cartridge manufacturer made the thread at his own discretion. If you decide to use a sleeve from a resistor, then before breaking the resistor, be sure to check whether the thread fits the cartridge. The resistor is completely disassembled and the sleeve is removed from the plastic base.
Fixing an electric cartridge in a chandelier
with screwless terminals
The fastening of an electric cartridge with screwless contact clamps is somewhat different from the traditional fastening due to the fact that the connection of the case with the bottom is carried out using two latches, and not a thread.

First, the bottom is screwed onto the threaded tube in the chandelier, then the wires are threaded into the cartridge, and finally the cylindrical body snaps into the bottom. In the photo, the latches at the bottom are broken off; with such a malfunction, the chandelier came to me for repair. Such a cartridge can be repaired, the repair technology is described in the article below.

Therefore, if you have to change such a cartridge in a chandelier, then in order not to damage the wires, first take the latches to the sides with a screwdriver, thereby freeing the body from the bottom.

This photo shows a cartridge with screwless terminals installed during the repair of a chandelier to replace a cartridge that failed. In this chandelier, the cartridge also performs a fastening function, fixes a decorative metal cup, to which a glass shade adjoins in the assembled chandelier.
Repair of electric chucks
E series electric chucks can be successfully repaired as they can be disassembled. In the G series cartridges, the parts are connected with rivets and in case of breakage they have to be replaced with new ones.
Repair of a collapsible electric cartridge E27
If the bulbs often burn out in the lamp or the bulbs begin to change the brightness of the glow during operation, then one of the reasons, in addition to poor contact in the switch or junction box, is poor contact in the electrical cartridge. Sometimes at the same time, when the lamp is turned on, the cartridge begins to make a specific buzzing sound, in addition, the cartridge may smell badly of burning. It is not difficult to check this. It is enough to unscrew the bulb and look into the socket. If the contacts are blackened, then you need to clean them. The reason for the blackening may also be poor contact at the point where the cartridge is connected to the wires.

For a quality repair of an electric cartridge, you need to completely disassemble it, check the reliability of the wire connection and clean the brass contacts to a shine. Sometimes they need to be slightly bent towards contact with the lamp base.
Sometimes when you try to unscrew the light bulb, its bulb peels off from the base. In this case, you need to try to unscrew the base remaining in the cartridge by unscrewing the cylindrical body of the electric cartridge, holding it by the bottom. If the case cannot be unscrewed, then you can try to grab the bulb base by the edge with pliers and thus unscrew it.
Repair of a collapsible electric cartridge E14
I had to repair a chandelier of five horns, in which only two light bulbs shone. The chandelier was old, Soviet-made with collapsible E14 cartridges with screw fastening of wires.

The chandelier was operated for many years with incandescent bulbs, and as a result of high temperature and weakening of the wires, they oxidized and burned at the clamping points with screws.

The screws got stuck in the thread and it was not possible to unscrew them with a screwdriver. I had to use pliers and as a result, in one of the cartridges, the fastening part broke off to fix the wire from the side contacts of the cartridge. There was no such cartridge at hand for replacement and I had to figure out how to repair it.

To do this, the fastening part of the contact was screwed up to the stop and a piece of copper wire, pre-coated with tin-lead solder, was inserted, as shown in the photograph.


After assembly, the installation site of the copper wire was filled with a large drop of solder using a soldering iron. The electric cartridge after the repair has become even more reliable than it was before.

For prevention, all five cartridges were checked and the contacts were cleaned with sandpaper. The wires were released, the burnt ends were bitten off, the insulation was removed and tinned with solder. But I came across one electric cartridge, in which, when unscrewing the screws, their heads fell off.

I repaired the cartridge using soldering, soldering the current-carrying conductors to the place where the screws were broken. Now the quality of the connection will be maintained for many years.
After such maintenance and repair, the chandelier will last for more than a dozen years, especially since LED filament bulbs are now screwed into the cartridges.
with screwless terminals
When repairing the apartment, the neighbor had to remove the chandelier from the ceiling. When she unscrewed the union nuts from electric cartridges with screwless contact clamps in order to remove the shades, then all the cylindrical parts of the cartridges detached from the bottoms and hung on the wires. The chandelier hung for only six years with incandescent bulbs. It became obvious that as a result of thermal exposure, the plastic became brittle, and the latches broke off. I decided to repair electric cartridges.

First, I sawed off the remains of the latches to the level of the platforms in the cylindrical base of the electric cartridge. In the photo on the left is a broken latch, and on the right - fitted to the required size.

The new latches were made from 0.5 mm thick brass sheet. A cut strip of brass, as wide as the latch that broke off, was bent into shape, as in the photograph. The latch can be made from any sheet metal, such as iron or aluminum.

The bent side of the strip was inserted into the bottom of the cartridge from the side of the rounded part. After that, a straight section of the strip was bent around the remaining holder of the broken latch, as shown in the photo.

After installing homemade latches, the bottom of the cartridge was screwed onto a decorative tube in the chandelier.

After connecting the electric leads to the cylindrical part of the cartridge, it was fixed to the bottom with the help of new latches. The do-it-yourself latches did an excellent job of holding the cylindrical part of the cartridge tightly. Now the latch will never break off.
It is hardly worth starting by considering the simplest option - installing a new one of the same type instead of a faulty product. Even a schoolboy is able to cope with this, knowing that you first need to turn off the voltage, and then unwind the cartridge itself, loosen the clamping screws of the terminal block, and so on. Basically, this question is of interest to those who want to "modernize" the chandelier in order to use an energy-saving lamp instead of the traditional "Ilyich's light bulb" - for this it is often necessary to replace the chandelier cartridge. Here we will deal with this in more detail.
It is pointless to remind the advantages of various halogen, and others. Once they are chosen, then all their advantages are already known and appreciated. But why change the cartridge in the chandelier? It's all about the discrepancy between the parameters of the socles (diameter and thread). Without delving into the classification of cartridges and the differences between their types (, E40), it is enough to indicate that one of the two must be installed - “14” or “27”. Lampholders E40 are designed for street lamps.
1. Turn off the machine in the apartment (access) panel. Hence the conclusion - it is advisable to replace the cartridge during daylight hours. What if this condition is impossible for some reason? Install a table lamp near the location of the chandelier so as not to work in complete darkness.
If the wiring in the apartment is done “wisely”, then the sockets and ceiling lights are separated along different lines (although the author also encountered “pleasant exceptions”). But we turn off the introductory machine for safety. This means that the sockets will be de-energized.
In an apartment, if an internal shield is mounted, it’s even easier. It is enough to turn off the corresponding machine.
2. Move the wall (or other) switch of the chandelier to the "off" position. If for some reason it is undesirable to turn off the introductory machine.
3. Using a probe-indicator, check the absence of voltage at the terminal block of the chandelier, through which its wires are connected to the intra-apartment line.

Why is this necessary if everything is already de-energized? According to the rules of electrical / installation, the switch (circuit breaker) is installed on the phase line, before the lighting fixture. Now the question is, does everyone know this? And of those who are "in the know", how many observe this provision? It is better not to take risks and check the presence / absence of potential at all terminals of the block.

4. Disconnect the wires of the chandelier. Here you need to navigate how it is more convenient to do it - leave it in limbo or first remove it from the hook ("butterfly").
5. Lower the chandelier down. Replacing cartridges at a height, especially if the lamp is large enough, with several bulbs, is not the best solution.
6. Remove the chuck. First, it unwinds, after which the wires are disconnected from its ceramic block. Next - remove the lower part of the case. Its fastening is made in different ways, depending on the design features of the chandelier. The procedure is easy to determine by visual inspection.

If the chandelier has been in operation for a long time, then you need to pay attention to the condition of the wires inside it (from the cartridge to the block). At this stage, they are easy to replace with new ones.
Next - reassembly and connection. And here is another tip - this must be done immediately. If you leave the installation of a new cartridge "for later", then it is not a fact that such work will go quickly. For those who do this for the first time, difficulties arise, as much is forgotten on the second day. Proven by practice.

If the connection of the chandelier was previously made by twisting, then it is advisable to organize a new connection using terminal blocks.
For domestic use, it is better to purchase WAGO products. Spring-loaded contacts are much more convenient to work with. Learn about the range and specifics of the use of these products.
To restore the chandelier to its full capacity, it is not necessary to replace the lamp socket, which does not glow, even if the filament is not broken. Flask depressurization (another probable malfunction) is the rarest case.
Typical malfunctions
- "Western" tongue. This often happens if, when replacing light bulbs, they are screwed in too hard. Therefore, the central contact of the base does not reach it. It is easy to lift a little, for example, with a thin screwdriver.
- Nagar on the tongue of the cartridge. As a result, communication is broken. You can clean it with fine sandpaper. If it is not at hand, the plaque is easily removed with the tip of a knife.
- Poor contact at the wire attachment point. To make a “broaching” of screws is a matter of seconds.
Practical Tips:
- Before starting work, you need to take care of your own safety. What and where to turn off, how to check that there is no voltage on the wires - indicated above.
- In any case, if you have to deal with the chandelier, you need someone to stand nearby and help, and at the same time, insure.
The light bulb is screwed into a special device - a cartridge designed for a lamp, through which it contacts with an electric current. An electrical cable is connected directly to the cartridge from the mains. All decorative elements included in the design of the lighting device are also fixed to it.
In this article:
The general design of cartridges for lighting equipment
The product consists of the following parts:
- cylindrical body;
- sleeve;
- ceramic insert;
- bottom of the product;
- brass contacts;
- fasteners.
Note! The case is designed not only to fix the sleeve, but also to protect against electric shock. Inside it are placed the central contacts.
The sleeve has an internal thread, which is called the Edison thread. The light bulb is screwed into the socket thanks to the thread cut in it. Models of sleeves are produced with special nests on springs, into which the lamp is simply inserted, fixed by additionally equipped pins (their number may vary for different models).
After the contacts of the sleeve and the base of the light source come into contact, the electrical circuit is closed, when the mains voltage is applied, the lamp begins to emit a luminous flux. The current from the conductors is supplied by brass contacts

To connect electrical wires, cartridges can be equipped with various devices:
- contact connecting clips with screws;
- contact connecting clips for which screws are not provided;
- connecting conclusions of wires;
- connecting leads to which wires can be soldered;
- special connectors.
Cartridge design options, their features
Types of products by design:
- screw;
- pin.
Their main difference is in the technology of fixing the light source. Incandescent filament lamps are usually equipped with a screw base. Accordingly, they are suitable for lighting equipment with screw sockets.

Expert opinion
Ivan Zaitsev
Ask an expertNote! Modern energy-saving light sources (halogen, fluorescent, LED lamps) are produced with both screw and pin bases.
Type of products by material
Most models are made of special heat-resistant plastic. But there are also ceramic versions of products.
The main distinguishing characteristics of ceramic products
- On screw-type products at high temperatures, the fastening nut sticks. Therefore, it must be made of metal.
- With prolonged continuous operation, as a result of exposure to high temperatures, sticking of the sleeve with the base of the product also occurs. In such situations, when replacing a light bulb, the sleeve is unscrewed along with it.
- Advantage - withstand higher temperatures.
- The disadvantage is that they are much more expensive.

The main distinguishing characteristics of products made of heat-resistant plastic
- During operation, white products darken.
- Can be used with incandescent bulbs up to 60W.
- Advantage - low cost.
- The disadvantage is a rather short operating period. Products under the constant influence of high temperatures quickly dry out.
Different models of cartridges differ in their dimensions. For ceiling chandeliers, products marked E27, E14 are usually used. It is easiest to choose a light bulb for products of this design. That is, in such cartridges you can safely screw not only standard bulbs with an incandescent filament, but also energy-saving, LED ones.

Products marked E27, E14 have the same design. They differ only in internal diameter, sometimes they are equipped with a built-in switch. Also on the market are product options with a base E40, E10. The inner diameter of such products is 40 and 10 mm, respectively.
Note! Models E14 are designed for low power. To organize lighting in a room, you need to use several of them at once.
Type G lampholders are designed for fluorescent, halogen lamps. The most common on the market are G4, G9, GU10, R7S. Therefore, when buying, you should carefully look at the markings. The number after G indicates the distance between the legs.
Expert opinion
Ivan Zaitsev
Lighting specialist, consultant in the building materials department of a large retail chain
Ask an expertImportant! For lighting equipment that uses low-voltage lampholders, for example with a G4 base, a transformer is required.

We select a cartridge for a ceiling chandelier
The design of the product must correspond exactly to the factory one, which is installed on the lighting device. Otherwise, there may be problems with its fixation.
What else you need to pay attention to when buying:
- marking;
- dimensions;
- power;
- voltage.
- It is better to buy products with a ceramic case. They have a much longer operating life.
- It is worth choosing products from well-known manufacturers in the market.
Note! Products E27, E14 of the same quality.

Marking
Each product must indicate all the main technical and operational parameters:
- manufacturer;
- rated current (A), sometimes power (W);
- type of current (for cartridges equipped with an additional switch);
- rated voltage (V);
- rated impulse voltage (kV);
- maximum operating temperature;
- IP protection class.
Note! Products marked E27, E14 can be used for a rated voltage of 250 V. Models E27 - for a rated current up to 4 A (880 W), E14 - up to 2 A (440 W).

Cartridge replacement
When you need to change the cartridge in the lighting device
- The product does not work when the switch is turned on, that is, the light does not light up. The main reason is the surface of the central contact, the sleeves are covered with rust. As a rule, their cleaning is ineffective.
- Cracks and other mechanical damage appeared on the surface of the case, which can be seen with the naked eye.
- As a result of contact of internal parts, a short circuit occurs.
- The base with the sleeve "soldered" into one.
- The terminals are out of order.
Note! Planned replacement of the device is carried out every 5 years.
To perform this operation, you do not need to have special knowledge in the field of electricity. After carefully studying the recommendations of experts, the replacement can be done independently.
Tools, materials for replacing the device:
- screwdriver-indicator;
- mounting knife;
- electrical wire (small lengths may be needed);
- a new cartridge corresponding to the lighting device;
- terminal blocks;
- insulating tape.
Replacement instructions
- First of all, you need to de-energize the room.
- Next, the fastening elements that hold the chandelier to the ceiling base are disconnected.
- The bolts holding the terminals are unscrewed. Wiring is removed from their cavity.
- When the lamp is already on the desktop, you can unscrew the ceiling lamp holder itself, fixed in the housing.
- Now you need to insert the base of the new product, fix it.
- Further, a conductive ceiling cable is passed through the hole in the housing. Be sure to strip the end of the wire.
- We connect the wires of the electric cable. To do this, on the terminals located on the removable ceramic insert, unscrew the bolts, insert the wires and tighten.
- We insert the insert with terminals into special grooves, fix the case.
- We fix the chandelier back to the base of the ceiling.
This completes the electrical work. It remains to screw in the light bulb and check the performance of the lighting device!
- It is recommended to buy only high-quality products of well-known brands in order to prevent premature failure of the device.
- It is forbidden to replace the cartridge in the presence of mains voltage. The consequences can be quite serious.
- If a malfunction of the main electrical wiring is detected, it is definitely worth replacing either the damaged section of the cable, or the entire wiring.
- The phase must always be connected to the central contact of the product, but not to the sleeve (when the lamp is screwed in, it will shock).
- Some cartridge models are equipped with lead wires. In case of connecting wires of different types (main - aluminum, from the lamp - copper), it is recommended to use special terminal blocks. If there are none, then after twisting the wires must be well insulated.

Expert opinion
Ivan Zaitsev
Lighting specialist, consultant in the building materials department of a large retail chain
Ask an expert