Proper gel nail polish.
The modern beauty industry suggests applying gel polish to nails instead of regular varnish when painting. It lasts much longer and allows you to create unique designs. But for painting nails with gel polish at home, it will take time and special skills, as well as special tools. Let's take a closer look at this.
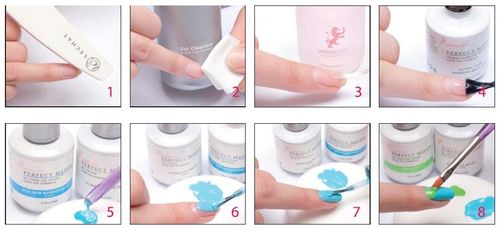
This non-acidic primer should be applied in a thin layer over the entire surface of the nails, where it does not dry completely, but remains slightly tacky. The only formula fills in the whites of natural nails and provides the most consistent tight fit.
Magnetic gel polish is available in a wide range of the most popular colors including new neon shades, so every customer can find a color to suit her mood and in line with the latest trends. Gel Lacoste also offers a French manicure on a natural nail. Today, if you want to have beautiful hands and nails, you can achieve it at home - the Internet is full of tutorials and ideas on how to do it. Unfortunately, most of them are quite common and do not cover most of the small but really key things to look for in your home manicure.
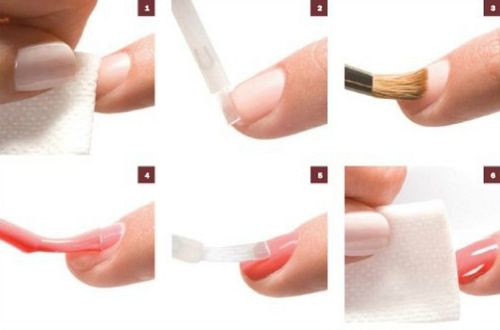
Preparatory stage
Before painting, first of all, it is necessary to properly process the nail plate. To do this, first remove the cuticle and give the nails the desired shape. If a cream or oil was used during these procedures, then the nails should be degreased. Thanks to these actions, the coating is more resistant to adverse factors.
Gel nail polish makes them look natural and shiny compared to other types of manicure. Curing time is shorter than acrylic nails. When applying nail polish, the danger of chemical and gas poisoning that occurs in the manufacture of acrylic nails is therefore considered safer for health.
They do not last long and are less durable than acrylic nails, although they are usually more expensive. If your nail clippers break, that could be a problem. If this happens, you usually have to trust to restore them as a manicure. What's more, if you don't give your nails a chance to heal, you risk serious problems.
For this reason, the results are often unsatisfactory, and sometimes even injuries to the nails or hands. Once you've chosen the shape you want, it's time to shape your nails with the files. You can use a 240 grit paper file. You have to be careful not to damage the surface of the nail plate or break it at both ends because it will open up and it will take a long time to repair.
Once you're done with the waste, the cuticles go. There are two ways to soften cuticles before they begin to process them. One of the options is a special professional gel that breaks them - they are quite strong and are not recommended for use at home. Once the cuticles soften, they go out of their way. Very important: use only the plastic end that needs to be pressed. Avoid the metal end, which serves to cut the cuticles. Any wrong move with it can seriously damage your nail plate and leave a mark on it that cannot be removed until it grows out.
Before painting the gel polish, the nails are carefully polished with a buff. high degree abrasiveness to remove the glossy layer.
Next, a primer is applied - it helps to fasten the nail plate and gel polish. In addition, it helps to improve the condition of the nails after the polishing procedure. Now they produce safe primers that do not contain methacrylic acid.
In terms of finishing your nails, you can buff them, get a French manicure, or have your nails polished in different ways. Some people think spray designs look better on gel polish manicures because they have a shiny finish. Gel Nail Polish definitely looks like the best alternative you can use. On the other hand, there are many factors to consider when choosing a fake manicure. It is best to consult with your manicure or beautician, this option is best for you.
If you have a metal push tool, you must squeeze hard because they are harder and rougher than plastic ones. The pouring must be very careful because the matrix is just behind the cuticle. This is a special tissue from which the nail is born, from which come the cells that make the nails themselves. If the matrix is damaged, the nail plate will hurt for the rest of its life because it does not heal.
After cleaning your nails from the cuticle, your nails will grow faster and look better. If you have peeling, you can remove them with these pliers. You have made the cuticle - this is the turn of the nail plate. This can be done either with a block or with a soft file. It has NOT been polished and blocks nail polish, our goal is not to make them glossy. We only want to polish them and clean them of staining and yellowing. Here's what the smoothing blocks look like.
Rules for applying gel polish
In order for the selected gel polish to please its owner for a long time, you need to adhere to certain rules. Here step-by-step instruction gel nail polish:
- A small amount is taken on the brush and evenly distributed over the nails.
- To achieve quick drying, the nails are placed in a UV lamp for one minute.
- The result is fixed with an LED lamp - nails are kept in it for 10 seconds.
- The finishing agent is recommended to be applied in a dense layer to create a gloss effect.
- At the last stage, you will need a transparent Cleanser, which contains moisturizing trace elements that nourish the nail.
AT recent times nail decoration is the subject of many innovative and creative solutions, and the variety of colors and compositions satisfies a wide range tastes. However, we will highlight some of the strongest manicure trends that we should not ignore.
This season, like the dress and manicure, pastel colors take precedence. Softer and more natural tones prevail, which do not overshadow the silver and gold trends. All colorful metallic nail polish turns out to be the equivalent of a beautiful jewel, and why not add to it. Whether your nail is fully lacquered, or you put on metallic accents, get ready for some chic experiments!
Once we get past the block nail tiles, your hands and nails will become targets in the powder. It is essential to wash them with water without soap. This is done in order not to seal the powder under the paint. After rinsing, you should dry well, there should be no water on the nail.
It's time to apply for a lacquer base. It can be simple or healing. It is important to lay the foundation under the varnish, because it protects the nail plate from staining and yellowing. Once you have chosen the varnish and laid the foundation, this is the first layer. When you apply it, you must be careful with its contours, not just for its uniform color. Professionals suggest that there should be a distance of 1 mm between the varnish and the cuticle, and the contour should be straight. Usually the elbow is applied in three nail strokes, with the brush moving from the cuticle to the free edge of the nail - the first stroke is in the middle of the nail plate, then covers the rest of the surface.
To consolidate the acquired knowledge, we suggest watching a video with step by step painting gel nail polish.
How to create patterns
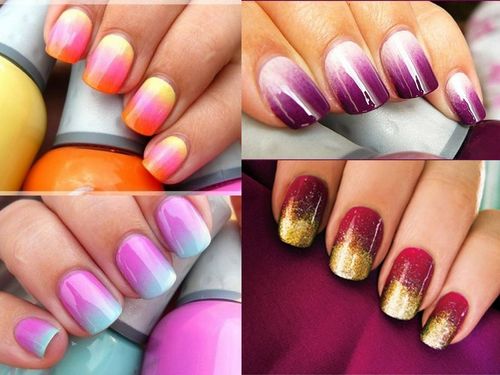
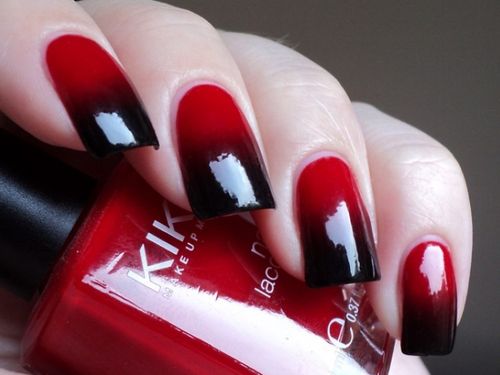
The technique of painting with drawings consists in double applying varnish of different colors on the nails. In addition, in the trends of 2016 there are lacquer markers, gradient manicure, and the Cat's Eye technique.
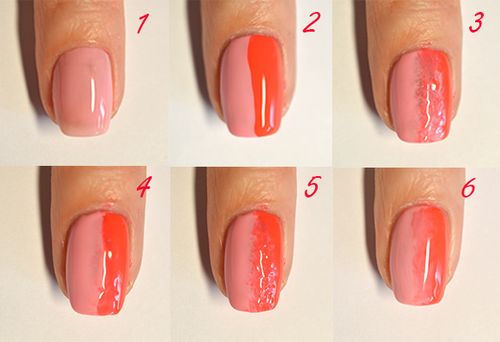
Gradient manicure at home is very simple: they take a small piece of an ordinary sponge, apply two gel polishes on it at a close distance from each other and imprint it on the nails. At the border of the intersection of two shades, a smooth transition will remain. Take a look at the photo.
It is used to even out the color itself, carefully following the contour of the first layer. The movements and direction are the same as the first layer. It is used to protect the varnish from damage and quickly peel, as well as for greater shine. Once you've pushed and worked on the cuticles, you need to feed them. If you don't have them, you can even use olive oil.
The oil is applied to the cuticles, and if you have the patience to wait for your elbow to dry earlier, you can rub the oil in with massaging motions. For the perfect finish to your homemade manicure, apply hand cream. It should match your skin type and may be the one you usually use.
Also, the “newspaper” manicure won great popularity among the current fashionistas of 2016. Step by step technique its execution is as follows:
- A few small pieces are cut out of the newspaper.
- Cover the nails with light or white gel polish, let it dry.
- Dip the newspaper in alcohol for a couple of seconds and apply to the nail.
- Topped with clear varnish.
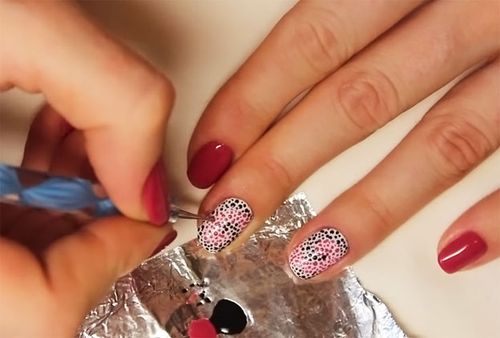
When painting, stencils, stickers, foil applications are used. Rhinestones are a favorite decoration of modern fashionistas. To do this, they take pebbles and apply them to the plate, slightly drowning them in the varnish that has not yet hardened. After that, a transparent varnish is applied on top for fixing. In the photo, options for such a manicure.
Among the manicure tools, there is one that a woman practically cannot live without. Gel Elbow is durable and effective and has become much more popular as it is extremely comfortable in our Everyday life. But is this fast and durable varnish somewhat negative and what are they?
Before you learn about the advantages and disadvantages of this gel polish, we will briefly explain what you need to know about this type of polish and how to use it. Gel polish can be made at home or in a manicure. It is wise to trust a specialist when choosing a gel polish, because if you do not use it properly, you can accidentally damage your nails for a long time.
Important to remember
- The power of the purchased ultraviolet lamp must be at least 36 watts.
- As a degreaser, it is best to use a dehydrator, not alcohol or acetone, as they may discolor the plate or not remove the sticky layer well enough.
- When painting, it is recommended to first process four fingers of both hands, and then thumbs. This is done to prevent the gel polish from dripping.
- The hand to be painted should preferably be placed on a stable support.
In addition, gelation requires a set of materials and tools that not everyone has at home. This helps our nails look longer and prettier. It hides inequality and creates the illusion of long and beautiful fingers. At the same time, however, you must be very careful with them. First, claw your nails into the desired shape. Then remove the cuticles from them. Then carefully remove the dust and the next step is to create some bases that prepare the nail for the gel.
Apply glue first with a special spatula, gel polish and bake. Then apply the chosen color and then bake again. Apply a second coat of gel polish and place under the lamp. Finally, a special special soothing oil is applied to the skin. At best, you will not think about visiting manicures in the next 2 weeks.
Basic materials
What do you need to paint your nails with gel polish at home? This is the minimum number of tools you will need:
- Baking lamp.
- Pushers, buff, orange sticks.
- Nail file, manicure scissors.
- Base and top coat.
Gel elbow is suitable for people with thin and brittle nails. It is suitable for people who do not have time to visit nail technicians every week. With the help of gel polish, you can even build nails. This will give you the perfect manicure without having to wait weeks to grow your nails.
Entering this manicure costs 2-3 times more than a regular manicure. Some say the higher price is offset by the fact that the elbow lasts 2-3 weeks. If you apply gel polish more than 7-8 times a year without giving the nail time to "rest", it can damage the nail plates.
- Cuticle oil.
- Degreaser.
- Primer.
- Color gel polish.
- Lint-free wipes.
To master the gel polish manicure technique at home, design elements may be required: rhinestones, stickers, stencils, etc.
As you can see, self-painting nails with gel polish is not at all difficult, but even a very exciting and interesting activity. It is enough to want, and you no longer have to spend money on an expensive salon procedure. The cost of acquiring the necessary equipment will pay off handsomely, and you will enjoy the process.
When it comes to gel polish, you have many options. If you decide to do it in a salon, you can suggest using acrylic nails instead of gel. Here's what you need to know about them. Acrylic nails have been common in the cosmetics industry for many years and this has contributed to their continued popularity. The method of application is as follows: acrylic nails are made using a liquid monomer and a powder polymer, forming a hard protective layer on the nails.
Acrylic only hardens when exposed to air. When acrylic hardens, it provides an excellent base for applying nail polish to your nails. Applying gel nail to nails allows you to use an alternative to acrylic nails, what's more, they look natural like normal nails. Gel polish is similar to nail polish - it has a base color polish and a gel polish. Both types of manicure are associated with chemicals, which interact with natural nails, but there are also serious differences between them.
We bring you reviews.