How to make a figure out of ice. Ice outdoor decorations or ice Christmas decorations for the street
Western countries have long been practicing decorating for the New Year not only the interior of houses, but also the streets, paying special attention to the decor of the backyard territory. For example, icy New Year's decorations for the street are very popular with them, but such decor is quite suitable for our latitudes. Moreover, making street decorations from ice is very easy, as well as fun, entertaining and completely inexpensive. In fact, to make ice outdoor decorations, you will need water, a couple of decorative elements (we will discuss this in more detail below), a suitable mold, as well as a capacious freezer or severe frost outside.
How to make street decorations out of ice.
How to make an ice wreath.
Festive wreaths can decorate the branches of trees or shrubs.
Method number 1. We take a ready-made pudding mold with a vertical insert in the center. We spread bright berries and green twigs (spruce, fir or arborvitae) along the bottom of the form, fill the form with water. We send the form with water to the freezer, until the water completely solidifies. After the water turns into ice, pour hot water into the basin and immerse the form with ice in it, with a sharp change in temperature, the ice inside the form will melt along the edges, and you can easily pull out the wreath. Backwardness is only to hang a wreath on a satin ribbon.

Method number 2. We take ready-made small forms for puddings, put the composition from the berries and branches of the arborvitae on the bottom, fill each mold with cold water and put it in the freezer. After the water turns into ice, the form can be immersed in hot water for literally one minute, pull out miniature wreaths and hang them on trees with ribbons.

Method number 3. In the center of a round deep shape, we set a glass or a jar, put twigs, berries, leaves, citrus peels around, and pour in water. To prevent the jar in the center from floating into it, you can pour water or pour stones. It remains to set the form in the cold, wait until the ice hardens, pull out the wreath and hang it on a ribbon.

Method number 4. In a baking dish with a vertical insert in the center, lay out acrylic snowflakes and Christmas balls, pour in a little water, put the product in the freezer. When the first layer of water freezes, lay out a few more balls in a circle, pour in water again and put in the freezer, after freezing add more balls and put the mold in the freezer for the last time, take out the wreath, tie a ribbon and hang the product on a street tree.


Photo of ice wreaths.


How to make ice balls.
Method number 1. We prepare the required number of balloons, pour water into them and pour out the food coloring, mix the water inside by shaking the balloons. We tie the balls and set them in the freezer or on the street frost. When the water inside the balls hardens, cut the shell with a knife and take out the colored ice balls.


Method number 2. You will need a special form for making ice balls (for drinks), you can put berries or sprigs of spruce on the bottom of this form, as well as put hanging ropes, pour in water and put in the freezer until completely solidified.


How to make an ice candlestick.
Method number 1. In the center of the food container we put a glass with stones (for weighting). We pour in water and lay sprigs of spruce or arborvitae on top, and also pour viburnum, lingonberry or dogwood berries. We put the mold in the freezer, after the water hardens, we take out the candlestick and put a lit candle in the center.


Method number 2. We take two different-sized bottles of 1.5 liters and 0.5 liters, cut each bottle in half, put the smaller bottle into the larger one, fix them with adhesive tape, put berries, leaves and tree branches between the walls, pour in water, and send the product into the freezer. After turning the water into ice, we take out the future candlestick from the mold, and put a lit candle inside.

Photo of various ice candlesticks.


Ice tree pendants.
Round flat pendants are made as follows, various berries, twigs or flowers are laid out on the bottom of a flat round plate, everything is filled with water, a pendant thread is laid on top, the composition is placed in the freezer, then pulled out, separated from the plate and hung on trees.


Ice stars.
- To make stars, you can use ice molds in the form of stars or baking dishes, to create ordinary stars, fill the molds with water and freeze in the freezer.
- To create colored stars, you must first add food coloring to the water.
- For bright compositions, you can put berries, various twigs, leaves, or add glitter into the molds.

Ice cubes.
We lay out various flowers or fruit slices in square-shaped ice molds, pour water here and freeze. Then we take out the ice cubes and decorate them with street flowerpots, tree branches and other yard elements.

Ice shards.
We paint the water blue, pour it into a rectangular shape in a thin layer, send the mold to the freezer, after hardening, hit the ice surface with a kitchen hammer, select beautiful fragments and put them somewhere on the street.

Icy heart.
Method number 1. At the bottom of a round plate, lay out the pebbles in the form of a heart, fill it with water and put it in the freezer, then take out the product and place it with an edge on a flat surface.

Method number 2. We put berries and pine needles in a heart-shaped baking dish, send the form to the freezer, then remove the product from the form and put it somewhere in a conspicuous place in the yard.


How to make ice garlands.
In the ice mold, lay out a dense woolen thread in a circle, pour in water, and put the mold in the freezer, after the water hardens, gently pull the end of the rope, all the ice should pop out of the mold. To get a colored garland, the water must first be tinted with food coloring.
Instead of an ice mold, you can take the base from a box of chocolates.


How to effectively decorate the house for the New Year:
Christmas decorations made of ice will help you quickly, simply and inexpensively decorate the site for the upcoming holiday. If you have not yet tried to create street decorations from ice, then we recommend that you urgently correct the situation, we assure you that you will definitely like this pastime.
The website "Dekorol" reminds its readers that you have the opportunity to receive notifications regarding the release of new reviews to your mail (fill out the subscription form in the sidebar).
Original taken from vodolei_idei in "Ice Ideas" with your own hands
Ice is a whole world of entertainment in winter. Ice is beautiful. Ice is creative.
Ice is a space for imagination and original ideas. Tableware, decor, games, candles and lamps, houses...
Something I'll try to tell you...
Ice is frozen water. Can you put flowers there? Someone came up with this idea - to put a rose in ice vase
- it will melt, gradually opening the flower ... romantic ... But only for a winter party.
Follow the link - description http://pastelwhite.com/2012/12/23/diy-frozen-roses/
Ice Wreath.
A regular cake mold will do to make it.
They will look bright and elegant in a winter snow garden.
But you can decorate them not only with a winter garden, but also use them as a decoration for a festive table.
In order for the "stuffing" to shine through the ice beautifully, it must be transparent.
HOW TO MAKE ICE TRANSPARENT AT HOME?
But "muddy" opaque ice is also effective. Such ice can be made ice buckets for champagne and lamps for candles.
Transparent and opaque ice can be combined to achieve the desired effect, as in the bottom photo.
This is such a "wreath - candlestick".
You can freeze inside any filling - for example, shells.
original openwork candle can be done with ice.
ICE FLASHLIGHT FOR THE STREET
The craft of ice lanterns is that the water near the walls freezes faster than inside.
Therefore, when a sufficient layer of ice has frozen, the excess water is simply drained.
To supplement it with something or not - the creator decides)
ICE WARE
Almost by the same principle, you can make ice glasses. 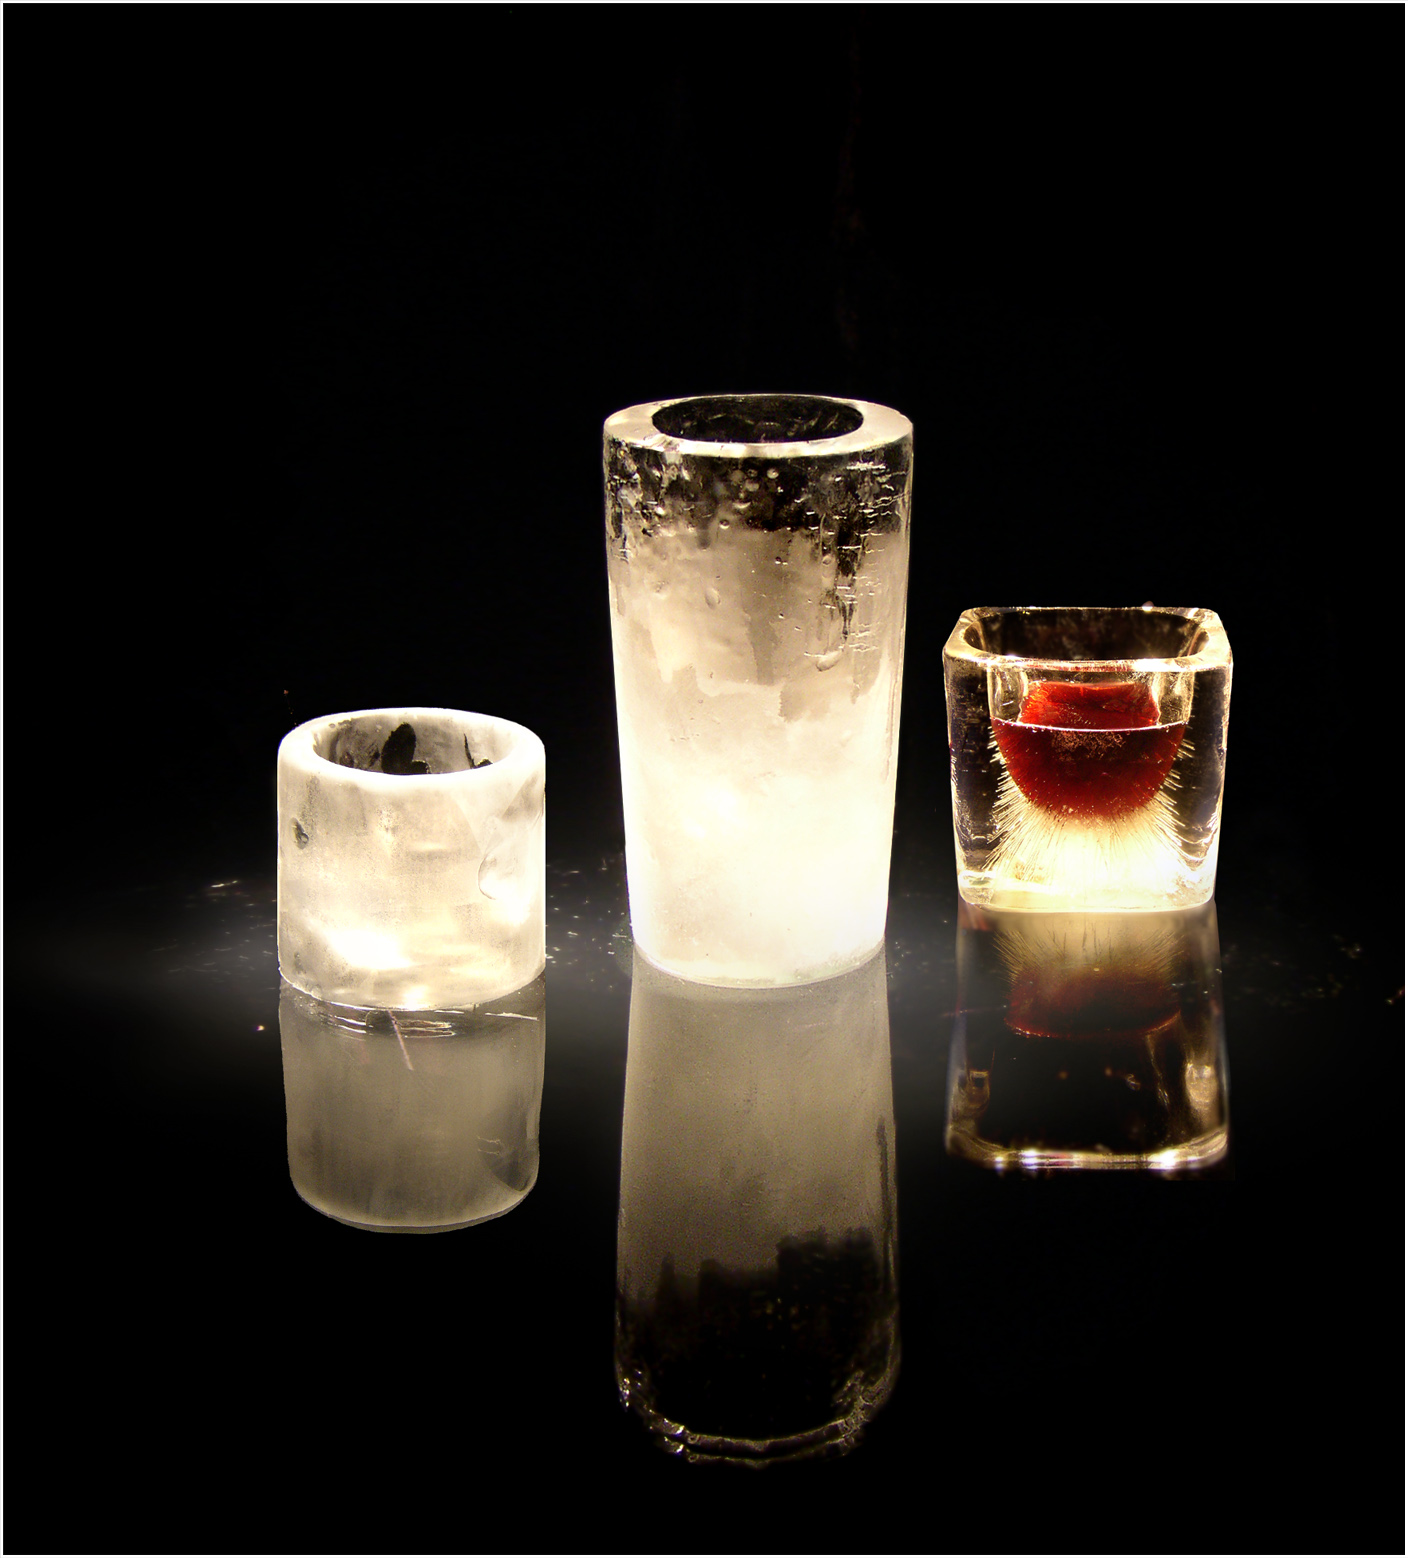
Containers for caviar from ice.
Ice dish for fruit it’s also easy to do - the shapes of a 5-liter water container are recognized, and the technology is the same: poured - froze - drained excess water.
And these summer ice containers with walls of flowers and herbs are unusually good, and just as simple in execution.
Cremanka for ice cream. What a beauty)))
Different containers, different fillings, different uses.
By the way, the bottle does not have to be frozen - you can do ice stand under her.
Two containers of different diameters: the smaller one should correspond to the size of the bottle and be heavy (you need to fill it with something) so that water does not push it out.
And here is a very laconic stand.
In general, iceware is already made to order, professionally.
Buffet ice table at the wedding.
JUST ICE CUBES
Ice cubes are the easiest thing to create. But ordinary cubes can also be made festive, original.
Cubes with rosebuds, for example.
Or with cherries.
Or - with berries cut into pieces?
Or - with fruit juice or puree.
Or - very gently - with flowers.
FIGURED ICE.
Ice figurines - the simplest ones - can be made by pouring it into disposable glasses or yogurt containers, adding dyes, berries and leaves, bright plastic toys of your choice.
And the thread must be frozen there - hung on branches.
A more complicated mold can be molded from foil.
And confess your love to your (your) beloved (beloved). Inexpensive and touching idea for Valentine's Day.
You can freeze ice in children's molds.

It’s not bad to freeze a snowflake inside or tint it.
Perfectly fit and different forms - for ice.
Yes, and just freeze a layer of water in a dish, put something there - it will turn out round ice pendant.
Inside is a frozen napkin.
Lime inside.
Pendant with orange and berries.
UNUSUAL FIGURES
By purchasing original forms, you can do, for example, ice rings.
Different forms - different figures.
But with the help of a rubber glove you can make famous Halloween ice hand.
For a cocktail.
For cold soup.
What about playing?
ICE PINS
Need:
9 plastic bottles filled with 0.5 - 1 liter of water,
1-3 balloons, a small amount of ink or other paint,
1 night of time for the skittles and balls to freeze.
Ice is an amazing material.
You can build a real castle from it, make a slide for children, carve sculptures, create a decorative composition for decorating a festive table, make a bar counter and even dishes - for example, cocktail glasses. Professionals from studios specializing in ice construction can help you decorate a yard, suburban area or interior in an unusual way.
But during the New Year holidays, it is much more interesting to become a creator yourself - and to attract family members: you are guaranteed an unforgettable family leisure.
Ice sculptures: professionals work
In Russia, the construction of snow towns and ice slides have long been folk winter fun. And the tradition of erecting ice sculptures dates back to the reign of Empress Anna
Ioannovna. In 1740, for the clownish wedding of Prince Golitsyn, she ordered the construction of the Ice House on the Neva - between the Admiralty and the Winter Palace. The house, 17 meters long, 5 meters wide and about 6 meters high, was built from ice blocks held together by water. Ice cannons were displayed in front of it, ice dolphins flaunted at the gate, ice pyramids towered on both sides of the entrance. Everything inside the house was made of ice - furniture, utensils, a fireplace, and even a bathhouse. The authors of the unique project were the best architects of that time. Since then, in the literal sense of the word, a lot of water has flowed under the bridge, technology has stepped far ahead, and ice cases
masters have learned how to create real masterpieces - and demonstrate them at any time of the year, not only in winter. On New Year and Christmas holidays, you can admire their work on the central streets and squares of the city, at numerous competitions and festivals of ice sculptures that take place in parks - Luzhniki, Sokolniki, Kuzminki, Krasnaya Presnya. There is even a year-round Ice Museum in Moscow.
What can be seen at ice sculpture festivals and competitions:
- ice palaces, slides and labyrinths;
- the most diverse and fantasy sculptures - Santa Claus, Snow Maiden and other fairy-tale characters, animals and birds, cartoon characters, ice chess and much more - these are real outdoor art objects created by talented sculptors.
But the activities of professional studios for the production of ice compositions are not limited to participation in festivals. For private clients they offer:
- installation of ice figures in suburban areas;
- production of interior ice figures, which can be both decorative and functional - used as original vases, candlesticks, seafood dishes, berries, fruits, ice cream, glasses and vessels for drinks;
- construction of ice bar counters equipped with everything necessary for making cocktails;
- unusual gift wrapping - for example, rings placed inside an ice bar look very impressive;
- in addition, ice logos and outdoor advertising are in high demand.
Prices depend on the number of ice blocks used and the complexity of manufacturing. For example, for a figure measuring 50 by 50 by 25 cm, you will need 0.5 blocks, it will cost from 2,000 to 5,000 rubles; for a figure with dimensions of 195 * 100 * 25 cm, 3-5 blocks are needed, the price is from 15,000 to 30,000 rubles, for a figure with dimensions of 500 x 300 x 25 cm, 20 blocks are needed, the price is from 100,000 to 300,000 rubles.
Material for making ice sculptures
The figures are made from ice blocks. The standard size of one is 100 x 50 x 25 cm, weight is about 120 kg. To create large sculptures, several blocks are needed, which are placed on top of each other and poured with water - in order for the seams to “stick together” and a monolithic form is obtained. Blocks can be purchased from companies that specialize in ice carving at any time of the year. In winter, the cost of one is from 1,500 rubles. without delivery.
What is an ice block made of?
For its manufacture, two types of ice can be used - natural or artificial.  Natural, or natural, is river or lake ice. River water is not held in high esteem by professionals: it is not as transparent as in a lake, where, thanks to springs, it acquires a beautiful bluish or greenish tint. Artificial is ice from an icemaker. It is he who is preferred by masters, since he turns out to be perfectly transparent, like a crystal. The fact is that in the ice maker, water is cleaned of impurities and does not stagnate.
In winter, sculptures, if the temperature outside is below zero, are created at the place of their installation, in warm weather - in cold stores at a temperature of -10°C. Do not be afraid that they will melt quickly: even at a temperature of + 25 ° C, they will stand for at least 4 hours. 
Sculptures can be not only transparent or matte, but also colored - companies have special technologies for painting ice.
As a rule, blocks are sawn in half and the inner surface is painted or inscriptions, patterns, numbers are applied to it.
Then the blocks are connected by pouring water. Structures made of ice with illumination look very beautiful - any shade can be achieved with light.
The process of making an ice sculpture with your own hands
Before starting work, the master draws a sketch. Then he puts ice blocks on top of each other, “glues” the joints with water, the number of blocks depends on the size of the product.
For cutting, he uses saws, chisels and cutters, similar to those used for woodworking. It is very important that the tools are well sharpened.
To create a sculpture measuring 2 * 2 x 2 m, an experienced carver will need an average of 2 to 5 days. Short thaws are not terrible for outdoor sculptures, and if the above-zero temperature lasts for several days in a row, it is better to cover them with polyethylene.
DIY ice sculptures
If, inspired by the work of professionals, you want to feel like Pygmalion and sculpt your own ice Galatea - everything is in your hands. The main thing is to stock up ice suitable for creativity and use the right tools.
You will need:
- ice, water;
- tools
- gasoline or hand saw, straight and angled scrapers, chisel, chisel, cutters;
- additional materials - stainless steel molds, wooden formwork, plastic containers, soap dishes, gouache or acrylic paints, polyethylene, plasticine.
Ice
You can order ready-made ice blocks or food ice, but it is much more interesting to prepare it yourself. Freezing tap water is not suitable: the ice will turn out cloudy.  It is best to use natural ice. Using a hand or chainsaw, you need to cut a block about 100 x 50 x 25 cm in size from the ice cover, preferably not a flowing reservoir.
The fact is that due to the current in the river, the ice is washed away from below - and does not reach the thickness required for work. If you have a pond on your site, ice from it is also quite suitable, the only condition is that the depth of the reservoir must be at least 50 cm. The block size of 100 x 50 x 25 cm is optimal, since it will be inconvenient to work with smaller blocks, and large - difficult to pull out of the pond.
In our middle lane, in natural springs, ice reaches the required thickness by the end of December - beginning of January. If the winter turns out to be warm, you will have to use artificial material.
It is easy to prepare it.
Take a stainless steel form or wooden formwork, cover the bottom with plastic wrap. You can also use plastic containers or soap dishes as a mold for small parts. Fill with prepared water purified from impurities and freeze in the freezer. True, in this case, freezing ice to create a large-sized figure will not work - after all, the volume of the freezer is not too large.
Process
- Sculpt a prototype of the future sculpture from plasticine. Alternatively, the sketch can be drawn on large white paper, wetted, and then applied to the ice mold and cut out along the outline.
- Ice blocks must be connected into a monolith. To do this, put the blocks prepared in advance one on one, pour water and immediately lay the next layer. Continue until you get the array you want. If you want the figure to be colored, add gouache or acrylic paint to the inner layer.
- Take a manual or chainsaw. Sawing off large pieces, give the sculpture an outline. It should be remembered that ice is a plastic material and can be easily processed at temperatures down to -28°C, but you need to work at temperatures from -2°C.
- To work out the details, you will need a straight and angled scrapers. The first - to break off the ice, the second - to turn the figure, make grooves and stripes. By the way, for the same purpose, you can use a chisel or chisel. Check out the sketch.
- When the figure is ready, pour water over it and wrap it tightly with polyethylene. Take it off after an hour.
DIY ice slide
Children will be delighted if, together with their parents, they build a slide for the most fun winter entertainment.
Process
- Carefully prepare the area where the slide will be located: it must be safe, without bushes, stumps and trees.
- Roll up snowballs - there should be a lot of them. Lay them in a slide, leave for a couple of days for the snow to compact. Level the surface with a shovel, make sides and steps.
- From a hose or watering can, pour hot water over the slide and wait until the surface hardens. Then level again with a shovel and pour hot water again. All - you can ride.
Do-it-yourself iceware
A win-win way to surprise guests with an unusual serving is to make dishes from ice for a festive feast: glasses, glasses, glasses, vases for fruit and ice cream, coasters for bottles. To make shot glasses or goblets, take silicone molds, fill them with distilled or boiled water, and put them in the freezer. The original glasses are enough for several toasts - then you have to repeat the procedure. Very elegant look vases for fruit or ice cream, made as follows. You will need two deep plates, water, leaves and flower petals. Put the leaves and petals in a plate, place a smaller plate in it, fill the space between the walls with water and put it in the freezer. To remove the ice vase, pour hot water over the plates.
The ice, of course, will melt over time.
But the process of creating ice sculptures or original items for the home will give so many positive emotions that the family will remember these holidays for a long time - and will look forward to the next ones.
Snow and ice sculptures and other snowy winter fun
“The bunny had a bast hut, and the chanterelle had an ice hut ...” - the fairy tale says. To create a similar miracle in your area, you do not need expensive materials and tools. Use improvised material - snow and ice!
Sculpt from the snow
The snowman became a good fat man only in the 19th century, at the same time the famous canonical appearance appeared: a body made of three snow balls of different sizes, a bucket on his head and a nose made of carrots. Everyone probably knows how to mold such a character, but besides the classic snowman, you can sculpt a lot of interesting things! For example, you can turn a snowman upside down and give him real boots or felt boots! Or fashion your favorite cartoon characters from the snow. And if you recently had a good rest at the sea or discovered in yourself a passion for something monumental, take on the creation of marine life from snow. To create such a masterpiece, “heavy artillery” is already required: shovels, scrapers, and even snow throwers or even tractors, but the result is worth it. Of course, it won’t be warm, like at sea, on the street, but you will collect enough “likes” in social networks!
Building a snow fort
If you have a big friendly company, why not arrange snow battles? Build real fortresses out of snow! The best conditions for creating a snow town are a relatively high temperature (about OH) and high humidity. Just roll the balls like a snowman and stack them on top of each other. Unfortunately, such a fortress will look a little sloppy. Then shape the snow globes into square blocks with a shovel. Another way is to collect wet snow in 10-liter plastic buckets and tip them in the right places like molds in a sandbox.
At lower temperatures construction is also possible. Here you can not do without containers for snow and water. Snow during frosts is very dry, so it needs to be moistened: snow is collected in layers in a bucket or other container, each of which is spilled with a small amount of water from a watering can or a perforated plastic bottle.
After the frame of your fortress is ready, make it unique - think over the original appearance. Cut through windows and doors, loopholes, etc. maybe even snow tunnels. Place a flag on the very top of the building. And don't forget to prepare a sufficient amount of "ammunition": snowballs after the construction of the fortress will come in handy!
Angel in the snow
For those who like to wallow in the snow, there is a great idea - to create a snow angel! Find an area with an even layer of freshly fallen snow without extraneous marks, stand with your back to it and squat down. Then just lie down on the snow (it is important that your head is imprinted well) and spread your arms to the sides, spread your legs shoulder-width apart. Move your arms up and down the surface of the snow without bending them. to make angel wings. Also bring and spread your legs several times to make a skirt. Now it is important to rise without damaging the creation!
ice sculptures
If Rodin's fame haunts you, try yourself as an ice sculpture maker! They can be made from both natural and artificial ice. To do this, a block of ice is cut out of the ice cover of the reservoir with a chainsaw, which can later be used to create a sculpture.
At the same time, be careful: if the temperature a few weeks before was above 8 C, in no case step on the ice - it can still withstand you, and under the weight of the ice block it will crack. But such ice will not be of very high quality: it contains a lot of foreign impurities and air bubbles that make the ice cloudy. Even if you try to independently cast blocks of the required size from pure water, there will be no "crystal") transparency - air bubbles will still remain inside. The secret of making perfectly transparent blocks lies in the constant circulation of frozen water: in this way, much less bubbles are formed and the ice becomes suitable for sculpting.
To carve a sculpture from a finished block, you need to arm yourself with a chainsaw - it is with its help that the first outlines of the future sculpture are given to the ice. When this stage is completed, the work is continued with cutters and a drill. If unnecessary “burrs” and bumps appear on the surface, heat these places with a regular hair dryer. The final touch is dousing the finished sculpture with cold water. After this procedure, let the figure harden.
With the onset of winter, the suburban area turns into a white desert and is no longer so pleasing to the eye and warms the soul. A transparent sparkling miracle - an ice sculpture - can revive the virgin snow. If complex compositions are only possible for a master, then simple forms are within the reach of an amateur amateur inspired by a creative idea.
You went out of the house to the street and looked at the figure of a rooster made of ice - a smile and a comfortable New Year's mood appeared on your face.
Step-by-step steps for creating ice figures
In the process of creating an ice sculpture, there are 5 main steps:
Step 1. Procurement of material.
Ice for creating ice figures must be clean, transparent, without any impurities, that is, one that can transmit light. This ice cannot be created at home from tap water, it turns out cloudy and not sparkling. Suitable ice can only be created by nature, it is cut from the frozen surface of lakes or quiet backwaters of rivers and sent to customers.

Take advice. Use the services of professional ice makers. These specialists are able to extract ice blocks of various sizes without breaking them.
Step 2. Preparing the tools.
Most of the tools that are used to create ice sculptures do not require special manufacture, these are chainsaws, electric saws, wood chisels of various shapes. But each master has an individual set, which he created himself to solve the problems that arise during the construction of the sculpture. An example of such tools is a chisel with a semicircular sharpening, for making particularly complex patterns, or (biter) for removing large masses of ice, resembling a metal comb, which are not found in the standard set of tools.

The absence of own-made tools does not mean at all that it is impossible to create ice splendor on your site with an ordinary tool.
Advice. All tools, and especially chisels, must have perfect sharpening, since any burr can spoil what was planned.
Step 3. Creating an ice figure.
Blocks of ice to create a figure are glued together with water. Water acquires this property at temperatures below zero. So the blocks are erected to the desired height, the seams are rubbed with wet snow so that they become less noticeable.

Chips and scratches on the surface of the ice can be ironed out with a warm, but not hot, iron. If the figure is above one and a half meters, then it must have a solid base, and if it is an ice slide, then a frame, wooden or metal, is used. The frame is strength. When using a frame, it is possible to create very tall sculptures and slides, but the charm is lost, since the frame is visible through the transparency of the ice.
What ice figures will decorate the site, your imagination will tell you: Christmas trees of various heights, Santa Claus with the Snow Maiden, an animal - a sign of the coming year, small slides, an ice table and benches.
Advice. At the summer cottage, it is best to create low, one and a half or two meters, figures with a solid base - for safety reasons and so as not to complicate the work of making the frame.
 You can make ice figures by inviting friends with a New Year's mood.


Step 4. Decorating ice figures.
Patterns on the surface of ice figures can be very different: ornament, cutting, and spirals - everything that the sculptor's imagination and skill is capable of, but the sculptor. it is you. Patterns can decorate both the entire sculpture and its various parts.

A combination of patterns of various manufacturing methods looks effective. One of the ways of decorating is (driving ice): its icy contents are cut out of the figure and dry snow is poured. The combination of transparent and white in the play of sunlight is unforgettable.

It is better to create patterns with the largest number of faces. The more facets, the more beautiful the sculpture will look. There is no need to paint the sculptures, they cease to live and become only a bright spot that hurts the eye.
Imagine a goldfish in an uncolored form. And the scales of the fish sparkle in the sun with their scales. The decor will be completely different.
Step 5. Highlighting the ice figures.
Ice is a living material, so ice figures live and play in the rays of sunlight. The sparkle changes every moment depending on the angle of view. At night, the sun can be replaced by electric lamps, which are installed either behind the sculpture, or at its base, or in special grooves that are drilled into the sculpture.


Advice. Do not use incandescent lamps for illumination - they will melt the figures very quickly.
Expand your horizons and watch a video about ice figures created by real artists with rich imaginations.
Thus, even a small original ice figurine will give your site a unique New Year's flavor.

And if you wish, you can build a whole ice town that will delight the eye until spring. Happy New Year, dear readers of my blog!
Instructions for making ice balls and compositions from them.
If you are lucky enough to become the owner of a private house, then on the eve of the New Year, you strive to decorate not only your home, but also the area around the building itself. To do this, you can use standard Christmas decorations, tinsel, as well as use more interesting decor options. One of them is ice balls.
How to pour water into a balloon?
There are quite a lot of options for making such jewelry. It all depends on your imagination and desire to experiment. The fact is that water does not flow into the balls just like that, that is, from an ordinary plastic bottle you cannot pour water into the ball and fill it to the extent you need. Therefore, the only option to fill the balloon is to supply liquid under pressure. For this you can use:
- Crane. To pour water into a ball, you need to put the neck of the ball on the faucet socket and turn on the water. After that, you need to tie the ball. Here, too, there are some subtleties. The fact is that if you tie the balls with a thread, under pressure, the water still begins to flow out in small drops and sooner or later it will flow out completely. The best option is to tie a ball. That is, you need to pull the neck up and make a knot out of it.
- hose. The manipulation is identical with the crane. The neck of the ball is pulled onto the hose.
How to make beautiful colored ice balls from balloons with your own hands: ideas, instructions, photos
Ice balls of different colors look very nice. In order to paint over water, you can use a variety of paints. An excellent option would be gouache, a concentrated solution and food coloring. Dyes for eggs that are used for Easter have proven themselves well.
Instruction:
- Pour some dye inside the balloon and fill with water.
- After the ball is tied, shake it a little so that the dye is evenly distributed throughout the entire volume of water. In this position, you can freeze the balls.
- Please note that a small ball with a diameter of approximately 10-15 cm must be frozen for about the whole night. To do this, put the balls in the freezer. Try not to stack one on top of the other, as they are deformed and the shape will not look like a spherical one.
- If it is very cold outside, you can take the balls outside to freeze. Do not bury them in snow, as it warms and the temperature inside the water, which is surrounded by snow, will be positive. It will not freeze, so keep it in the cold for a while.
- Then turn them over so they freeze on all sides. After that, proceed to extract the balls from the rubber. It lags behind frozen balls very well. You will need to pry the rubber a little with a wrench or knife and just remove it.
- Now you can lay out these balls in the order convenient for you and decorate as you wish.

 colored ice balls
 colored ice balls
 How to make an ice ball with fresh flowers ideas, instructions, photos
A very unusual and cute option is to make balloons with flowers and various decorative elements inside. To do this, put a small flower bud inside the ball, then fill it with water. Please note that when filling the ball with water, a flower or any decorative element will rise up. Therefore, the composition will turn out mainly from above. It is best to use small flowers. Rose buds are ideal. Try to use flowers without thorns and sharp tips so as not to pierce the balloon while filling it with water.
After that, the ball is tied in the standard way. Often, instead of flowers, use thuja sprigs, rowan seeds and citrus slices. Such compositions look very impressive and unusual. Ice balls with flowers and various decorations are used not only to decorate the area near the house. This is a great option to decorate the New Year's table. Place such balls in several places on the New Year's table.


 ice ball with natural flowers
 How to make an illuminated ice ball ideas, instructions, photos
If you wish, you can make illuminated Christmas balls from ice. To do this, you will have to purchase LED bulbs, as well as tablet batteries. You need to fasten the battery between the antennae of the LEDs and tie them together. This can be done with tape. Further, this luminous element is placed in a plastic bag or in a ZIP package, which is inserted inside the ball. The balloon is then filled with water and frozen.
In this state, the LED can burn for a long time. You will also receive additional lighting for your backyard, as well as cheer up everyone around you and guests.
 illuminated ice ball
  illuminated ice ball
 How to make a Christmas tree from colorful ice balls?
From ice balls you can make a variety of sculptures and products. Very often they build a Christmas tree or make snowmen. To do this, use green dyes. Pour a small amount of dye into the balloons and fill them with water, tie and mix. Freeze some of these ice balls. After you remove the rubber from the surface of the balls, form a Christmas tree out of them. It can be a tree in the shape of a pyramid or a flat Christmas tree, which is laid out around the perimeter of the snow.
You can complement the Christmas tree of green balls with multi-colored balls. This will be an imitation of Christmas toys. This decor looks very organic and unusual. It will be a great addition to the decoration of the area near the house.

How to make a snowman out of ice balls?
You can make snowmen out of ice balls. To do this, use balls of different sizes and fill them with different amounts of water. You will need three balls: large, medium, small. Freeze after filling. Set the balls one by one.
If you want a transparent snowman, then don't paint over the water. If you want the snowman to be white, add a small amount of white dye to the water. These snowmen look very cute. They will be able to complement the festive New Year's table or a plot near the house.
 ice ball snowman
 How and what shapes can be made from ice balls?
Possible figures:
- Pyramid
- Lock
- Christmas balls on trees
- Turtle
- Snowman
 ice ball figures
 ice ball figures
 How and what buildings can be made from multi-colored ice balls?
It all depends on the number of balls and their size. Build big buildings from huge balls. This will save you time. If desired, you can create huge castles.
 buildings made of colorful ice balls
 How to decorate the yard with colorful ice balls: ideas, photo tips
Decoration options:
- Lay out along the steps
- Make a separate ice zone with sculptures
- Lay out along the porch
- Decorate flower beds


Street decoration with colorful ice balls: ideas, photo tips
To decorate the street, you will need a huge number of balls. There are several options:
- Droshki decor
- Decor of park areas
- Playground decoration


Decorating a kindergarten with ice balls: ideas, photo tips
Ice balls are often used to decorate areas near kindergartens. Get the kids involved in making ice balls. To do this, give the children a balloon each and show them how to put the balloon on the water faucet. Specify the volume of water to be poured into the balloon. Help the children tie the balloons and put them in the freezer or take them outside if it's very cold. After the balloons are frozen, take the kids outside and decorate the area where you usually play.
Decor with ice balls
Ice balls are a great option for decorating a private home, as well as a way to decorate your New Year's table. Ice balls are often used to decorate the New Year's table and its serving. The balls are laid out on a dish and candles are lit around them. Such a composition looks quite impressive and beautiful.
VIDEO: Ice balls


