How to recover old photos. Professional restoration Restoring very old photos in Photoshop
Photographs on paper have the unpleasant property of fading, fading, becoming covered with small cracks and scratches over time. In general, lose its original appearance. Almost every person in the house has old black-and-white photographs from the family archive, damaged by time. However, they are dear to the heart and it is a pity to throw them away. Today there is a way to restore not only damaged color photographs, but also very old black and white photographs. To do this, use the tools of Adobe Photoshop - a powerful program for working with photos. In this article, we will tell you how to recover time-corrupted or damaged photo images.
To restore photos on paper, you will need a computer with appropriate software and a scanner to scan images. In fact, there are many photo recovery methods using various Adobe Photoshop tools. The main task is to understand what needs to be corrected in the photograph and to choose the right tool for solving a specific problem.
The most commonly used tools in Adobe Photoshop for restoring photos include the Clone Stamp Tool, the Healing Brush Tool, and the Patch Tool. Although there are really many ways to restore photos, we offer you the most common and simple sequence of actions for restoring an image:
1. Photo scanning
The first stage is one of the most important. To restore a damaged or damaged photo on paper, you must first scan it with high quality. Before scanning, do not forget to wipe off fingerprints and old dust from the photo. When scanning, you should be guided by the following rules. First, in the scanner settings, you need to set the highest resolution - at least 300 - 600 dpi. A lower resolution will not allow you to print the restored photo. Secondly, black and white photographs should be scanned in "color" mode (RGB) rather than black and white, as color mode allows more detail to be preserved. Scanning in grayscale mode may result in poorer quality and more noise.
Thirdly, those photographic images that have a sufficiently large number of small scratches and cracks are recommended to be scanned several times (two or four times, changing and rotating the paper carrier in the scanner). Thus, you will get two or four scans of one photo, which will allow you to get rid of a significant amount of unnecessary "garbage" by adjusting the opacity of the layers in Adobe Photoshop.
If you set yourself the goal of eliminating embossing or large artistic grain in the photograph, then it is better not to scan the picture, but to photograph it with a digital camera under evenly diffused light. Or, again, use multiple scans to reduce the graininess of the image. In principle, in Adobe Photoshop, as practice shows, you can work even with poorly scanned photos and get good results when restoring. However, the implementation of the above rules is still highly desirable.
2. Image analysis and cropping
In the process of scanning and converting a photo from damaged paper into digital form, a lot of small cracks, scratches and dust particles appear, which are sometimes completely invisible in the original image. This is understandable, because the scanner enlarges the photo when scanning. After scanning, it is important to analyze the image in terms of whether it is necessary to remove dust, which parts of the photo require restoration, and which can serve as donors for lost areas.
In a word, it is worth immediately assessing the degree of damage that you will have to eliminate. Next, we crop the image in accordance with the laws of composition. Worn corners of a photo can be removed if they do not contain any valuable information and do not harm the overall compositional solution.
3. Color correction
Finally, you get started with Adobe Photoshop. And the first task is the color correction of the photo image, because in most cases old black and white photographs can no longer boast of good contrast and a wide dynamic range. To do this, just use the keyboard shortcut Ctrl + L to call the dialog menu Levels (levels). First, you can use the button Auto (Auto) and look at the finished result of color correction. Most often, the Auto Levels algorithm fails when working with old images, and the result is far from what you want to see. Therefore, you may have to adjust the tone manually.

Working with levels (Levels), the white and black point sliders will need to be moved to those points in the image where the histogram displays the beginning of areas with dark and light pixels. To increase the contrast and color saturation of the photo, you will also need to use the Match Color menu. Here you can increase the intensity of the color using the Color Intensity slider, while you will need to check the Neutralize box to neutralize the midtones that appear.
4. Remove scratches and dust
The next step in restoring a photo is removing a variety of scratches and dust. To remove dust, the Dust&Scratches filter is used, followed by applying a layer mask and restoring areas undamaged by dust. Remember that dust is always more visible in the shadows and, accordingly, it will be much easier to remove it automatically there. When removing dust, work at a 100 percent approximation to subsequently get a clean, restored photo, when printed, there will be no scratches and dust particles that you have not noticed.
To eliminate cracks, you will already need to switch to the Lab Color mode, where you can correct the image both in relief and in color. Cracks and scratches are removed from the photo using the Clone Stamp Tool. You can also use the Healing Brush Tool for this purpose. When working with these tools, be especially careful when removing scratches and cracks from faces in a photo.
Hair, clothes, and some other details are often the only areas in an old photograph that can be called clear and detailed. Therefore, when working with them, you should also be extremely careful. If necessary, you can additionally remove bags under the eyes, wrinkles and other imperfections in the photo with the same Clone Stamp Tool and Healing Brush Tool.
5. Restoration of missing sections
Some areas of an old photo may be so damaged that they will have to be restored using other, similar areas in the picture. To restore missing or damaged sections, you need to use the Clone Stamp Tool. Here you only need to select an area in the photo from which you can copy some of the pixels and, thus, restore the damaged area with their help. The cursor pointer is placed on this area, after which you need to click the left mouse button by pressing the Alt key. Next, you need to move the cursor to the damaged area of the photo and click the left mouse button again. You may have to create a new layer to correct every major detail in the photo.

In order to close large damages, it is better to use the Patch Tool, which provides for the creation of a kind of patch with which you can cover the damaged fragment of the image. To restore symmetrical details of the face, use the Flip Horizontal function from the Transform group to flip the copied fragment horizontally. Then use the Warp command to transform the fragment so that it complements the photo. True, here it must be borne in mind that a person's face is very rarely symmetrical, as a result of which a face restored in this way may look unrealistic. So, you will probably have to perform additional correction and feathering of the restored fragment.
6. Minor corrections, sharpening and general photo correction
At the last stage, you are engaged in eliminating minor flaws and improving the overall appearance of the photo image. In particular, if the photo has shadowed areas, then they can be removed using the Shadow / Highlight option. To correct dark and light areas, it is necessary to choose the right settings so as not to lose detail in the image and not “kill” the contrast. To achieve a really high-quality result, it is recommended to use curves (Curves), with the help of which it will be possible to further work out the dark and light areas of the photo image.
To improve the clarity of the photo, use the Unsharp Mask tool. Don't get too hung up on eliminating noise when restoring photos. Firstly, the elimination of noise is a rather complicated task and often you will not achieve the desired result without degrading the image quality. And secondly, the grain in old photographs looks quite impressive, adding a kind of spirit of the time to the image. Finally, you can try to make the photo more interesting and colorful by additionally adjusting the contrast and color saturation of the image using the Hue / Saturation option, which is called by the Ctrl + U keyboard shortcut.
Today, many photo salons offer a service for the restoration of old, time-damaged photographs. However, you can save your money by restoring photo images yourself. Do you have old, faded photographs in your archive? Then use the Adobe Photoshop tools according to the scheme described above and the result will pleasantly surprise you.
Restoring an old photo in Photoshop
Time can leave its mark on the pictures in your photo album, turning them into old and damaged photos with cracks and scratches.
In this tutorial, we will show you how to use the Adobe Photoshop editor, restore old photo and rid priceless family photos of extraneous shades, cracks, dust and scratches.
First, we'll look at how to restore the right hue from a faded photo by restoring the color tint to an old baby photo.
Restoring contrast and removing extraneous shades is quite simple. To do this, on the layers palette, select the layer of the open image and call the context menu by right-clicking on the image thumbnail. In the context menu that appears, select the Duplicate Layer command - create a duplicate layer.
Go to the tab Image - image, and execute the command Auto Contrast - auto-contrast. In most cases, the automatic color and contrast functions do a good job of correcting discolored or distorted tones. However, if the automatic algorithms cannot solve the problem properly, you should use the function of changing the levels of color shades. To do this, you need to create a new adjustment layer by clicking on the Create a New Fill from Adjustment Layer icon - creates a new adjustment layer or fill layer located at the bottom of the layers palette and selecting the Levels command - levels.
On the Adjustments panel that appears - correction, you need to move the black and white markers under the histogram to the center to increase the contrast.
Thus, after applying the Auto Contrast function, we increased the contrast using the Levels adjustment layer and restored the color tone of the photo in just a couple of steps.
Also, with the help of the Photoshop editor tools, you can remove unwanted tint from the photo.
Consider this with an old home photo that has a pronounced red tint. To begin with, on the layers palette, select the layer of the open image and call the context menu by right-clicking on the image thumbnail. In the context menu that appears, select the Duplicate Layer command - create a duplicate layer.
Now go to the Image tab and run the command Auto Tone - auto tone.
In most cases, we will get neutral shades. If the colors still don't look neutral, create a new adjustment layer by clicking on the Create a New Fill from Adjustment Layer icon at the bottom of the Layers Palette and choose the Levels command.
Go to the settings on the Adjustments panel, and in the Channel menu - channel, select the command Red - red. Next, you need to drag the middle marker to the left to increase the red hue or to the right to weaken it. After that, in the Channel list, select the Green command - green and move the gray marker again. Repeat the same action by selecting the Blue channel - blue.
If you set the Channel list to RGB, you can use a gray marker to lighten or darken the entire image without changing its color.
With the Photoshop editor, you can restore old photos removing small dust particles, cracks and scratches from them. Consider how to perform these operations on the example of an old military photo.
First create an empty transparent layer. To do this, go to the tab Layer - layers and in the drop-down list New - new, select the command Layer. You can also use the keyboard shortcut Shift + Ctrl + N. Now let's move on to removing cracks in the photo. Tears, scratches, creases and cracks that are present in many old photographs are most conveniently eliminated with the Spot Healing Brush Tool - a spot healing brush. And the Clone Stamp Tool is a stamp.
To get started in the toolbar, select the Spot Healing Brush Tool, you can also use the hotkey J. In the attribute bar, check the Sample All Layers checkbox. Sample all layers. And set the appropriate brush diameter.
Click on the defective part of the photo, gradually removing the crack. You may need to repeat this operation several times.
If the result does not suit you, then try using the Clone Stamp Tool located on the toolbar. First you need to set the starting point from which the area will be copied to replace the defect. To do this, while holding the Alt key, select the area on the image that is most suitable for replacing the defect and click the left mouse button. Then click on the defect. As you can see, the Clone Stamp Tool is much better suited to this image than the Spot Healing Brush Tool.
In the same way, continue to carefully paint over the cracks, while remembering to set new starting points.
With the help of the Clone Stamp Tool, you can also restore missing corners and fragments of the image by selecting the starting point in the same way.
It should be noted that we apply the Spot Healing Brush and Clone Stamp Tool to an empty layer, and not to copies of the original image. Because in this case, the tools will only borrow information from the background layer. This is very convenient so that after making changes, we can adjust the adjustment layers without fear of changing the color of the corrected areas.
Now let's see how to remove dust and scratches from this image. First, let's create a new layer, merging the previous two. To do this, hold down Ctrl and left-click on both layers, thereby selecting them. Next, click on any layer with the right mouse button and in the context menu that appears, execute the Merge Layers command. After the layer is created, call the context menu by clicking on the image thumbnail with the right mouse button. In the context menu that appears, select the Duplicate Layer command - create a duplicate layer. To remove dust and scratches, Adobe Photoshop often uses the Dust&Scratches filter located in the Noise group on the Filter tab. In the dialog box that appears, set the Radius value to 6 and the Threshold value to 16. And click OK.
This filter slightly blurs the image, so after applying it, you should add a new layer mask. To do this, click on the Add Layer Mask icon at the bottom of the Layers panel.
Zoom in for a better view and select the Brush Tool, setting the foreground color to black. Treat those areas where details need to be restored. For example, the outlines of a figure, eyes or lips. Thus, we have rid the images of many defects, significantly improving its appearance.
Also, to restore a photo, you can tint a black and white image to some shade. Using the following photo as an example, we'll look at how to tone an image to a sepia tone.
To do this, you need to create a color balance adjustment layer. Click on the button Create a New Fill from Adjustment Layer, located at the bottom of the layers palette, and select the command Color Balance - color balance.
On the Adjustments panel, in the Tone group, check the item Midtones - midtones.
To achieve a sepia tone, increase the red and yellow colors by dragging the sliders to the desired hue. The result will pleasantly surprise you.
It should be noted that there are such damage to the photo, which is very difficult to restore. If a part of the photo requires a very complex correction, as in this image, then you can try to cut off the damaged area using the Crop Tool - frame. On the toolbar, select the Crop Tool or use the hot key "C" and select the image starting from the corner of the photo.
As you can see, the selected area remains visible, while the outer one becomes darker. You can also hold down the left mouse button inside the selected area and move the frame to the desired position. Similarly, you can change the frame size. To do this, hold down the left mouse button on the corner markers of the created selection and move the cursor until the required size is obtained.
Then press the "Enter" key on the keyboard. Or double-click with the left mouse button to crop the image to the frame. Using this method, you can quickly crop an image by removing photo defects, as well as fine-tune the size of the future image.
Thus, thanks to the tools of the Adobe Photoshop editor, restore old photos won't be difficult. You can easily remove blemishes and damage, as well as restore color and contrast to faded photos, resulting in refreshed images.
(1)| 1. | Photomontage. Photo processing. | 14:19 | 9 | 28067 | |
| 2. | Create a label | 8:00 | 1 | 23925 | |
| 3. | Draw snow, rain, sun | 18:10 | 0 | 9958 | |
| 4. | Filter "Lens Correction" | 7:16 | 0 | 4208 | |
| 5. | Snapshot histogram | 9:33 | 1 | 6016 | |
| 6. | How to create a realistic shadow? | 16:33 | 0 | 8694 | |
| 7. | Vector masks | 15:54 | 0 | 7729 | |
| 8. | portrait retouching | 11:27 | 0 | 9564 | |
From April 12, 2015 to early June, there were many posts based on these photos. Dmitry himself became interested in this process, bought a good scanner that allows you to digitize images from any media in a very high resolution, and started restoration. Moreover, his approach differs from most restorers and retouchers from Photoshop. The main goal is to recreate the original image, not a quick result. The examples below fully illustrate what has been said.
Personally, I have my own selfish interest in Dmitry's venture - all of a sudden something local history from the family bins pops up!))) If someone deems it appropriate to distribute this post, we will be very grateful!)))
Dmitry leads a group on Odnoklassniki https://ok.ru/profile/570398517042, connect!)))
Original taken from g_decor
Restoration of old and damaged photographs.
We have a new type of service for the restoration of old and damaged photographs, color and black-and-white negatives, slides and archival photographic documents. The quality of the copy is significantly superior to the quality of the original material.
Time does its job: photographs on paper and film deteriorate over time, begin to fade, fade, become covered with small cracks and scratches. You can restore them to their original appearance with the help of photo restoration.
Modern methods of restoration allow extensive work on image correction:
1. Remove scratches, cracks, bruises, folds, dust effects and small interferences.
2. Increase sharpness to a certain limit on fuzzy and blurry photos.
3. "Glue" torn photos, while the place of "gluing" parts of the photo becomes invisible.
4. Restore lost parts of the image.
5. Adjust the brightness, contrast of the image, perform color correction.
6. If necessary, replace the background with a uniform one to highlight a specific object or person in a group photo.
It should be noted that the concepts of retouching and restoration differ from each other and have different tasks.
In the case of retouching, it is necessary to produce the most beautiful photo, hide flaws and show the image more spectacular than it really is. Similar photos can be seen in glossy magazines. There is an effect of a certain artificiality. Each photo contains an element of fiction. Such work, basically, is associated with the ability to use graphic programs and is purely technical.
In the case of restoration, the main thing is the impeccable preservation of the information of the original image, its historical authenticity. This is much more difficult to achieve. It is necessary to remove only the interference that interferes with the perception of the original. In the case of restoration, it is not enough to master the graphic editor, you must have the skills of an artist. A person without training and a certain experience of such work is not able to achieve a good result. The restoration of each photo requires a lot of time, painstaking work and care.
It is possible to scan historical photographs in extremely high resolution, allowing you to see the smallest details of the source without loss of quality.
Here are more examples of photos, "before" and "after" their restoration. Look.
Preserve your family archive for posterity. Only those who remember their "roots" have a future.
I would be grateful for the dissemination of information. Contact phone: 89139788415
Original entry and comments on
Restoring a photograph may seem like a time-consuming and sometimes impossible task. However, this is absolutely not the case, because Photoshop tools will help you easily restore even the most seemingly time-damaged picture.
In this material, you will learn how to apply correctives, learn how to work with such useful tools as Healing Brush Tool (Healing brush) and Clone Stamp Tool (Stamp), as well as understand the basic principles of old pictures. But before you start the lesson, you need to understand one simple fact - each photo always requires a different approach, because there is no specific restoration rule, but the methods and techniques described below can be applied to any damaged image. You just need to learn how to combine different techniques and then you can restore a snapshot of any damage complexity. Well, let's get started!
Step 1
Open the image in Photoshop. First you need to adjust the contrast, because the image looks too light. To do this, it is better to use an adjustment layer. Levels (Levels). Remember that for color correction, using adjustment layers is much preferable to using the Adjustments menu (Correction). The fact is that using a layer allows you to adjust the colors at any time. In addition to the flexibility of work, you can also remove the adjustment layer and thereby restore the original settings.
So apply adjustment layer Levels (Levels). To apply it, click on the icon Create new fill or adjustments Layer (Create a new adjustment layer), which is located in the palette Layers (Layers):


You will see a menu with level settings. By moving the right and left sliders, try to achieve the desired result:

Step 2
Now you need to get rid of seams, dust and dirt. To clean up such defects, you can use the Healing Brush Tool (Healing brush) (Hot key J):

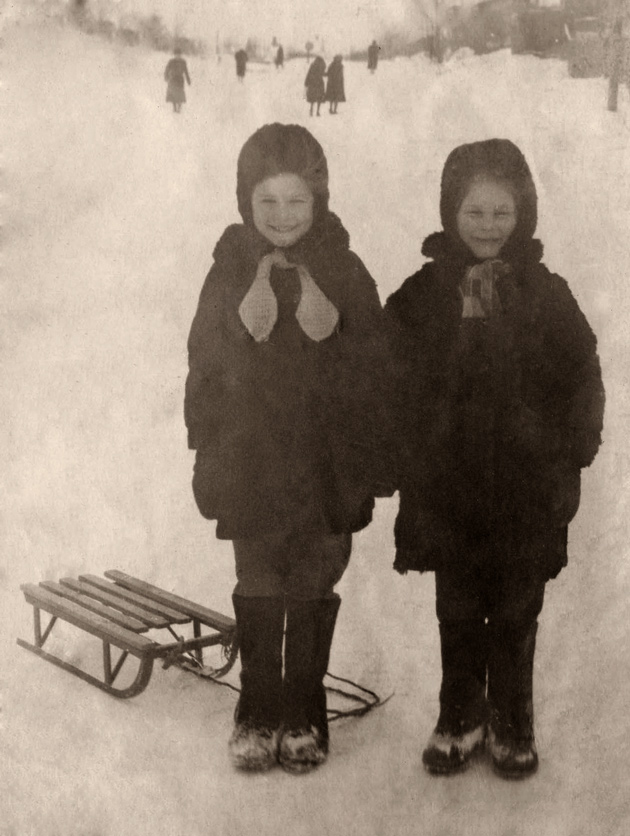
The principle of the Healing Brush is simple, as you will now see. First, let's get rid of the seam on the girls' fur coats. So select the main layer, set the desired brush diameter (slightly larger than the seam) and hold down the Alt key and without releasing click approximately in the place, as shown in the figure below:

Then release the Alt key and go over the seam:

As you understand, the repair brush uses the pixels of the selected area and mixes them with the pixels of the defective area. This and this tool have settings that you need to become familiar with. Click on the canvas with the right mouse button:
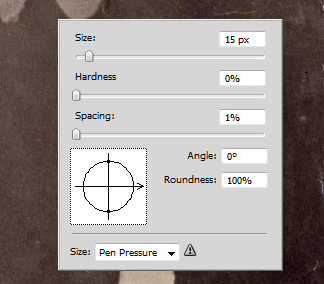
- Size - brush size
- Hardness - the hardness of the edges. The harder the edges, the sharper the blend border will be.
- Spacing - intervals. You can set brush intervals.
You can only fix the defect on the sled using the Stamp tool:

This tool works in a similar way, with the only difference being that it doesn't blend pixels. To eliminate the seam, use Alt to select the "suitable area" and then paint over the seam with it:

As you can see, using this tool it is convenient to eliminate defects on the clear edges of objects. Thanks to the above methods, get rid of all defects:
Step 3
Now it remains to make the photo a little clearer. To do this, make a duplicate of the main layer (Ctrl + J) and select Filter - Other - High Pass:

In the filter settings, set the value so that only small contours are visible in the preview window:

Click OK. Change the blend mode of this layer to Overlay:

After that, you will notice how the picture has become clearer and more contrast:

This is how you can retouch a photo using simple tricks and tools.
Surely, many of you in your family albums have old photographs that bear the imprint of time - scuffs, tears, scratches, dirt, despite this, they are priceless, because they pass on the memory of the past to new generations. With the advent of new technologies and knowledge, people have learned how to restore time-worn pictures and return old photographs to their former attractiveness.
Today we will talk about retouching old photos in Photoshop. Retouching old photos is a bit laborious, however, the result should please you, because in Photoshop you can achieve almost complete restoration of a photo to its original state, and perhaps even improve the photo source.
I found on the Internet an old photo with visible defects, which I will try to restore with the help of retouching in Photoshop.
Getting Started
Open the photo - Ctrl + O.
To begin with, we analyze the image: the photo has large scratches, abrasions, fragments of the background are missing, there is also small debris and noise that appeared when the photo was scanned, the corners are torn off or erased.
We define the tasks that we face:
- framing
- Removal of large defects, restoration of parts of the image
- Color correction
- Clarity enhancement
framing
If there are no fragments in the photo that do not carry a semantic load and do not participate in the composition, which can be easily sacrificed, such as: pieces of a uniform background, trees, draperies, etc. we just crop them to save time and effort.
In my case, the corners of the photo are torn off on both sides, I decided to get rid of part of the background so as not to complete the image in places where there are no semantic elements.
Take the Crop Tool (Frame / Crop), frame the area that we want to leave, cut off the rest. Elements that will be cropped will be darkened, adjust the size of the frame until you are happy with the result.

You may not need to crop the image in your case, crop the edges only if necessary.
Getting rid of small debris and scratches
Go to the layers palette - F7, copy the layer - Ctrl + J, so as not to affect the original by editing and be able to later compare the source with the result obtained after retouching.
Go to the menu Filter – Noise – Dust and Scratches (Filter – Noise – Dust and scratches).

We set the values by eye, so as to hide minor defects. I set the "radius" to 12 and "isohelium" to 10. Uncheck the Preview box to compare the future effect of the filter and the source. To apply the filter, click OK.

Apply a mask to the layer. To do this, click on the mask icon at the bottom of the layers palette. A white mask will appear next to the layer thumbnail, and the foreground and background colors at the bottom of the tool palette will change to black and white.

Take the tool Brush tool (Brush). The principle of working with a mask is that you can quickly hide some fragments of the image and also quickly restore them if necessary.
With black we erase parts of the image, with white - on the contrary, we return everything that was erased if necessary.
Select black color, I took a standard round brush with soft edges. We erase parts of the blurry image on significant parts of the photo: faces, folds of clothes, borders of large elements that should remain clear. If we erased the excess, we switch between colors and restore parts of the image with white.
Here's what I ended up with at this stage:

We got rid of minor defects, now we move on to large scratches and missing fragments. Let's use for this tools Healing Brush Tool (J) (Healing brush), Clone Stamp Tool (S) (Clone stamp) and Path Tool (J) (Patch).
Removal of large defects
Make a duplicate of the layer Ctrl + J, apply a mask - right-click on the layer and click "Apply Layer Mask".

We go to the initial source layer, make a copy of it - Ctrl + J, move it under the copy of the layer with the mask, which we created a step earlier (now this layer will be the penultimate one). Select the top layer, press Ctrl + E to merge the copy of the layer with the mask with the bottom layer - a copy of the source.
Select the Healing Brush Tool (Healing brush). The tool copies a sample of a user-specified fragment of an image and superimposes it on another part of the image, taking into account the content of the substrate, thus imperceptibly merging different fragments with each other. The Clone Stamp Tool works in a similar way, with one difference: it does not take into account the content of the bottom layer when overlaying fragments one on another.
Take samples of the whole background around the scratches with the Alt key, fill in large scratches with these fragments. Take a sample for each scratch, as different areas are lit differently.

In areas where large fragments of the photo are missing, use the Healing Brush along with the Clone Stamp Tool. Using a clone stamp, copy the nearby entire area of the image - Alt, and fill in the missing fragment with this piece, then go through the Healing Brush Tool to smooth the edges and uniform the background.
Instead of a healing brush, you can use the patch Path Tool (J), it works on the same principle as the Healing Brush Tool. When working with a patch, you pre-outline the area that needs to be retouched, and then, holding down the left mouse button, see which part of the image to use as a patch by moving the mouse over the image. After you release the mouse, the fragment is filled with the selected area of the background.
In difficult places, where special clarity is needed and border pixels should not be allowed to mix, make a selection using the Lasso Tool (L) (Lasso) or Polygonal Lasso Tool (Polygonal lasso), and then use the healing brush within the selection.

I removed cracks and major defects, let's see what happened:

Some places in the photo became blurry and lost their character, the folds break off in some places and do not continue. Now we will try to fully restore the background and unstick the characters from the background.
To restore the broken folds, I used the Path Tool (J), simply dragging the folds from one place to another.

I copied the lost elements of clothing from one person, transformed Ctrl + T and pasted to another person.

To sharpen the image and lift objects from the background, try to achieve edge contrast of important elements. I added some dark background around the people in some places with a selection and a combination of a Healing Brush with a Clone Stamp to increase edge contrast and create depth.
I also created a selection with the Polygonal Lasso Tool and filled it with the Paint Bucket Tool with a dark color on a new layer to enhance the difference between the silhouettes of the people and the background.

To smooth out the hard edges, I made a Gaussian blur with a radius of 25px. Filter- Blur - Gaussian blur.

Change the layer blending mode to “Multiply” (Multiply), Opacity (Opacity) of the layer is reduced to 30%. We process the rough places of the blurred layer with an eraser with soft edges.

Make a copy of all layers on a new layer - Ctrl + Shift + Alt + E. Let's move on to color correction.
Color correction
I desaturated the image to get rid of extraneous color elements and type the color again - Ctrl + Shift + U.
Add contrast to the image Image – Adjustments- Brightness / Contrast (Image – Correction – Brightness / Contrast). I increased the contrast to +50.

Return the color - Image - Adjustments - Hue / Saturation. Put a tick in front of "Colorize" (Toning). We make settings to your liking. In the top line, select a color, in the second, its degree of saturation.

I also decided to tweak the levels - Ctrl + L, to achieve even greater contrast. Move the sliders and experimentally come to the desired result.

Sharpening
How to improve image clarity is a matter of taste. Some people use sharpness filters, but I love and always use another standard filter - Paint Daubs (Oil painting).
Filter - Filter Gallery -Paint Daubs (Filter - Filter Gallery - Oil Painting). We put in both settings (brush size and sharpness) ones.

Usually a single filter application is enough to sharpen the image, but in my case I used the filter several times. To repeat the filter action used in the previous operation, press Ctrl+F.
Everything is ready, you can select all editable layers in the palette by holding down the Shift key and clicking on the outermost layers (the first one from the top and the penultimate one). Press Ctrl+G to merge the selected layers into a group. Now you can disable/enable the visibility of the layer group by clicking on the eye icon to compare the result with the original.

My result:

In this tutorial, we looked at how to retouch old photos in Photoshop. I hope you learned something new for yourself from the lesson.


