How to glue sliders on nails
What modern lady does not dream of a long beautiful manicure? The work of the whole industry is aimed at achieving the desired, and new fashion trends appear in nail art. These include the slider design, which involves the artistic images being applied to the nails with a sticker. Its special composition fixes the picture for a long time, and some transfer techniques make it easy to make fashionable nail art at home. Learn how to stick sliders on your nails.
What are nail sliders, and what types are there
The term "slider" is borrowed from English, in translation this concept means "slide" or "slide". Before applying the finished design drawing to the prepared nail plate, the picture with the image must be moved from the base. If you are concerned, you will need to study the issue in more detail. With seeming simplicity, it will not be easy to make a fashionable manicure with your own hands.
To decorate your nails with a sticker, choose from three types. Modern application techniques are divided depending on the type of sliders, which can:
- cover the entire nail;
- have a transparent base;
- have a dense pattern.
Full nail sliders
These stickers are applied to the entire surface of the nail. The decorative image is fixed due to the snug fit of the base to the base coat and thanks to the transparent varnish over the slider. The application technique does not limit the use of any, and the “translator” will last longer than in other cases. When choosing this slider design, upon completion of the manicure procedure, the surface of the nail will be completely covered with a decorative image.
On a transparent basis

Sliders with a transparent film base look spectacular under certain conditions. The clear backing limits the use cases as this type is not suitable for bright nail polishes, but only for the light or white ones it was originally designed for. But stickers on a transparent substrate help to create original compositions on any topic, which makes the manicure noticeable.
With a dense pattern
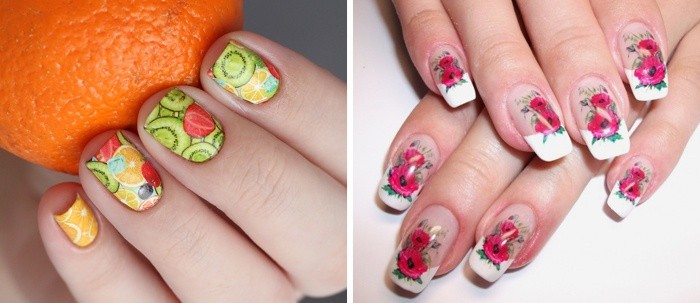
To use a slider with a dense base, it is necessary to carefully prepare the nail. The advantage of this type of stickers is the unlimited scope for experimentation, they are often used for French manicures and as a substitute for hand painting. The sticker will look equally good on light and bright shades of varnish. The combination with additional decorative elements in the form of sequins, rhinestones makes this type of slider so popular.
How to work with translation sliders: instructions
To apply the slider, it is necessary to make a base, which can be varnish, base coat, shellac, (gel, acrylic). Owners of natural nails can use the simplest technique, but if they are extended, it is important to take into account some of the nuances. You can easily make a fashionable manicure with your own hands using decals if you follow the steps in this instruction:
- The application technology will depend on the base, so first select the sticker, and then the shade of varnish.
- Before the main procedure, do a manicure to bring your nails and hands into perfect condition.
- To apply the slider at home, you must have on hand: tweezers or an orange stick, a pusher, a cotton swab, a transparent fixative varnish.
- Depending on the type of stickers and the desired pattern, cut out fragments to create a spectacular manicure.
- Before application, the slider is immersed in water for 40 seconds, and then carefully separated from the base.
- Place the drawing on the nail, leave it to dry completely and cover with a clear varnish.
How to apply sliders on regular polish
Applying a slider on a regular polish is an affordable technique even for beginners, it does not require much experience. The initial stage involves choosing a slider, preparing the nail and applying the base layer, which is the same for natural nails, as well as those coated with gel or acrylic. If you are taking your first steps in slider design, wait for the second coat of polish to dry before applying the sticker.
- To make the shade expressive, ordinary varnish, regardless of color, must be applied in stages in two layers.
- Take the sticker, using a stick or tweezers, apply it to the nail with the adhesive side.
- To fix the sticker, remove bumps and air bubbles, go over the surface of the nail with a cotton swab.
- To keep the slider tightly and not ruin the manicure, apply a transparent fixative varnish over the sticker.
Under gel polish
You can make a manicure with a decal for gel polish at home. The difference from the salon procedure will only be that the master has special tools and experience, which helps to complete the procedure faster. Otherwise, there are no obstacles. To, learn how to make a slider design for nails under gel polish according to this instruction:
- Carefully process the cuticle, remove the glossy layer with a file.
- Give the nail plate the desired shape, wipe the nail with a degreaser.
- Apply gel polish, dry it in a lamp, and then place the slider - all or a fragment - with the adhesive side. Wait for complete drying.
- At the finishing stage, it is recommended to apply a transparent layer of varnish on top, which will preserve the sticker and at the same time fix it even more tightly.
When building
If extensions are used first, there should be no difficulties with stickers either:
- After the manicure, when the nails are modeled, lightly walk over the surface with a pusher and brush off the dust.
- Complete the extension procedure by applying the finished drawing, but accuracy will be required here, since it is impossible to move the picture on the acrylic coating.
- When building up with gel, be sure to dry your nails in a lamp, so that you can then glue the finished picture on top.
- Otherwise, the application technique will be standard, and at the finish, you will need to fix the slider with a transparent varnish or top coat if it is a gel extension.
Why Sliders Can Peel or Peel Quickly
How to use a nail design slider so that it does not peel off or peel off quickly? There are two main reasons that lead to the appearance of such unpleasant phenomena: a violation of technology or poor-quality material. To avoid flaking, when applying the sticker, gently go over its surface with a cotton swab, leveling and removing bumps. It is better to glue the decal on the dried second layer of varnish.
Sliders flake off or peel off quickly when not covered with a top coat or clear polish. The durability of a decal is affected by the base film, elasticity, sticker thickness, and how well the base base is dried. The fulfillment of the last condition helps to securely fix the slider and eliminate the option when the picture starts to “creep”.
Video tutorials on applying a slider design on nails
Those who wish to master the technique of slider design do not even have to leave home. Informative master classes with professional recommendations, detailed instructions and illustrative examples are available in the video tutorial. With their help, you can learn: how to make a slider design for nails, which means foil manicure or slim, how difficult it is to apply iridescent pictures. Step-by-step mastering of the slider application technique and accessible explanations that will help you avoid common mistakes are the undeniable advantages of the video tutorials below.
How to cut the slider design exactly on the nail
For a flawless manicure, cut the slider exactly along the nail. How to stick a slider design on the entire nail, what tools do experienced nail art masters recommend using? You will receive answers to questions related to the technique of applying the slider exactly on the nail in the video below. With practical visual tips, you will quickly master the technique of slider design, learn how to cut pictures correctly.
How to make a slider design with water stickers
Water stickers help create no less spectacular manicure than duct tape sliders. On a light background, they look more advantageous, and due to the strength and ease of movement on the surface of the nail, the slider design with water stickers has become one of the most popular and favorite techniques among masters. Easy-to-use ultra-thin film is also preferred because it can stay on nails for up to three weeks. The video tutorial below will help you learn how to make a slider design using water stickers.


