How to draw neat snowflakes on nails
Every girl wants to be irresistible regardless of the season. In winter, when everything around is white and white, you just want to splash bright colors. The easiest way to do this is with a manicure. Reds, burgundies, purples, all shades of blue will look great on nails this time of year. Nail art is also popular. New Year, Christmas and Scandinavian motifs find fans every year. Most often, they prefer snowflakes on their nails. Because such a manicure is easy to perform, saves time and money. You can make it yourself.
Preparing for nail art
Before you draw snowflakes on your nails, you need to put them in order. Because even the most beautiful pattern will fade on sloppy nails. If necessary, we cut it, be sure to file each nail, making them the same length. Next, we polish the nail plate so that the varnish lies evenly. After that, you can start painting.
Traditionally, cold shades of blue, blue or white are used. In addition, 2015 is the year of the Blue Wood Goat, so these colors will no doubt be popular not only in winter.
What length of nails to prefer for manicure with snowflakes? Such a pattern will look advantageous both on long ones and on long ones. Therefore, everything here depends on the personal preferences of its owner. The main thing, as we noted above, is clean and well-groomed nails.
How to draw snowflakes on nails
Now that our nails are prepared and painted, we can start decorating them. There are many ways how to nails. For example, this can be done with a needle, a special brush, using a stencil, stickers or stamping. Let's talk about each of the options in more detail.
Needle drawing
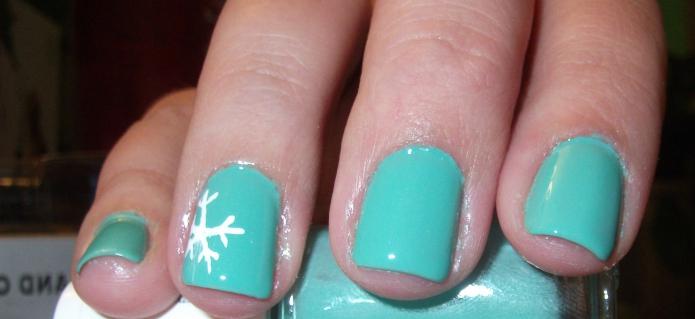
Of course, the easiest and most affordable way is drawing with a needle. If not, you can also take a toothpick. We dip the needle into the varnish and put a dot in the center of the nail. Now we draw a cross, on top of it another one - diagonally, similar to the letter "X". The snowflake is ready. Next, on each ray we make two parallel strokes. You can also put dots at the ends. If you connect them with wavy lines, you get a snowflake-spider web.
Drawing with gel pens
The easiest way to design nails is To work, you will need a fixer (or colorless varnish) and the most common gel pens for writing.
First, cover the nails with two layers of varnish and dry thoroughly. After we draw a snowflake. There are no restrictions: it all depends on your skills or imagination. Don't be afraid to ruin the drawing. If something doesn't work, wipe the nail with a damp cloth and start over. The finished drawing is dried and fixed.
Painting with a brush
Almost all manicure masters prefer to use a brush. It is much more convenient than drawing with a needle. Because with a brush you can draw lines of any thickness: wide, narrow. In addition, snowflakes on nails drawn in this way look more solid and artistic.
For work, we need: varnishes, a thin brush and acrylic paints - they dry faster and are more convenient to use. Of course, no one forbids the use of ordinary nail polish.
We paint the nails, dry thoroughly. For convenience, the paint is squeezed out of the tube onto the work surface. We take a brush, dip it in paint and draw.
Snowflake stencils
The most beautiful and complex in execution are openwork snowflakes on nails. It is almost impossible to draw them by hand because of the many small details. Therefore, it is much more convenient to purchase adhesive-based stencils. They are easy to use at home too.
First, carefully separate the snowflake from the adhesive base and fix it on the nail plate. We paint with varnish on top, wait for it to dry a little, and tear off the stencil with a sharp movement. Drawing a snowflake on the nails is ready!
Stamping with snowflakes
There are not only various patterns, but also types of stencils. So, they are not only on an adhesive basis, but also on special metal discs. This manicure technology is called stamping, which means “stamping” in English. The cost of a set is different: from several hundred to several thousand rubles. It depends on the brand of the manufacturer and its components. What does it include? Disks with stencils, a rubber stamp with which the pattern is transferred to the nails, a scraper and a special varnish.
How to draw snowflakes on nails with stamping? We take a disk with a painted snowflake and paint the pattern with varnish. Remove excess coating with a scraper. Next, we press the rubber stamp to the disk so that a snowflake is imprinted on it. The resulting pattern is transferred to the nail, strongly pressing on it with a stamp. The main thing is to do everything quickly and accurately. Such a manicure looks very professional, as if it was not done with your own hands, but in a salon. This is probably why stamping has become so popular.
Stickers for nails
This method is very simple and suitable for those who do not have time for a manicure. We tear off the sticker from the base and attach it to the nail, previously varnished. It should dry out, but not completely. Carefully spread the snowflake with a toothpick so that there are no bubbles and irregularities. Ready! Of course, this option has its downsides. You will have to try so that the sticker fits well on the nail. Buy stickers in reserve - come in handy!
Types of snowflakes
Many girls are wondering what to make snowflakes on their nails. Photos of manicure show that their size does not matter. Both large and small snowflakes look beautiful on nails.
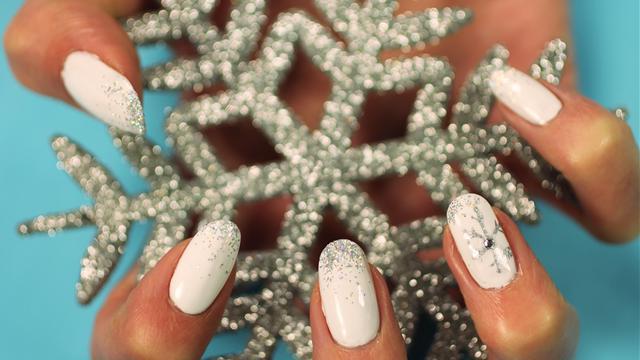
big snowflakes
You can draw one large snowflake on each nail. It will look spectacular, and your nails will definitely attract attention. Get creative. For example, focus on one nail by decorating it with a large snowflake.
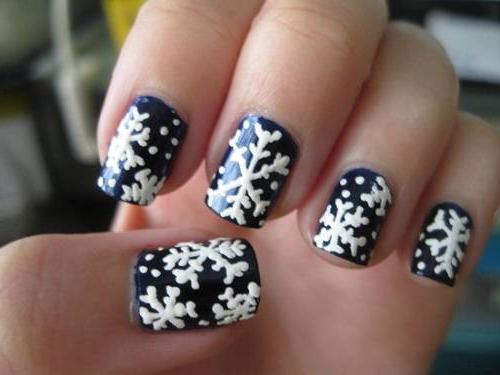
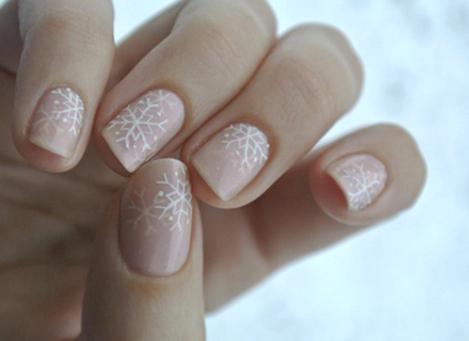
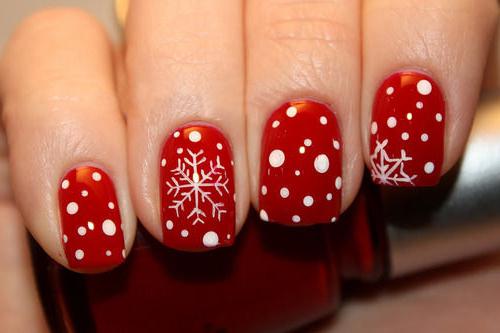
small snowflakes
Such a manicure looks neat, well-groomed and, of course, original! Draw a snowfall of tiny snowflakes on your nails - it will definitely not go unnoticed! You can add a pattern with dots and small strokes.

Half of a snowflake
A very interesting option for girls who want to stand out from the crowd. A half of a snowflake will look especially good on the side, at the base or on the free edge of the nail. You can try like this. Paint with varnish. Draw a white snowflake on only one finger - it will be very beautiful.
Snowflake at the end of the nail
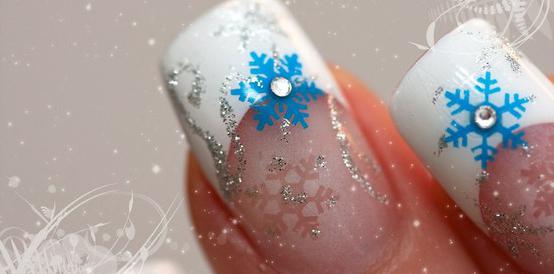
How to draw a snowflake on the nails to visually lengthen the fingers? Try to make a pattern on the free tip of the nail. The main thing is to use contrasting colors: black, blue, white. A very beautiful blue snowflake will look on a classic French manicure. You can also add rhinestones and sparkles.
Conclusion
We made sure that drawing snowflakes on nails at home is not difficult. The main thing is a little patience and accuracy. There are many options for every taste and budget: from needles to stamping. Do not be afraid to fantasize - create your own unique manicure. Make a picture of a snowflake on your nails for the New Year's party and you will become the queen of the holiday! Complement the image with iridescent rhinestones and sparkles - success is guaranteed to you! Happy New Year!


