How to apply gel polish at home: step by step photo + video
Modern nail polishes are super-resistant, but no matter how durable the varnish is, it cannot resist household chemicals and prolonged contact of fingers with water. Therefore, the creators of well-known brands of nail polish products have found an alternative to conventional nail polishes - these are gel polishes.
Most girls are worried that gel polish is difficult to apply and such a procedure can only be entrusted to the masters in the salon. However, they are wrong. Applying gel polish at home is quite possible and many girls are already doing this. Saving time and money in person! So today the site website will show how to apply gel polish yourself at home. Let's start with step by step instructions and tips.
To perform this procedure, you must purchase:
- Base coat for nails (Base coat);
- Gel polish of a certain color;
- Top coat. It is desirable that the base, color gel polish and top be of the same company;
- Lamp for drying gel polish. Suitable UV lamp (ultraviolet) or LED lamp. .
- Degreaser. If there is none, then it can be replaced with nail polish remover without acetone or ordinary alcohol;
- Primer (Ultrabond) acid-free. It is not necessary to use, just a degreaser is enough. Prolongs the wear of gel polish, improves the adhesion of the base to the nail. If your coating does not last as long as you would like, use an additional primer.
- Lint-free wipes(you can take a soft cloth). It is better not to use cotton pads, because the fibers from them stick to the nails and spoil the manicure;
- Manicure tools(nail file for shaping nails, grinding file or buff, pusher or orange stick;
- Nourishing cuticle oil. It is applied at the end of the manicure to soften the skin around the nails, giving the nails a well-groomed appearance.
Applying gel polish step by step
1 . First of all, you must treat your nails, that is, do a manicure. To give a smooth and uniform shape to the nails. Push back and remove the cuticle. If you are doing a nail bath, it is better to wait 1 hour before applying gel polish.
2 . Grinding file (buff) to polish nails in order for the gel polish to lay flat on the nail plate. It also enhances the adhesion of the base to the natural nail and prolongs the wear of the coating. The buff removes only the glossy shine from the nails, you should not press hard. Light movements on all surfaces of the nails, also do not forget about the end of the nail (free edge). After polishing, the nails should become matte.
3. Degrease nails. To do this, apply a degreaser / nail polish remover / alcohol solution on cotton pads and carefully wipe each nail until it squeaks. This step can be repeated 2 times. Also, to enhance the durability of the coating is used acid-free primer (Ultrabodn), applied in one layer. Now the nails are ready for applying the base.
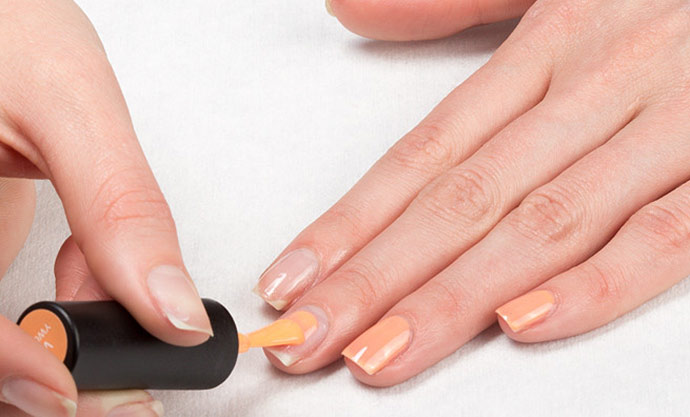
4. Apply a thin layer of base on nails. Take your time, the gel polish does not dry in the air and gives you time to apply everything evenly and accurately. Usually gel polish brushes are very convenient. Push a drop of base close to the cuticle, but make sure that the gel polish does not run onto the skin. We also coat the end of the nail with a thin layer (seal it).
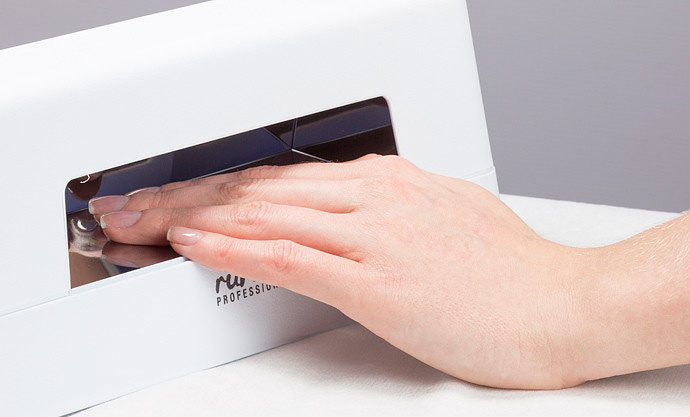
5. Dry nails in UV lamp (36W) for 2 minutes or LED lamp for 30 seconds. You need to be very careful with the nails covered with the base and do not touch them to any surface. Avoid getting dust, specks and hairs on your nails. If all these precautions are taken into account, then the color will fall perfectly on the nails. If the varnish gets on the skin of the fingers, then you need to carefully remove it with a cotton swab dipped in nail polish remover.
Read also:
6. On the dried base (carefully, it has a sticky layer!) Apply colored gel polish. The coating is applied in a thin layer. Do not worry if the gel polish lays down in stripes and shines through. Usually colored varnish is applied in 2-3 layers. But there are also colors that lie evenly and tightly in 1 layer.
7. Dry the color layer in the lamp. If necessary, apply another layer of color and dry again in the lamp (2 minutes in the UV and 30 seconds in the LED lamp).
8. Apply top. It is a protective layer that gives an amazing shine to the nails, and also protects the color coating. Thanks to the top coat, your nails will retain their beauty for a long time, despite long-term contact with water, cleaning, cooking and other external factors. By the way, the top is not only glossy, but also matte (Matte top coat) and is used in nail design.
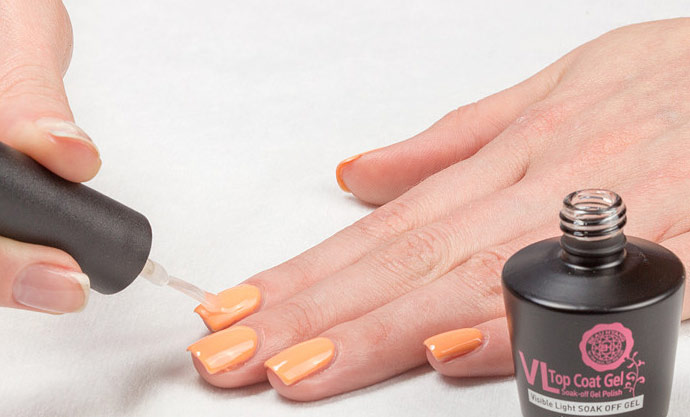
9. The top coat is applied in one layer and dried in a lamp.
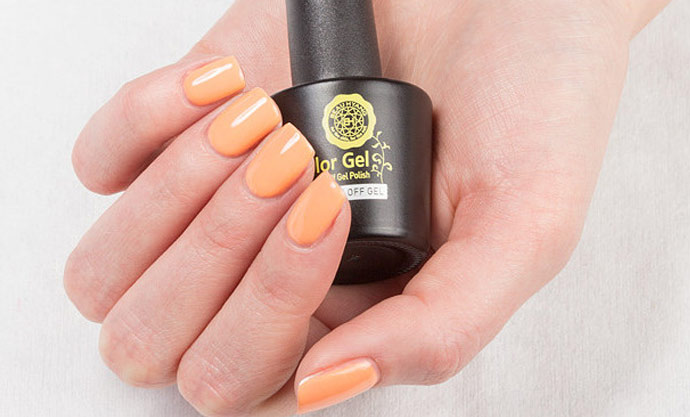
10. After drying the top, it is necessary to remove the sticky layer with a special solution. Soak a cotton pad in the degreaser/nail polish remover/alcohol solution and remove the tacky top coat from each nail in turn. Voila! Your nails will shine with new colors!
Admiring the beauty of your nails, you can not forget about the skin of your hands. Therefore, after removing the sticky layer, you need to coat the cuticles of each nail with nourishing oil. Rub them into the skin around the nail in a circular motion. Then, when the oil is completely absorbed, apply a nourishing cream to the skin of the hands and rub it into each hand with massage movements until completely absorbed.


