Manicure with ribbons, 4 step-by-step master classes
Ribbon manicure is one of the quickest and easiest ways to make your hands beautiful and stylish. Quite a few materials and efforts and on your nails a unique design, concise and trendy. We have prepared for you 4 ideas on how to use nail tapes with step-by-step execution schemes. Perhaps our photo selection will inspire you to repeat one of the patterns yourself or come up with your own nail design. In our article, you will find a little trick that allows you to make the perfect manicure.
What you need to create nail art with tape
To make a nail design with ribbons, you will need:
- Ribbons for nails. They come in different qualities and have a variety of shades, they can be matte, glossy and holographic, but they all have an adhesive layer on the back. The cost of the tape is from 30 rubles, you can buy it at any store with goods for nail design.
- Coatings. The simplest nail design with ribbons can be done with just 1 shade of varnish, for more complex options, choose 2-3 shades of coating.
- Top base and finish. These coatings will extend the life of your nail design and make it look neater.
- We recommend that you use a little trick: to ensure that your design always turns out flawless, you need a liquid manicure tape. It resembles ordinary nail polish, applied with a similar brush, but not on the nail, but on the skin around it. After that, the selected design is executed, for example, . When the nail art is completed, the liquid tape is removed from the skin with a film, and with it the errors of your work are removed. The price of this cover is about 500 rubles.
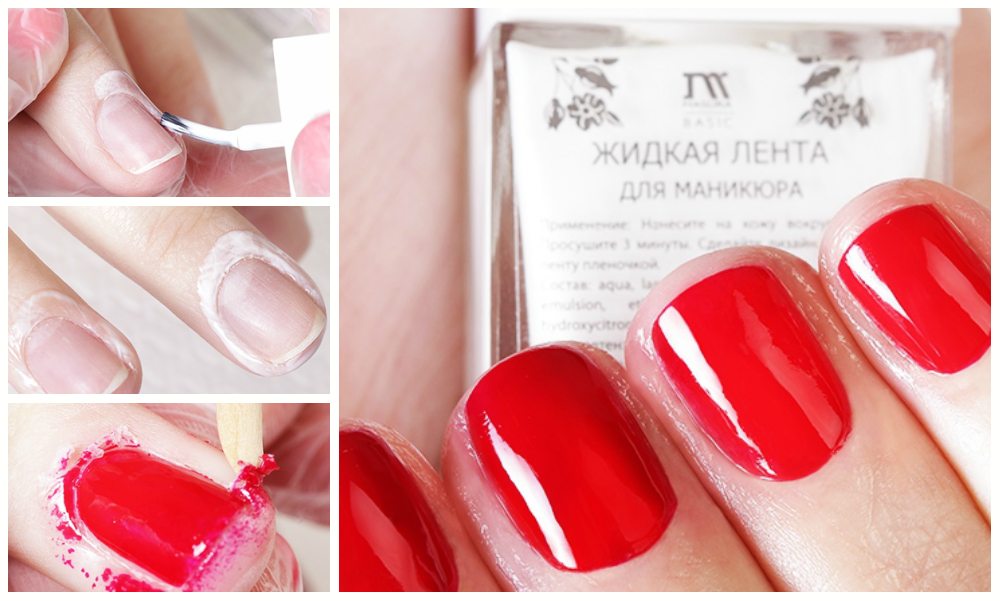
In addition, you will need tweezers to remove the tapes from the nails, an orange stick to securely fix and adjust them, and nail scissors to cut the pieces to the desired length. Armed with these materials and tools and having prepared your nails, having made a classic or unedged manicure, you can proceed to nail design.

How to create a manicure with ribbons
Nails with tape can be a harmonious addition to any image, the main thing is to choose the right design and shades of coatings and the tape itself. Each manicure with ribbons can be unique, it all depends on your imagination and preferences - you can use ribbons of the same color or several shades in the design, or you can use it as a stencil for perfect lines.
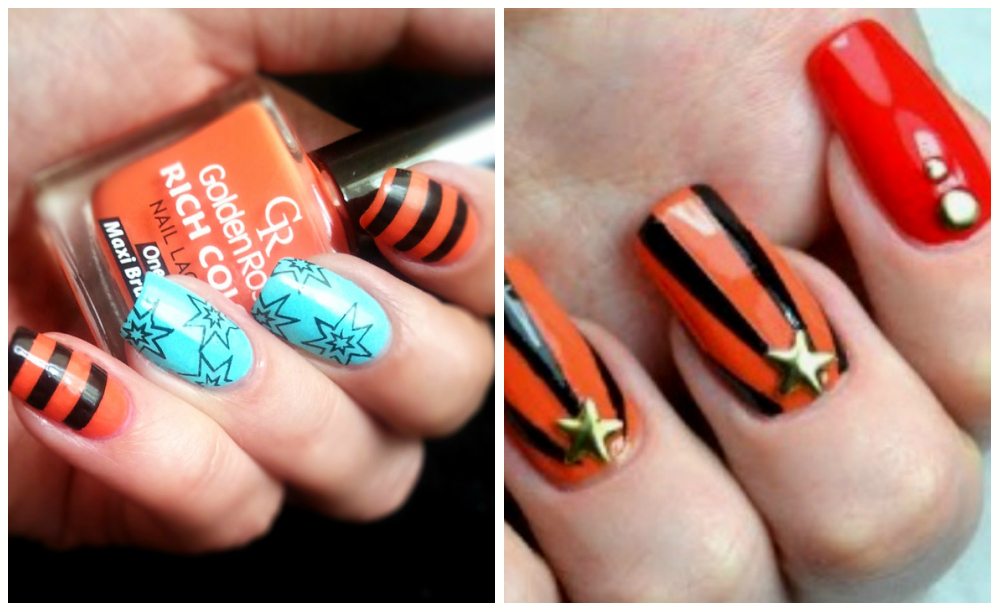
For example, using black and orange varnish and a ribbon, you can make a themed design for Victory Day - 10 minutes and you have a St. George ribbon on your nails.
With such a versatile material for manicure at hand, ideas will not run out for a long time, and you will always look your best. Let's look at the best ideas and their step-by-step instructions for execution.
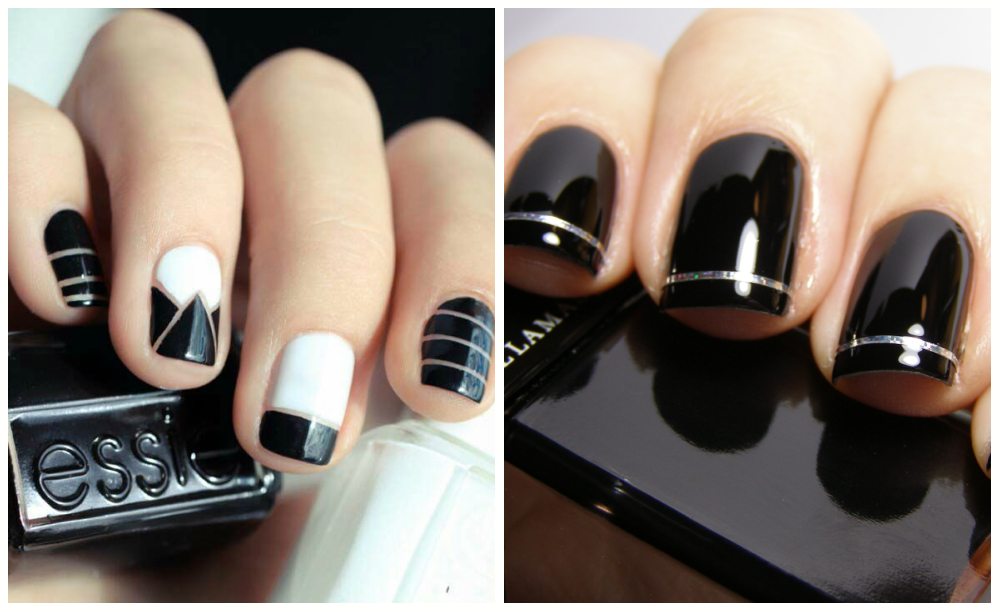
Option 1: Geometry on nails
Such a manicure with ribbons for design is performed using white varnish, ribbon for nails and 3-4 coatings of any color. Choose any varnishes to your taste, the main thing is that they are combined with each other and in harmony with your wardrobe. The step by step diagram looks like this:
- Cover the nail plates with white varnish in 2 layers and wait for it to dry completely.
- Take sticky tapes, cut them into small pieces and stick them as shown in the photo below. The nail should be divided into rectangles of different sizes.
- After that, the resulting rectangles must be painted over with multi-colored varnishes. Take 3-4 shades of coatings so that neighboring areas are of different colors.
- Without waiting for the varnish to dry completely, carefully remove the stencils.
- After complete drying, cover the nails with a layer of glossy finish.
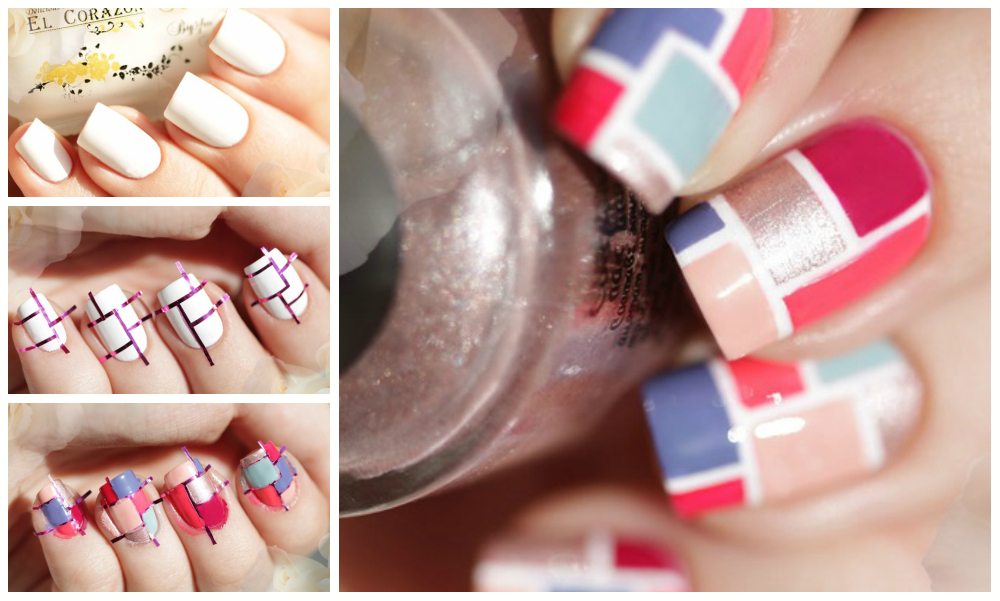
Today they look fashionable, and the design made with the help of such a manicure device will attract only admiring glances.
Option 2: Lunar French
Doesn't lose its popularity. Using adhesive stencils, you will quickly complete a beautiful nail design that is appropriate for both everyday wear and an evening look. Step by step instructions for you:
- Cover your nails with a layer of base coat and wait for it to dry.
- Place the strips on the nails as indicated in the diagram. The part of the nail near the cuticle (hole) should remain covered only with a colorless varnish.
- Apply the selected shade of varnish to the surface of the nail below the stencil.
- Apply a second coat.
- Use tweezers to remove the adhesive strips from the nails and wait for the coating to dry.
- Apply a top coat on top.
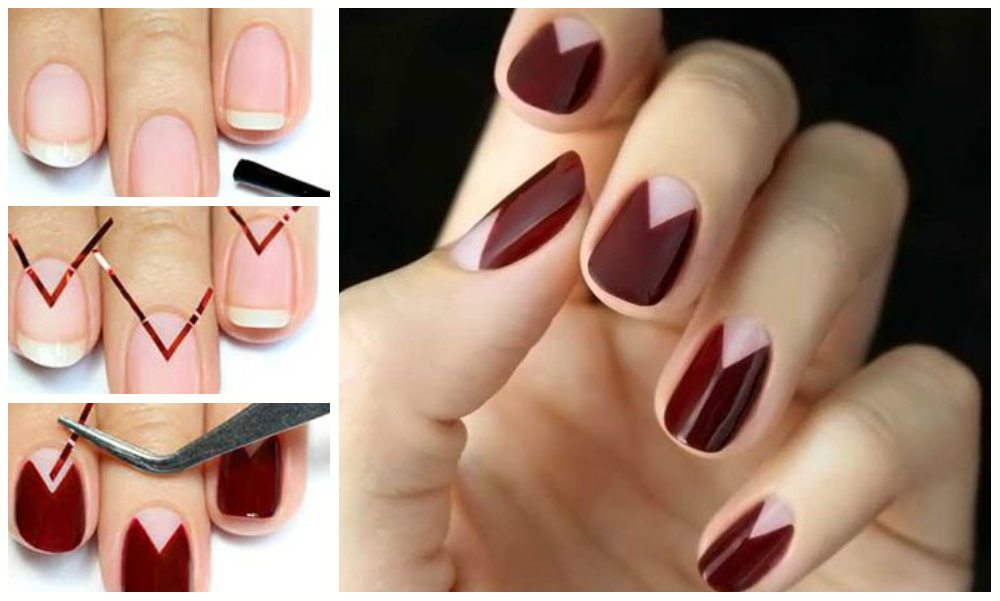
In this design option, it is important to choose a beautiful and self-sufficient shade of the coating. You can take the burgundy color fashionable this season as in the photo above, or you can give preference to any of your favorite colors.
Option 3: Neon Stripes
Neon nail art will be appreciated by bright and active girls, in whose wardrobe there are rich colors. You can choose any color combinations, we suggest you repeat the gray-yellow nail design. Each girl will be able to repeat this scheme with her own hands:
- Cover your nails with a base top.
- Take a neon yellow polish and apply it in 2 coats on the plates.
- Wait until the varnish is completely dry.
- Place stencils on all nails as in the photo or on some fingers in random order.
- Cover your nails with a layer of gray polish. After the first layer has dried, repeat the coating again.
- Until the varnish is completely dry, remove the stencils with tweezers.
- After drying, cover the nails with a layer of fixer.
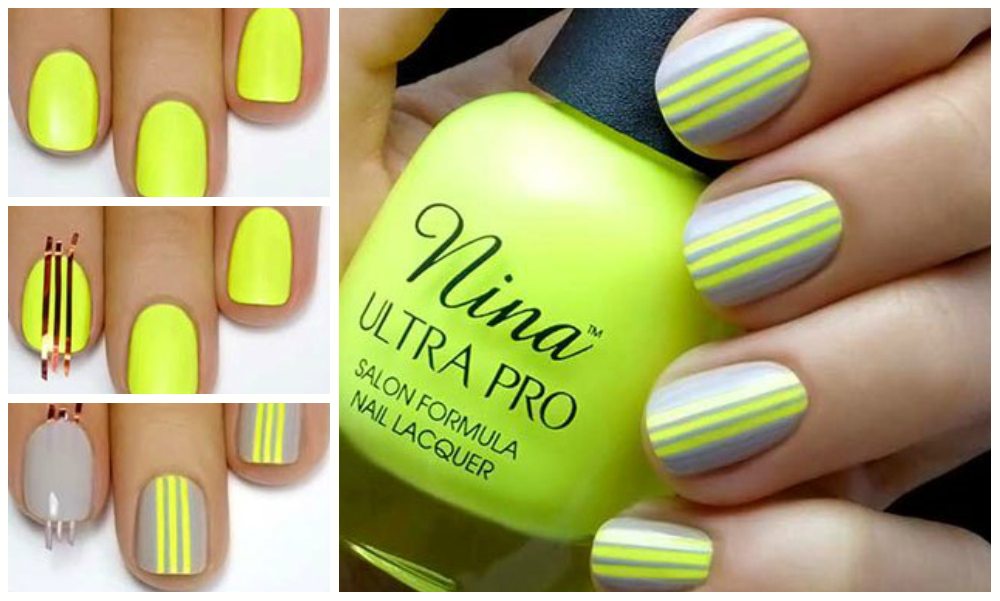
You can make such a manicure even more interesting if the top coat is matte and the stripes remain glossy.
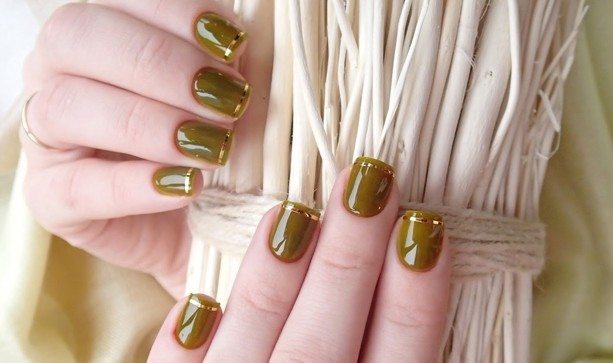
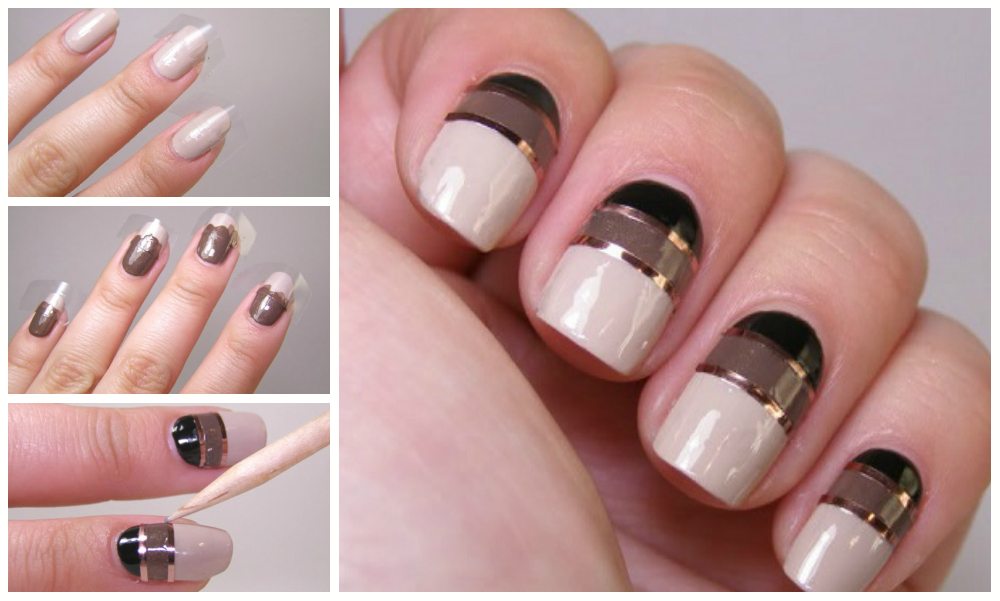
Option 4: Striped frappe
Lovers of pure shades will appreciate the combination of coffee, soft beige and dark brown. To repeat this design, you will need ordinary stationery tape, all other materials are the same as in the previous master classes. The scheme is this:
- We cover the nails with a layer of soft beige or milky varnish.
- We are waiting for drying.
- We place pieces of adhesive tape on the nails so that they close the halves of the plates from the tip.
- We cover the upper part of the plate with a coffee shade.
- We are waiting for it to dry completely.
- Repeat steps 3 and 4, but apply dark brown polish to the hole.
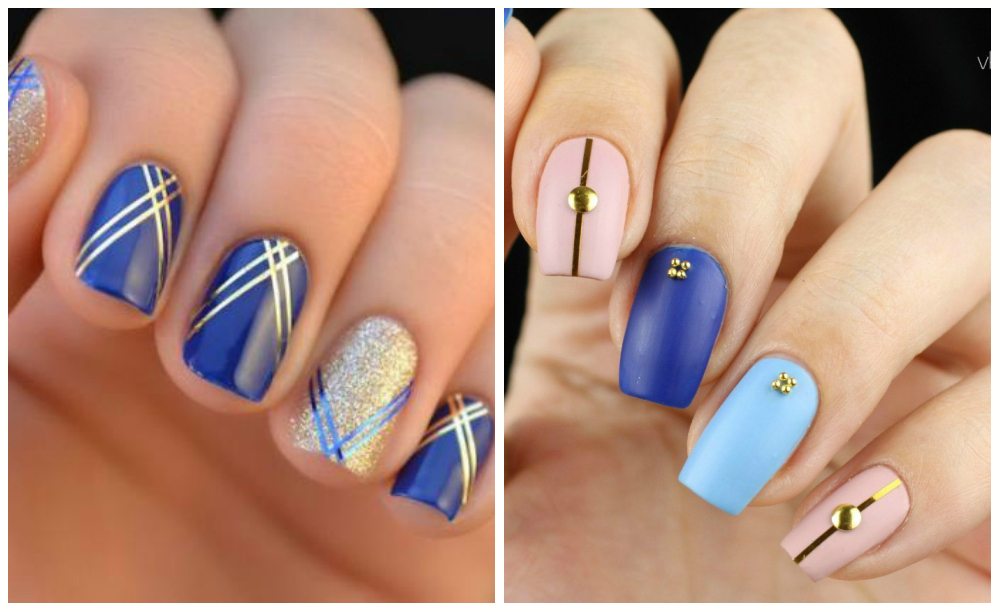
- Now cut the pieces of gold ribbon to the desired size and place them on the border of the flowers. With an orange stick, you can adjust the strips so that they are fixed securely.
- From above we cover the nails with a layer of finish. Ribbon nails are ready!
Of course, according to this scheme, you can perform a manicure with any other color combinations, but the shades of coffee with milk that are fashionable this season are worthy of your attention. We hope our lessons will help you decorate your pens and make neat nail art.


