How to properly apply gel polish at home. Step by step instructions
Shellac - gel and varnish in one vial that lasts 2-3 weeks. If you decide to work with such material, you need to know how to properly apply gel polish in stages. Violation of technology will lead to the fact that the varnish will quickly chip or lose its luster.
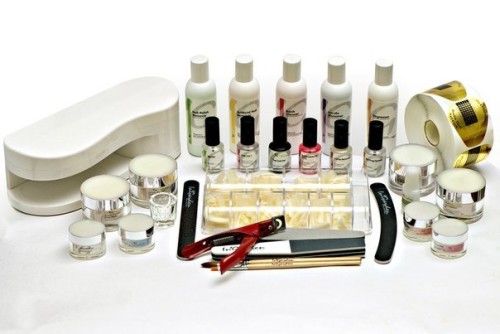
Necessary tools and materials
It is not at all necessary to go to a beauty salon and pay for the services of a master. You can quite correctly apply shellac at home. To do this, you need to work in stages and have the following:
- Manicure set.
- Orange sticks and sponges.
- Ultraviolet lamp.
- Grinder (buff).
- Disinfector, cuticle oil.
- Base (clear gel), color coat and finish gel.
- Various accessories: sequins, slider stickers, foil, stamping.
Many do not understand how to distinguish shellac from any other gel polish. CND has created a hybrid of varnish and gel, patenting the name "shellac". That's why there are many names: shellac (CND), color gel, color gel. Different companies, different names.
1st stage. Preparing nails
A competent master knows how the correct application of gel polish gradually affects the final result. If a mistake is made in the course of work, the coating begins to flake off and crack in the first days (hours). To make your hands pleasing to the eye with a magnificent manicure, do everything correctly and step by step. First, prepare your nails for applying the gel. For this:
- We give the nails the correct shape using a fine-grained file.
- Remove the keratin layer from the nail plate. You will need a coarse-grained grinder (buff). We need a matte nail, and for this, carefully remove the gloss. If hard processed, the plate will become thin and brittle.
- We move the cuticle with an orange stick and do a shallow manicure.

- Cover the treated nails with a bond (drier).
Now you can correctly and gradually apply layers of the gel.
2nd stage. We apply the base
It will be correct to put a layer of primer under the base. This is a special solution, which includes a fragment of nucleic acid. It will protect the nails from delamination, and the manicure will be like new for a long time. Now you need to apply the base.
The base is a transparent gel that firmly binds the natural structure (nail) and the colored gel. Apply base coat with a special brush. And do it right. We took a drop of gel and gently, without touching the skin, we make rubbing movements from the edge of the nail to the cuticle. And then in the opposite direction. Each layer should be thin. Dry the coating in a UV or LED lamp. You need to apply 1-2 coats of base coat.
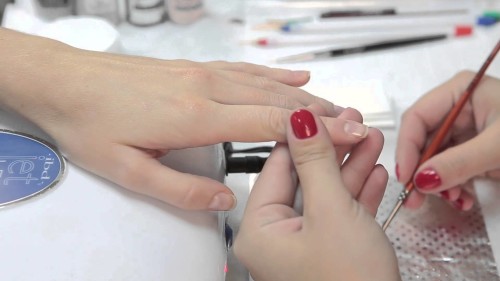
After the base has solidified, a dispersion layer is formed. Smooth it out gently with a dry brush. Then the color gel will lie evenly and correctly.
3rd stage. Apply color coating
Covering nails with a colored base is easy. If you have ever painted their houses with ordinary varnish, then you will apply shellac correctly. If you put shellac too thick, you will get waves and bubbles. Apply gel polish correctly, gradually and completely dry the previous layer. Just need to apply 1-3 layers. Pay special attention to the end (butt) of the nail. "Seal" it as carefully as possible.
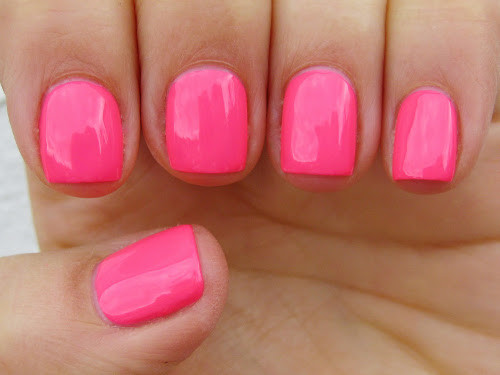
Remember to dry each layer in a lamp.
4th stage. Finish Gel
To fix the base coat and give the nails a beautiful shine, it is necessary to apply a top coat. Here it is already necessary to apply a layer denser than all the previous ones. And, as usual, we dry our nails in a special lamp.
We process the finished manicure with a disinfectant to remove the dispersion layer. The cuticle of the nails can be covered with a special oil.
Types of shellac coating
You can apply shellac correctly and in stages at home. But the beauty industry is constantly evolving, something new appears. Monochromatic matte manicure is boring. I would like to experiment. For example:
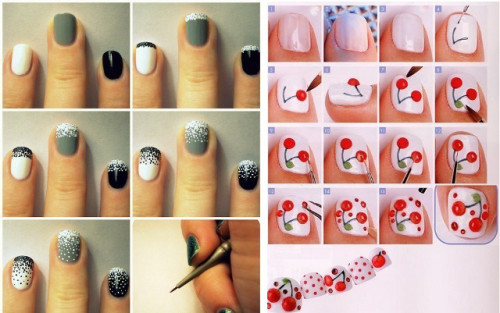
- Use accessories. Such as glitter, slider stickers, stamping, foil.
- Cover nails with Bluesky gel from the Cat's Eye collection.
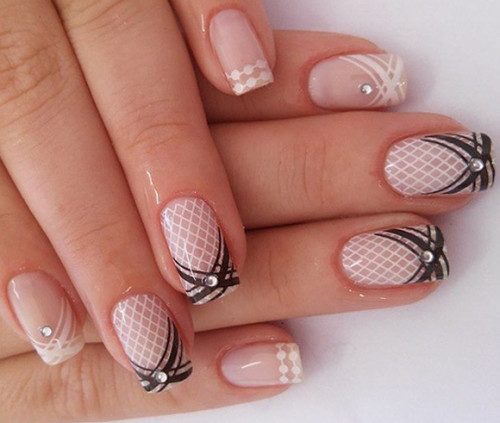
- Make French. And not simple, but colorful.
- Coat your nails with mirror gel polish.
At home, making such beauty will not work right away. But it's not that hard to learn.
Use of accessories
Having sequins for manicure at home, a couple of stencils and prof. foil, you can apply masterpieces on nails. Put glitter on top of the base color, and the manicure will look more original.
Water stickers (slider) or photo stickers are also very good. You need to apply them on the main color or base. Photo design is afraid of water, and slider stickers need to be wetted first. To keep the pattern on the nails, you need to apply a top coat on top.
Stamping is a modern trend in nail design. You can also perform this procedure at home. You will need:
- Metal plate with engraved designs.
- Stamp.
- Scraper.
Choose a pattern on the plate, cover it with varnish, and then remove the excess with a scraper. With a stamp, transfer the pattern to the nail. With the help of such a device, you can make the finest openwork drawings. Stamping is easy to use even for a beginner.
Foil is a real lifesaver. You can create a mirror design, or you can tear the foil and make original drawings. Or stick a picture slider on one nail.
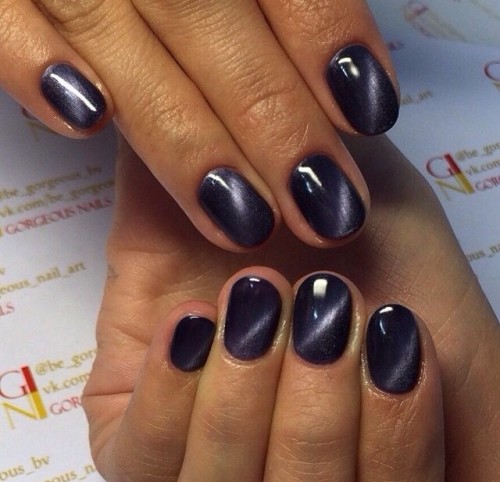
Cover nails with Bluesky shellac from the Cat's Eye collection
The Bluesky brand has released a series of color gels called "Cat's Eye". It contains special particles that are attracted by a magnet (included in the kit), and a pattern is formed that looks like a cat's eye stone.
You can apply "Bluesky" "Cat's Eye" at home. Proceed in stages: treated hands - covered with a base - you can apply Bluesky magnetic gel polish from the Cat's Eye series. And immediately bring the magnet very close to the nail for 5-10 seconds. Use it correctly. Do not hit the painted surface with the magnet. The metal particles that are part of the gel color will be attracted to the surface. Drawing "Cat's eye" is ready.
To further emphasize the beauty of Bluesky Cat's Eye polishes, use sparkles or a slider. Stamping will also be quite appropriate. Do not forget to do everything correctly and in stages. You also need to apply a finish gel.
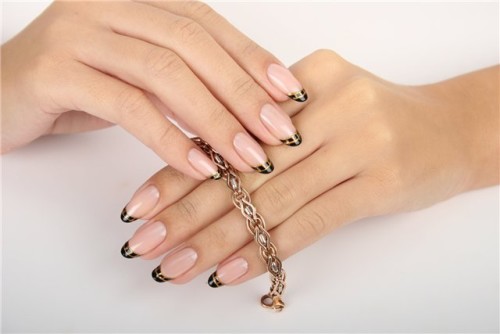
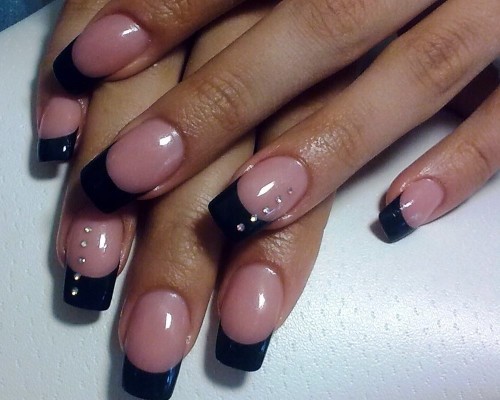
Make a french
French manicure (French) is very popular and, perhaps, will never go out of fashion. French looks great on any length of nails. To make such a manicure at home is quite simple. We perform correctly and step by step everything that we did before: preparing nails - base coat - applying the main color. Now you can apply the jacket.
Draw a smile line yourself or use stickers. We cover the tip of the nail plate with colored gel polish. Color options are only limited by your imagination.
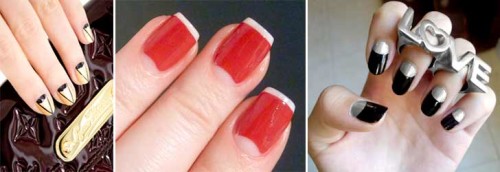
Girls more and more often began to make a "Hollywood jacket" with a sheen of metal color. Use foil to create this effect. Carefully stick it on the tip of the nail. Remove the rest of the foil with a file. Cover the finished jacket with a finish gel.
Fashionistas should pay attention to the reverse (moon) jacket. The entire nail (including the butt) is covered with a dark-colored matte varnish, and the area near the cuticle remains transparent. Or painted over with a lighter shade. You can use foil instead of varnish.
French and stamping are perfectly combined with each other. Especially if you are doing a classic French manicure. Openwork stamping will look just gorgeous. You can also use glitter or slider stickers.
Mirror manicure
The Bluesky company has created a wonderful mirror gel polish. Stunning molten metal finish. Such a manicure can be done using foil, but Bluesky gels are much easier to use. To make a mirror manicure, you need to purchase a Bluesky metallic base, as well as a stained glass coating.
A metallic base coat is applied over a regular base coat, and then a stained glass coat is applied. If you cover the Bluesky mirror varnish immediately with a top coat, without a stained glass layer, then the entire effect of molten metal will disappear.
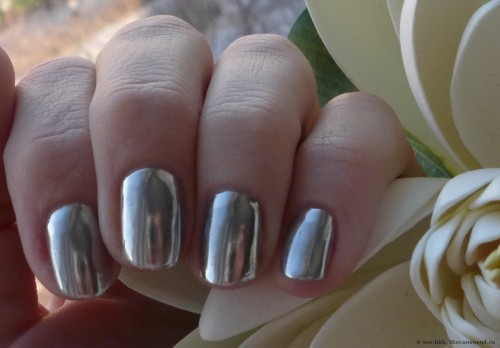
Accentuate the mirrored design with glitter or sticker sliders. You can combine the use of Bluesky varnishes and stamping. Or use foil as an addition.
Single phase gel polishes
You can do without a base and a fixer if you apply a single-phase gel. It is enough to remove the matte layer from the plate with a buff and you can immediately apply a single-phase gel. It just flows down to the cuticles, and you need to work quickly enough. Otherwise, irregularities and air bubbles will form. If you are a novice and you decide to try a single-phase manicure, ask the client to keep her fingers down. So the gel will lie more evenly. It is necessary to apply a single-phase gel in 2-3 layers and gradually dry them in a lamp.
Single-phase varnish goes well with accessories. But if you used glitter or slider stickers, cover your nails with a top coat or colorless polish. Otherwise, all beauty will peel off.
Undoubtedly, a single-phase varnish can be applied much faster than shellac. But is it right to cover the nails immediately with gel polish or is it better to apply the base? Everyone decides for himself.


