Photo retouching: saving old photos. Professional restoration Restoration of black and white photos
This tutorial is about restoring an old torn photo. Restoring old family photos is something you can do for your relatives and make them cry, and of course it's a service you can earn. Let's see how a typical photo restoration process goes.
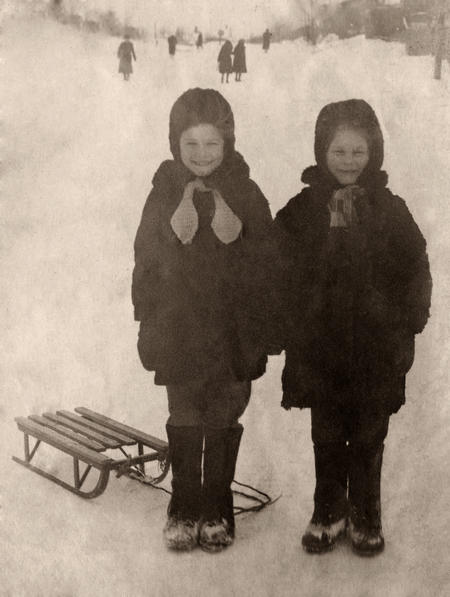
When choosing a photo for this tutorial, I ran into a lack of material that I could use publicly. The photo I'm using is a family photo, scanned and sent to me in terrible resolution. In the end, I decided that this kind of image would be suitable for my lesson. The end result shows that you can work with even poorly scanned images and get relatively good results.
Of course, because of this, the size of the print can be limited, but the most important thing in this tutorial is to guide you through all the steps of the workflow. There are a few important steps you can just keep in mind, but never be afraid to be creative and use your own solutions. Here are the steps:
1. Make a copy of the original;
2. Adjust the size of the image and crop the areas you won't be working with;
3. Repair damaged areas;
4. Get rid of noise or other unwanted patterns;
5. Adjust the light and shadow (in color photos you will also need to adjust the skin color);
6. Adjust brightness and contrast;
7. Sharpen up.
First step
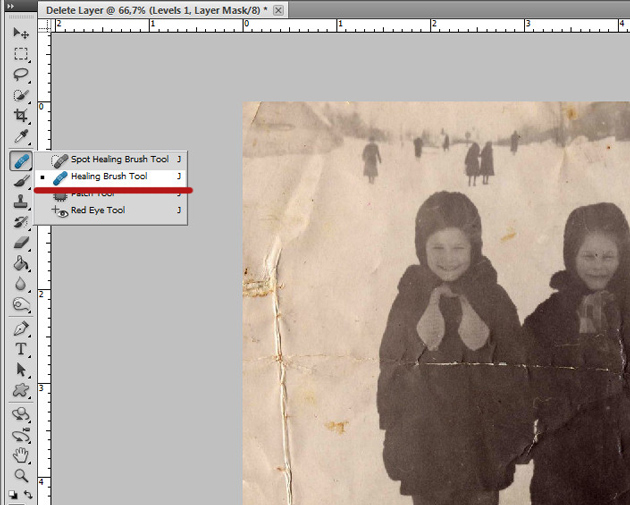
And finally, let's get to the lesson. In the first step, I already decided on the size and cropped the image. Then the recovery process begins. With photos like this one, I always start with the Patch tool and use it quite roughly and massively. Next, I refine the details with the Patch, Healing Brush, and Clone Stamp Tool. We will deal with this in more detail in the next step. 
Second step
The principle of operation of the "Patch" is similar to the principle of operation of the "Highlight Tool" (Marquee Tool). You select the area around the one you want to fix, then click in the center of your selection, hold down the mouse button, drag the selection to another area with similar problems, and release it. Make sure you align your selection before releasing it. Let's move on to the next step and align accordingly. 
Third step
See how the alignment is done in the shadow of the curtains in the background. Make all large areas in the image in this way. This tool does not always work correctly, but it saves time, and starting with it is a good way to start restoring a photo. 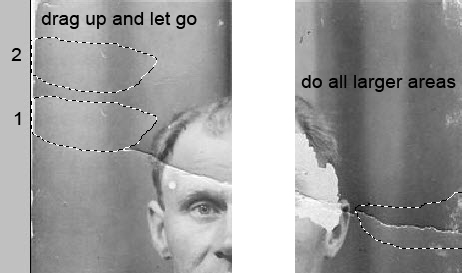
Fourth step
After you are done with all the large areas, switch to the Healing Brush (Healing Brush Tool, in the picture its use is marked in red), and the Clone Brush. Don't be afraid to experiment with these tools. If you want the restoration process to be efficient, then it would be a good idea to get the most out of these three tools.
Note that the Spot Healing Brush is a tool that you can use too, and as its name suggests, it interacts with dots. It works by simply clicking on the dots you want to remove, and I often use it in photos where there are a lot of dots that ruin the image. In general, the workflow should begin with this tool, and only then switch to the Healing Brush. However, in our case, this is not particularly necessary.
As you can see in the image below, I used a Clone Stamp on the borders of the image. The Healing Brush and Patch in this case can create some completely unnecessary artifacts. Just try it and you will understand what I mean. And again, switch between tools, experiment until you get the desired result.
Thirteenth step
Once all the main parts of the image are in place, I go back to the Clone Tool and use it to process any borders that need to be edited. I do all this on a separate layer, the retouch layer. To better control the process, you can lower the transparency of the clone tool. Just drag the area, process it, and don't lose sight of the Ctrl/Command + Z keys. 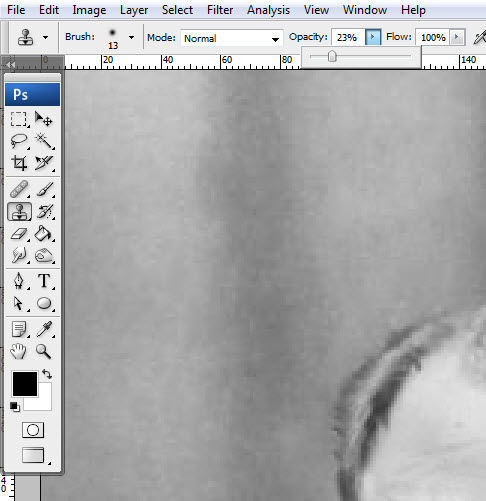
Fourteenth step
Often when retouching, you use different layers for different parts of the image. If you don't want to work with countless layers, just merge the layers when you're ready to stop retouching. I usually process small parts on different layers and glue them into one retouching layer, but never glue the base layers.
It's best not to glue the layers together unless you're sure you've done everything right. It's always good to be able to go back and redo something. 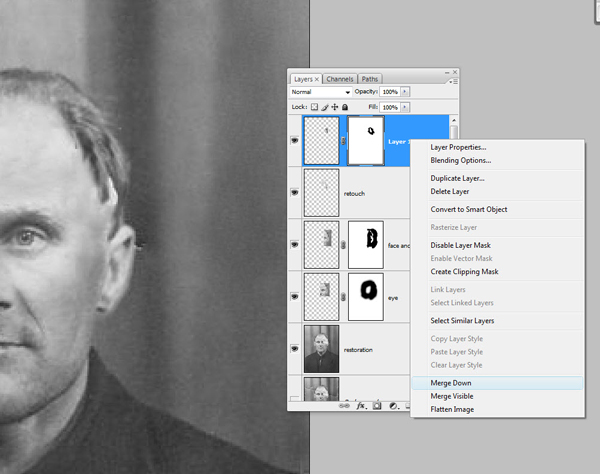
Fifteenth step
Restoration work can be considered completed. 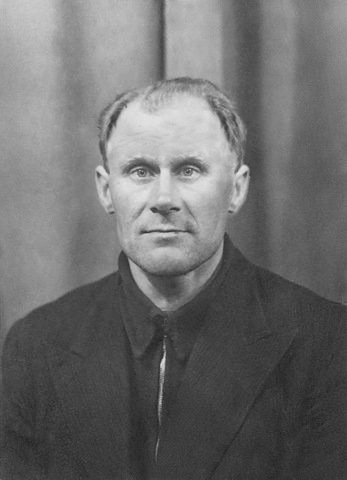
sixteenth step
The next thing I'll do is group the layers. Select all layers and press Ctrl/Command + G. Now I create a new layer with this group Ctrl/Command + Shift + Alt+E and name it Noise. We will use this layer for noise reduction. Before we start doing this, I would like to mention one thing that I may not have said at the very beginning.
As you can see in the screenshot, I left the original file on the background layer of my PSD file and turned it off. When working, it is convenient to store the source in a PSD file and start with the copy to layer command (Ctrl / Command + J). So we get the image with which we will work further.
Note: When you hold down Alt and click on the eye icon in front of a layer, you turn that layer on and turn off all the others. Good for a quick comparison. 
seventeenth step
Now we will try to reduce the noise level. There are many ways to deal with noise, but here I'm using the Reduce Noice filter from the Noice tab. In this tutorial, I overdid the noise reduction a bit, and if memory serves me, my strength values were 8 units, and something like 20 units for details.
I used another little trick - in the Advanced Dialoge, I maximized the detail and brightness of the blue channel. I also subjected the red channel to processing - I strengthened some details. This allows you to keep the original image without too much blur. This technique was suggested to me by Taz Tally and is just as good for removing scan defects or any other defects. 
Translation: © Lilis, Obscurantism, Vladimir Kotelnikov, Ready.
Everyone in the archive now has photographs of relatives who may even have passed away. And these photographs are perhaps the only memory that I would like to keep. Photos were rare back then (not like now!), and they are truly unique.
Knowing how to repair an old worn or torn photo can be useful to anyone.
The material is presented in the form of lessons, painted in steps and their results - restored photographs. This is mainly presented in three lessons: fixing color photos, retouching defects in black and white photos, and coloring black and white photos.
Of course, these are not strict instructions. Each photo is different and requires different tools, but I tried to put together the basic tools of Photoshop. They would allow a person who has started working with this program and already knows the main points, techniques and tools for work, to learn how to restore photographs and be useful.
Usually, when stored for a long time, photographic films and photographs deteriorate, fade, scratches appear, and if handled carelessly, they deteriorate. But all the same, we do not throw them away, since these are grains of memory, of the past. A person without a past cannot clearly see the future. Scanning (digitizing) allows you to increase their shelf life indefinitely, but restoration will help to bring the image quality closer to the original.
There are some important points that you should never forget. Since this process is creative - no one limits you to just using these steps - seek, try, explore. The list of these steps looks something like this:
1. To work, create a copy of the original image
2. Set the required resolution for the photo and crop it to the required size - so as not to waste time on those areas that you will have to crop later.
3. Retouch/Restore Image Areas
4. Remove noise from the image.
5. Align the areas of light and shadow (in color photos you will also need to restore the original skin color)
6. Correction of brightness and contrast of the image.
7. Sharpening
When working, remember that a person's face is not symmetrical. And you can not copy one eye instead of the other. And that these are not abstract people, but faces familiar to us.
But remember that this is not easy work for 5 minutes. This work requires precision, diligence, skill, knowledge and, most importantly, patience.
Part 1. Restoration and retouching of color photographs.
Often, color photographs are stored in albums, taken with a “soap box” and printed out a long time ago. Often these are photos of small sizes or immediately taken in bad lighting, maybe a little overexposed. Time passes, photos lose their attractiveness, change color, deteriorate. And, looking through these photos, I want to restore their former attractiveness or improve them.
In this tutorial, we will look at several examples of what can be done with an old color photograph.
So, first, you need to scan this photo.
Secondly, open it in Photoshop. Immediately create a duplicate of the layer, as in the process something may not work out and you can always start over. And also, having the original version of the photo, it is very interesting to compare the original with the received one.
1 example. Photo of familiar size 9 x 13 cm.
The photo is small and they would like to make it bigger
The photo was scanned. Opened in Photoshop. File - open.
Duplicate the layer in the layers window.
Leave the duplicate layer visible and hide the background by clicking on the eye in the layer window.
Now, to improve the color, let's use Curves: Image - Correction - Curves. A window will open with three pipettes. With the first eyedropper selected, click on the blackest color in the photo, the third eyedropper on the whitest color in the photo, and the middle eyedropper on the gray color. Click Yes.
Colors are brighter and images are better.
But that's not all. There are small white spots left on the hair, which can be removed using the Spot Healing Brush tool. This tool allows you to replace the area you click on with an adjacent close color. To do this, select this tool and select the desired brush diameter, which is slightly larger than the small dots on the hair and click on them with the left mouse button. You can also correct minor irregularities in the skin and clothing. Now the photo is a bit cleaner.
The photo contains a lot of wasted space around the edges. You can remake it into a vertical one by cutting off unnecessary parts. To do this, take the Crop tool. And select the desired part, then press Enter. Photos are cropped according to the selected fragment.
To create a truly portrait photo like in the studio, it would be good to replace the background. To do this, the existing background must be erased with the Eraser tool. You need to work carefully so as not to damage the main characters themselves. As you work, change the diameter of the eraser brush and its hardness on the additional panel.
Now you need to create a new layer for the background: Layer - New - Layer. And place it behind the photo layer. On it we will create a background using the Gradient tool.
Choose the gradient you like and fill the empty layer. You can also take any picture with a suitable landscape or another ready-made picture with a background and put it behind the photo layer.
We left the fill as a gradient.
So, here is the result.
2 example. Photo of the Zenit factory from the old days.
We found this photo on the Internet. On the site www. Uralsk.info. The photo has scratches and in general the quality of the photo is not very good. I would like to make it better.
Open the photo in Photoshop. Immediately create a duplicate layer.
Initially, we wanted to remove scratches. To do this, we will use two tools:
Stamp and patch.
The stamp allows you to draw on any area with another selected area. For example, there is a clear piece of the sky and the same one, but with a crack. First, select a tool, with the ALT key pressed, click on a clean piece, then without Alt on a piece with a crack. You will paint over the crack.
The Patch tool works like this. Select this tool, select the area with defects with it, then transfer it to a clean fragment. A fragment with a defect will be painted over with a clean piece, but in accordance with the tone (darker or lighter) as on the one that we are correcting.
Using alternately one or another tool, whichever is more convenient for you, we remove all scratches and cracks in the photo.
After that, you need to slightly adjust the colors in the photo. First, let's add contrast: Image - Correction - Brightness / Contrast. A window will open where we increase the contrast by about 45 points. Please note that you have checked the Use Legacy box. This makes the colors brighter.
Basically, that's it!
These photos have also been edited:
The photo faded over time and yellowed around the edges. Using Curves, Brightness/Contrast restored the colors. With the help of a stamp and a patch, the skin, background and hair were treated to remove small and not very spots.
The photo eventually lost its brightness and spots appeared. Using Curves, Brightness/Contrast improved the chromaticity of the photo. With the help of a stamp, irregularities were corrected and stains were removed. Also used the menu: Filter - Noise - Retouch. Then the photo became not so grainy.
Part 2. Restoration and retouching of black and white photographs.
Now black and white photographs are made only in studios and then on purpose. And if you dig into the old albums of our parents, grandparents, you can find a lot of such photos. And many are stored simply in packs, not in albums. Traces of time, cracks, spots, creases are very visible on them. Such photos are unique, there is nowhere else to take them and it is pleasant to restore the lost. Surely every family has such photos.
We wanted to show that they can be restored.
Example 1. Photo of the war years.
Rummaging through the albums of relatives, we found a photograph of the war years, quite spoiled by time. In addition, it is very small, about 10 x 8 cm. We scanned it. And we decided to fix it.
We first opened it in Photoshop. And we immediately created a duplicate of the layer so that we had something to compare with and so that, if it didn’t work out, we could quickly return to the beginning. Also, when working with black and white photos, we recommend periodically saving your work. And don't be afraid to create unnecessary duplicate layers. Here is a very long work and quite small. We work on a large scale, zooming in on the image. And we use tools with brushes of small diameters so that the work is more accurate.
After creating a duplicate layer, we tried to remove all spots from the photo using the Stamp and Patch tools, it takes a long time and a lot of the same actions. Get ready for your hand to get tired.
You don’t need to restore the edges of the photo too much, since it’s easier to crop them and then create a normal frame. We worked first with the background, then with the clothes, and then moved on to the faces.
After that, we decided to remove the yellowness from the photo. The colors here are not restored, as in color photos, but also change quite quickly with the help of Curves. We remind you: Image - Correction - Curves. The first pipette clicks on the blackest color, the third pipette clicks on the whitest. And with a medium pipette - on gray. Moreover, you will see the result immediately, and if it does not suit you, then you can immediately click in another place without leaving the window. If everything suits you, click "Yes". We also used the Filter - Noise - Retouch command to remove graininess in the photo.
The edges of our photo are quite jagged. So we cut them off. Select the center part of the photo with an oval selection. Selection - Invert. Then the edges will be selected. Press Delete on your keyboard. The edges will be removed. Only the oval with the center of the photo will remain. We darkened the areas of the background where it was too light with the help of the Burn tool.
So that the edges are not empty, we will create a frame. To do this, create a new layer. Layer - New - Layer. Place it below the photo layer and fill it with a radial black and white gradient.
And to make the photo more expressive, we select the eyes and sharpen them. Filter - Sharpness.
The background in the photo is too different. We have created a new layer. We took a regular black brush and painted over the layer. It's not scary if the desired part is painted over or we go beyond the edges. We are on another layer, then erased the excess with an eraser. Now apply Filter - Blur - Gaussian Blur.
So, our work on this is over. It's not ideal, but it's gotten much better.
Example 2
The photo was processed according to example 1. The principle of work is the same.
Part 3. Coloring black and white photos.
Example 1. Baby photo.
Sometimes you want to colorize a black and white photo. Of course, it is desirable that the photo be of good quality. Then the result will be better. 
The quality is ok, but it is better to trim the edges.
When coloring, you can ask the owner of the photo about the real old flowers that were there, but you can also act on the mind.
To begin with, we create a duplicate layer, after that we remove all the bumps, spots and scratches. And we align the colors of the original photo using the Image menu commands: Curves, Brightness / Contrast.
Now we need to start actually coloring. Here we will place each color on a new layer so that they do not interfere with each other and do not mix. Let's start with the face. Create a new layer. Name his face. The color can be taken either from another color photograph of a person or picked up in the color palette. So, take the Brush tool, at the bottom of the tool window, click on the main color. A window with a palette of shades will open, try to choose a color close to the skin color. Set the diameter of the brush that is convenient for you and paint over the face.
In the Layers window, change the blending mode to Saturation or Overlay or Chroma. Try with different options. We used Saturation. You can change the Opacity and Fill here (in the Layers window). Don't forget to erase the extra edges and color on the eyes with an eraser, they can't be skin color.
Play around with different options. Next, on a new layer, paint over the next section of the photo.
The collar was painted over, the blending mode in the layers window was set to Soft light. You can also go to Image - Adjustments - Hue/Saturation. A window will open where you can drag the sliders in the Hue and Saturation fields to achieve the desired hue.
On a new layer, paint over the coat with a reddish color, set the blending mode to Multiply. Use Saturation / Hue to select the desired hue.
On a new layer, paint over the scarf with a pinkish tint, set the blending mode to Linear dimmer. On the same layer, the mittens were painted over, since the parts of the photo do not interfere with each other.
On a new layer, paint over shoes and tights in one color. The blending mode is set to Overlay.
On a new layer, paint over the seat of the chair with green and the back of the chair with brown, set the blending mode to Overlay.
The background is painted over in blue, the blending mode is Overlay. Do not forget to erase the edges of the flowers with an eraser if they suddenly overlap each other, because because of this edge there can be completely unexpected shades.
The colors don't look very natural. To fix this, let's create an adjustment layer: Layer - New Adjustment Layer - Color Balance. This layer will be placed above all layers, so its operation will affect all layers and all colors.
Summary of our work. 
These photos are processed according to the same principle.
Old photographs help us to travel back to a time when there were no DSLRs, wide-angle lenses, and people were kinder, and the era was more romantic.
Such pictures most often have low contrast and faded colors, moreover, often, with careless handling, creases and other defects appear in the photo.
When restoring an old photograph, we face several tasks. The first is to get rid of defects. The second is to increase the contrast. The third is to enhance the clarity of details.
Source material for this lesson:

As you can see, all possible flaws are present in the picture.
In order to better see them all, you need to discolor the photo by pressing the key combination CTRL+SHIFT+U.
We will eliminate defects with two tools.
For small areas, use "Healing brush", and retouch large ones "Patch".

Choosing a tool "Healing Brush" and holding down the key ALT click on the area next to the defect that has a similar shade (in this case, brightness), and then transfer the resulting sample to the defect and click again. Thus, we eliminate all minor defects in the picture.

The work is quite painstaking, so be patient.

The patch works as follows: we circle the problem area with the cursor and drag the selection to the area where there are no defects.

We remove defects from the background with a patch.

As you can see, there is still quite a lot of noise and dirt left in the photo.
Create a copy of the top layer and go to the menu "Filter - Blur - Surface Blur".

Set up the filter approximately as in the screenshot. It is important to achieve the elimination of noise on the face and shirt.

Then we clamp ALT and click on the mask icon in the layers palette.


With this brush, carefully go over the face and collar of the hero's shirt.

If you need to eliminate minor defects in the background, then the best solution would be to completely replace it.
Create a layer print ( CTRL+SHIFT+ALT+E) and create a copy of the resulting layer.
Select the background with any tool (Pen, Lasso). For the best understanding of how to select and cut an object, be sure to. The information contained in it will allow you to easily separate the hero from the background, and I won't drag out the lesson.
So, select the background.

Then press SHIFT+F5 and choose a color.

Click everywhere OK and deselect ( CTRL+D).

Enhance image contrast and clarity
To increase the contrast, use an adjustment layer. "Levels".

In the layer settings window, drag the extreme sliders to the middle, achieving the desired effect. You can also play around with the middle slider.


We will increase the clarity of the image using a filter "Colour contrast".

Again create a print of all layers, create a copy of this layer and apply a filter. Set it up so that the main details appear and click OK.

Change the blend mode to "Overlap", then create a black mask for this layer (see above), take the same brush and go over the key areas of the image.

It remains only to crop and toned the photo.
Choosing a tool "Frame" and cut off unnecessary parts. When finished, press OK.


Restoring a photograph may seem like a time-consuming and sometimes impossible task. However, this is absolutely not the case, because Photoshop tools will help you easily restore even the most seemingly time-damaged picture.
In this material, you will learn how to apply correctives, learn how to work with such useful tools as Healing Brush Tool (Healing brush) and Clone Stamp Tool (Stamp), as well as understand the basic principles of old pictures. But before you start the lesson, you need to understand one simple fact - each photo always requires a different approach, because there is no specific restoration rule, but the methods and techniques described below can be applied to any damaged image. You just need to learn how to combine different techniques and then you can restore a snapshot of any damage complexity. Well, let's get started!
Step 1
Open the image in Photoshop. First you need to adjust the contrast, because the image looks too light. To do this, it is better to use an adjustment layer. Levels (Levels). Remember that for color correction, using adjustment layers is much preferable to using the Adjustments menu (Correction). The fact is that using a layer allows you to adjust the colors at any time. In addition to the flexibility of work, you can also remove the adjustment layer and thereby restore the original settings.
So apply adjustment layer Levels (Levels). To apply it, click on the icon Create new fill or adjustments Layer (Create a new adjustment layer), which is located in the palette Layers (Layers):


You will see a menu with level settings. By moving the right and left sliders, try to achieve the desired result:

Step 2
Now you need to get rid of seams, dust and dirt. To clean up such defects, you can use the Healing Brush Tool (Healing brush) (Hot key J):
The principle of the Healing Brush is simple, as you will now see. First, let's get rid of the seam on the girls' fur coats. So select the main layer, set the desired brush diameter (slightly larger than the seam) and hold down the Alt key and without releasing click approximately in the place, as shown in the figure below:

Then release the Alt key and go over the seam:

As you understand, the repair brush uses the pixels of the selected area and mixes them with the pixels of the defective area. This and this tool have settings that you need to become familiar with. Click on the canvas with the right mouse button:

- Size - brush size
- Hardness - the hardness of the edges. The harder the edges, the sharper the blend border will be.
- Spacing - intervals. You can set brush intervals.
You can only fix the defect on the sled using the Stamp tool:

This tool works in a similar way, with the only difference being that it doesn't blend pixels. To eliminate the seam, use Alt to select the "suitable area" and then paint over the seam with it:

As you can see, using this tool it is convenient to eliminate defects on the clear edges of objects. Thanks to the above methods, get rid of all defects:

Step 3
Now it remains to make the photo a little clearer. To do this, make a duplicate of the main layer (Ctrl + J) and select Filter - Other - High Pass:

In the filter settings, set the value so that only small contours are visible in the preview window:

Click OK. Change the blend mode of this layer to Overlay:

After that, you will notice how the picture has become clearer and more contrast:
This is how you can retouch a photo using simple tricks and tools.
Printed photographs are fragile reminders of important moments and events of the past. Often old photographs are in a single copy, so damage to the photograph can greatly sadden the owner. Paper has been exposed to moisture, water, sunlight and dust for years. Sometimes, if stored incorrectly, even new pictures can become inappropriate. Learn the basic ways to restore your photos, learn how to do them at home, and start storing your photos the right way to preserve memories for generations to come.
Steps
Digital restoration of minor damage
- Open a new tab with a photo that fits the entire window to see the changes.
-
Repair tears and missing fragments. If the photo has tears, cuts, or missing fragments, use the Stamp tool to recreate parts of the image and damaged areas. Select a tool and select the part of the photo where you want to copy or use information on a mouse click. Move the cursor to the area you want to restore using the copied material.
Print the image. After restoration, print the photo using an inkjet or special photo printer on glossy photo paper.
Fix the tears with acid-free adhesive tape. Fix a tear or repair a torn photo with acid-free tape. Ordinary tape or duct tape contains an acidic adhesive that can damage the photo over time. Purchase archival tape or tape with an acrylic adhesive compound from the office supply department or specialty store. Cut off small strips of tape and fix the tears on the back of the picture.
Use patch tape. A torn photo can be repaired with paper tape and acid-free glue. Patch tape is available at art supply stores or office supply stores. Apply a small amount of glue to a strip of paper and press down on the torn area on the back of the photo. Gather up any excess glue with a cotton swab. Leave the photo to dry face down on a towel and press down with a small book to keep the edges from fraying.
-
Create a humidification chamber for photos with warped edges. If old photos are wrapped or deformed around the edges, then a homemade humidification chamber will help solve the problem. The camera will allow you to saturate a dry, fragile photograph with moisture so that the paper at the edges opens and straightens.
- Type water at room temperature 5-7 centimeters high into a plastic container for storage. Place a wire rack in the container and make sure the top is not submerged. Place the photograph on top of the grille and cover the camera with the lid. Leave for a few hours. Periodically examine the photo and wipe off any drops of water on the paper. When the edges straighten out, remove the photo and leave to dry face up on a towel. Cover the photograph with blotting paper or parchment and press down with a book.
Use the correct equipment. To recover photos at home, you will need a quality scanner and image editing software for your computer. For example, you can purchase a photo editor like Photoshop and a scanner that allows you to scan photos in high resolution, which is measured in dots per square inch. The higher the resolution, the more detailed the scanned image will be. In most cases, a resolution of 300 dpi is recommended.
Scan a photo. Place your photo carefully in the scanner and choose to scan in high resolution to capture all the details of the photo. Subsequently, save the finished image as a TIFF instead of a JPEG. The TIFF format will increase the file size, but will provide high detail and image quality. Save the image and open it in a photo editor.
Crop the image. Use the appropriate tool to remove signs of damage from the edges of the photo. The edges of old photographs are often deformed by high humidity or contact with water. If the damage is located around the perimeter of the photo, then cropping will help to quickly solve the problem.
Remove scratches and traces of dust. The Dust and Scratches filter, or the Spot Healing Brush tool in Photoshop, or similar tools in other photo editors make the process of removing imperfections much easier. Zoom in on the image and remove the traces of damage with the mouse cursor. Take your time and zoom out periodically to control the result. The filter will also remove some details, so don't go overboard with this feature.


