PM shutter drawing. Download Makarov pistol detailed drawing with dimensions
The Makarov pistol
![]()
One of the first serial PM produced in 1949, distinctive features which are shaped frames, a protrusion on the right side of the trigger guard and stores with an oblique protrusion for turning off the bolt stop.

PM pistol manufactured in 1977
![]()
![]()
History of the creation of PM
The pistol, designed by Nikolai Fedorovich Makarov, was adopted into service to replace the TT, which did not meet the new army requirements for personal short-barreled weapons. During the Second World War, soldiers and officers of the Red Army gained extensive experience in the combat use of personal short-barreled weapons, both domestic and captured, of a variety of designs and manufacturers. The advantages, disadvantages and various features of most combat pistols of that time were identified. Including, clashes at short and extremely short distances, close battles in urban conditions showed the insufficient stopping effect of the bullet of the cartridge used in standard TT pistols, compared to the more effective 9 mm cartridges of the German Parabellums and Walters, as well as several significant shortcomings of the cartridge itself weapons. For example, the TT did not provide a sufficient degree of safety in handling due to the lack of a safety mechanism, in addition to the safety cocking of the hammer, which did not allow one to safely carry a pistol in full combat readiness at all times. The TT also had a fairly long length.
Its simple trigger mechanism worked only in single-action mode, while the best German captured pistols had a double-action trigger, which allowed the pistol to be safely carried with a cartridge previously chambered, and the owner of the weapon could instantly open fire. The need to develop and adopt a more advanced type of personal weapon that meets all the requirements of that time became obvious. And, in fact, officers preferred to go into battle not with a pistol, but with a much more effective submachine gun, using the service TT or captured Walter only when absolutely necessary, if the more effective weapon failed or simply ran out of cartridges. So, even during the war, it was decided to replace the Tokarev pistol with a modern model with higher combat and performance qualities. As a result, not only the requirements for personal weapons were revised, but also the overall concept of their use in active army.
The new pistol was supposed to have smaller dimensions and weight, a trigger mechanism that allowed opening fire without first cocking the hammer, a greater stopping effect of the bullet, greater safety in handling and high reliability in difficult operating conditions. An experimental Makarov pistol was developed at the Tula TsKB-14 (later renamed TsKIB SOO) under the designation TKB-429, which exactly met the above requirements. At the beginning of the search for the best option and the early stage of development work, Makarov designed two versions of his pistol. One was chambered for the 7.65mm Browning cartridge, which gave the advantage of smaller dimensions and weight of the weapon, the other was chambered for the more powerful domestic 9x18. The 9x18 cartridge was created by engineer Semin before the start of the war. Its prototype was the German 9mm Ultra, developed by the German company GECO, however, having the same sleeve length, these cartridges are not interchangeable, since the bullet diameter of the domestic cartridge is 9.2 mm. In terms of energy and bullet speed, the 9×18 (official designation 57-N-181) occupies a niche between the 9mm Short and 9mm Parabellum, having a greater stopping effect of the bullet than the first and at the same time the ability to be used in blowback weapons, in comparison with second. The new Russian 9 mm cartridge was shorter than the standard 7.62x25, with a lower muzzle velocity and bullet energy, and less penetrating effect. However, due to the larger caliber, it not only had no less stopping power than the more powerful 7.62 mm cartridge, but even surpassed it in this quality. As a result, the choice was made in favor of the more effective 9 mm cartridge.
Makarov worked day and night to create his pistol. According to the designer’s recollections: “Suffice it to say that at that time I worked every day, practically without days off, from eight o’clock in the morning until two or three o’clock in the morning, as a result of which I modified and shot samples two or even three times more than my competitors, which, of course, made it possible to perfect reliability and survivability.” By choosing an automatic operation scheme using recoil energy with a free shutter, the designer made the weapon small-sized, relatively light, very reliable in operation, easy to maintain and inexpensive to manufacture. In general, the general layout and design of the components and mechanisms of the weapon were based on the solutions used in the German Walther PP, but at the same time Makarov significantly improved them in several areas: simplification of both the design itself and the handling and maintenance of the pistol; multifunctionality of parts; increasing operational reliability in extreme conditions operation; increasing the strength of parts and service life; increasing manufacturability and the pace of mass production. The recoil spring is located around the barrel, making the pistol more compact and lighter than designs that place the recoil spring under the barrel.

Makarov managed to almost completely eliminate delays in firing caused by sticking the cartridge into the feed ramp. The designer managed to achieve an ideal relationship between the height of the upper cartridge, the geometry and inclination of the chamber bevel, the shutter-casing mirror and the ejector design. With the PM, the upper cartridge in the magazine is located very high, almost at the level of the chamber, as a result of which, with the other above-mentioned features, the cartridges are fed at a minimum angle and the risk of sticking is minimized. The same Walter PP is very “picky” about the shape of the bullet of the cartridges used due to the low location of the upper cartridge in relation to the chamber. The reliability of the PM thanks to this design has been proven not only in tests, but most importantly, in real combat operations - in Afghanistan, Chechnya, and other countries where local soldiers fought and continue to fight. The hammer-type, double-action trigger mechanism with automatic safety cocking has a much simpler and more technologically advanced design. Descent with warning. The trigger pull when shooting with a pre-cocked hammer in single action mode is 2 kg, and when shooting self-cocking - 4.5 kg. The trigger parts are much stronger, more durable, and the mechanism itself is easier to maintain than that used in the PP pistol. The bolt stop lever is located on the left side of the frame.
The design of the Makarov PM pistol
On the left surface of the bolt-casing there is a safety lever, which, when turned on, blocks the firing pin and safely releases the hammer. In the on position, the safety locks the sear and the bolt-casing, while the trigger does not touch the firing pin. The PM fuse is an original design, significantly different from the Walter PP system, and the only significant similarity is its location. Makarov designed a fuse that is turned off by moving the lever to the lower position, that is, by a natural movement of the thumb of the shooter’s hand holding the weapon, while Walter’s fuse is turned off by moving the lever up. Sighting devices consist of a fixed front sight, made as part of the bolt-casing, and a rear sight, fixed in a dovetail groove with the possibility of making lateral corrections. The magazine latch is located at the bottom of the handle. The gun consists of only 32 parts.
The PM has good accuracy for a compact pistol. When shooting at 25 meters with standard 57-N-181 cartridges, the dispersion radius of the R100 is 75 mm, and at 50 meters - 160 mm. At a distance of 10 meters, the dispersion radius is only 35 mm. It is necessary to separately note one of the design features of the PM - the multifunctionality of parts. For example, a double-leaf mainspring of complex shape, in addition to its direct and main purpose, also performs the function of a hammer release spring by bending its wide feather, and the lower end of the spring is a magazine latch. Some parts, especially the fuse, have a rather complex shape. But subsequently, a change in the production method made it possible to simplify and reduce the cost of the technological process. As a result, Nikolai Fedorovich created a pistol, which is an independent design with a number of original solutions, much more reliable, durable, simple and has a greater service life than the Walther PP taken as a basis.
F.V. pistols took part in the competitive tests. Tokareva, I.I. Rakova, P.V. Voevodina, S.A. Korovina, A.A. Klimova, GV. Sevryugin, S.G. Simanov and A.I. Lobanov, as well as foreign systems such as Walther PP, Mauser HSc, Sauer 38H, Beretta M1934 and FN Browning model 1910/22. The standard pistol was the standard TT. The most severe test was placing the pistols in a pit filled with a slurry of sand and water. In this case, Makarov’s sample demonstrated undoubted superiority in reliability. Pistol designed by N.F. Based on the results of tests in 1948, Makarov was recognized as the best, but it was recommended to make a number of changes to the design. After some modifications, the pistol was put into service under the designation PM (Makarov Pistol) in 1951. At the same time, after all the necessary work to improve and prepare for mass production, its production was launched at the Izhevsk Machine-Building Plant back in 1949.
It should be noted that in initial period production, in parallel, work was carried out to improve and adapt the design of the pistol for mass production and to develop the most suitable technology. The plant's designers and technologists did a great job. Identified defects were eliminated, such as short service life, rapid settling of the mainspring and other shortcomings. As a result, the original version of the PM pistol underwent a number of changes, both internal and external. Experience of combat use in the army and law enforcement agencies indicates the very high reliability and ease of use and maintenance of this weapon. Over time, shortcomings also emerged: a small stopping and penetrating effect of the bullet; small magazine capacity; a narrow handle, with a small angle of inclination like that of the TT - 102°, which does not provide full contact with the palm. Arrows with low level preparation or without regular training shooting with PM do not demonstrate high accuracy, since you need to get used to its handle and somewhat peculiar “grip”.
When shooting from a PM, especially when the bluing is erased, in side light the reflection on the front sight is perceived as the absence of its side part. As a result, the shooter turns the weapon in the direction of the light and the bullets fall away from the center. The presence of a manually controlled safety lever, which complicates the handling of the weapon, can also be considered a disadvantage of the weapon. However, at that time, the concept of personal short-barreled peacetime weapons dominated, that is, light, compact, convenient, possessing the necessary accuracy at short shooting distances and not burdensome for everyday wear. In the event of the outbreak of hostilities, personal weapons would no longer be very serious or significant on the battlefield. Therefore, the disadvantages of the Makarov pistol were not taken seriously into account, especially in comparison with its advantages.
The very first PMs were produced in Tula in a trial batch of 20 to 30 pieces. The numbers began with “TM”, followed by numbers and the year. After this, the production of Makarov pistols was moved to Izhevsk, where in 1949 a test batch of 5,000 copies was made, with numbers starting with “TM”. The frames of pistols of early production (1949 - 1953) are distinguished by a figured front part, and the trigger guard has a protrusion on the right side of the upper edge. The side protrusion of the trigger guard, when pulled down, opened access to the trigger, making it possible to remove it. In 1949, the pistol number was stamped on the rather wide front lower end of the bolt casing. In later versions, numbers were placed on the left side of the bolt casing and frame. Shutter lag at the bottom there was a switch lever, also called a tooth. After the last cartridge was used up, the bolt-casing was placed on the bolt stop, and at the moment the loaded magazine was attached, the lever (tooth) of the bolt stop, interacting with the inclined protrusion of the window on the left side of the magazine, released the bolt-casing, sending the cartridge into the chamber. In order to ensure greater safety in handling weapons, the lever that automatically turns off the bolt stop was subsequently abolished. Now, in order to release the bolt casing with the magazine removed or attached, you need to press the outer protrusion of the bolt stop. Such a reduction in the combat qualities of the weapon, increasing the reloading time, is, of course, a controversial decision, but justified by the practice of operation in the army. The rear wall of the base of the handle of the PM frame produced in 1949 has a flat surface and does not have a bracket for clamping the mainspring, which is held directly by the handle and screw. Since 1950, the shape of the rear surface of the base of the handle has been changed due to the fact that the fastening of the screw holding the mainspring and the cheeks of the handle was constantly weakening.
In 1950, production of the same shaped frames began, but with the base of the handle having a mount for the mainspring clamp bracket and the clamp itself. Pistols manufactured in 1949 were equipped with grip cheeks with a diamond-shaped cross notch on the back surface, the color of which could be either black or brown. Later ones have a smooth back surface, and only a red-brown color with various shades of it. From the second half of 1953, pistols with a modified trigger pull shape and reduced trigger free play began to be produced, as well as transitional models with a shaped frame, a bracket for clamping the mainspring, and a trigger guard that does not have a protrusion. In 1954, the configuration of the safety lever lever changed slightly. From the same year, production of a new type of frame began, with a thin front part, which is used to this day. In 1970, a reduced firing rate was adopted - from 5,000 to 2,500 rounds. In 1984, in order to ensure more convenient handling of the weapon, the number of notches on the left surface of the bolt casing was increased from ten to thirteen. Since 1988, the lever of the safety lever began to be manufactured using the method of casting in a mold and subsequent processing by milling. Around 1989 the quality of workmanship deteriorated. The shape of the bolt stop lever was gradually simplified. The hammer and trigger also began to be made using the same method. The shape of the front part of the trigger guard was changed, which in the 90s began to be made by casting. In 1993, production of pistols with a cast frame began.
One of the most important advantages of the pistol created by Nikolai Fedorovich Makarov is its reliability in the most difficult operating conditions. This quality has been proven not only in tests and during operation in the active army, but also in harsh combat conditions. The first major military conflict in which the PM took part, in more or less significant quantities, was Vietnam War. In the incredibly harsh conditions of war in the jungles of Southeast Asia, the Makarov pistol demonstrated excellent reliability. And then in Afghanistan, with minimal maintenance and sand, the PM worked flawlessly. In the First and Second Chechen Warriors, the Makarov pistol again proved its reliability, without letting the fighters down Russian Army And Internal Troops at the right moment, when the cartridges in the machine’s magazine ran out, or it was necessary to act in close combat. Former and current officers, veterans of the Afghan war and two Chechen companies, who had the opportunity to use their Makarov service pistol in battle, speak something like this: “In those conditions when both the pistol and your hands are all dirty, sometimes after a long absence of any care for weapons, I very much doubt that then some foreign pistol would not have failed, and the PM saved the lives of many of our soldiers.” Of course, when the chamber, the bolt-casing mirror, the grooves of the frame and the bolt-casing, and the ejector spring are heavily clogged with dirt, delays sometimes occur, but most of them are caused by careless handling of the weapon and other shortcomings due to the fault of the owner.
In the early 1990s, as a result of the collapse of the Soviet Union and a significant reduction in government orders for the army and law enforcement agencies, Izhmekh began producing export versions of the Makarov pistol for the civilian arms market. Such pistols were distinguished mainly by the presence of a rear sight adjustable in two planes and enlarged handle cheeks with protrusions under thumb. By the mid-1990s. new PM variants were presented: IZH-70 chambered for 9×18 cartridge with adjustable rear sight; The IJ70-17A (IZH-70-200), whose production began in 1994, uses the 9mm Short (9×17) cartridge, and its variants IZH-70-100 (chambered 9×18) and IZH-70-300 ( under 9×17) are distinguished by magazines with a capacity of 10 rounds; in 1995, a service version of the PM, created for security structures, was released under the designation IZH-71 chambered for the 9×17 cartridge, produced in various versions, differing in magazine capacity and sighting devices.
In accordance with the Weapons Law passed in 1997, which regulated the use of firearms private security organizations, Izhmekh launched the production of PM chambered for the 9x17 (9mm Short) cartridge, the bullet energy of which was 20% less than the standard 9x18 cartridge. Such weapons are classified as service weapons. One of the latest options The PM is Baikal-442, which is a sports and training modification of the Makarov pistol chambered for 9×18. The main differences between this weapon and its prototype are the trigger guard with a front protrusion, a wider handle with a protruding diamond-shaped notch on the front and handle cheeks with side protrusions for the shooter’s thumb. Double-row magazine with 10 or 12 rounds. The handle width is 34 mm. As a separate order, it is supplied with a push-button magazine latch located under the slide stop lever and can be equipped with laser pointer and a micrometric whole, adjustable in two planes.
In Russian federation civilians according to the Weapons Law, since the time of the Bolshevik revolution, they do not have the right to own short-barreled weapons, unlike many European countries and especially the United States, with civilized and democratic legislation, where Russian pistols are exported and ordinary citizens can buy them relatively freely or having a residence permit. As a result, for the domestic market, the manufacturer of Makarov pistols and its various variants was forced to develop the following products based on the combat PM: the MP-654K air pistol of 4.5 mm caliber; gas IZH-79-8 and MP-79 chambered for 8 mm cartridge; traumatic 9 mm pistols Izh-79-9T “Makarych” and MP-79-9TM, as well as MP-80-13T chambered for .45 Rubber. Not taking into account the pneumatic pistol for sports training shooting and gas models, which have proven to be extremely ineffective for self-defense, the most popular are traumatic products that shoot rubber balls.
PM has become widespread not only in the Warsaw Pact countries, but also in many friendly Soviet Union countries, and subsequently throughout the world. Wherever the Makarov pistol was used, its highest reliability and simplicity were noted, as a result of which this weapon became very popular even in the presence of a large selection of much more modern ones and samples from leading arms companies in Europe and the USA. Makarov pistols, in addition to the Soviet Army and law enforcement agencies, were in service and were manufactured under license in the GDR, Bulgaria, China and Dominican Republic. After the unification of Germany, the production of PM was launched by the famous German weapons manufacturer - Simson. Despite all its advantages, by the end of the 1980s the Makarov pistol did not meet the requirements for a personal short-barreled weapon. Due to the widespread use of personal armor protection (PIB) in the armies of most countries of the world and active terrorist organizations, the weapon had to use a powerful cartridge with high penetrating and stopping effect of the bullet, and have high firepower. In order to create a new, more effective pistol, design work was launched at the “Rook” competition.
A temporary measure to solve this problem was the PMM pistol (Modernized Makarov Pistol) chambered for the 9×18 PMM cartridge with a reinforced powder charge and a lightweight bullet with a steel core and a cone-shaped head. The pistol itself differs from the prototype in the simpler shape of the bolt-casing, enlarged grip cheeks with side protrusions for the thumb, as well as a larger-capacity magazine with a double-row arrangement of cartridges. Compared to the PM, the PMM pistol has higher combat qualities, which, however, are inferior to their Western counterparts. 9x18 PMM cartridges are not interchangeable with standard cartridges and cannot be used in weapons chambered for the 9x18 cartridge. Due to some confusion, problems arose with breakdowns of standard PMs. The PMM is not widely used, and the PYa pistol, which won the Rook competition, cannot yet replace the PM due to financial difficulties. As a result, at present the Makarov pistol still remains a service weapon in the army and police. However, no matter what, the Makarov pistol combines the best qualities of a compact personal short-barreled self-defense weapon. It is compact, very reliable, durable, safe, easy to use and maintain. Despite the small, by modern standards, resource, some PM pistols, mainly produced in the 1960s. with the best workmanship, they have a very large shot and at the same time function reliably.
So the Soviet “Makarovs” in shooting ranges have a fire rate of up to 40,000 rounds. The average lifespan of the recoil spring ranges from 5,000 to 7,000 shots. Modern PMs, as a rule, cannot withstand more than 5000, since they, in fact, are not designed for this. Another example of reliability - one owner of an old combat PM fired only about 52,000 shots from his pistol without a single delay. With proper experience and training, the pistol demonstrates excellent accuracy, even with standard grip cheeks. For example, the author knows the following result - when shooting at a distance of 25 meters with a series of five shots, when shooting with two hands at a low tempo, with Barnaul cartridges with jacket bullets, the maximum diameter of the group of hits was 60 mm! Even today, with a huge assortment of the latest and highly advanced models from leading manufacturers such as Glock, Beretta, Steyr, Walther, Smith & Wesson and Sig Sauer, many people well versed in weapons choose the proven, trouble-free Makarov pistol to protect their lives.
Countless discussions have been held on the suitability of the Makarov pistol as a compact self-defense weapon. In these disputes, there are usually two dominant sides with opposing opinions. Those who consider the PM not a suitable weapon for such use, given the huge selection of the latest models, cite as seriously substantiated arguments the presence on the arms market of a huge selection of the latest models from leading manufacturers, which are ahead of the Makarov pistol not only in technical and technological terms, but also in the most important in this aspect of use qualities. As a rule, pistols with polymer frames, with double-row or single-row magazines are indicated as a comparison. Note that the length of the PM is 161 mm, and the width is 30.5 mm. Here it is necessary to give a couple of examples. New ultra-thin Walther PPS for 9mm Parabellum with a single-stack magazine for 6, 7 or 8 rounds, having the same length as the PM, but only 23 mm wide! Well-proven Glock 26 of the same caliber, with a double-row magazine with a capacity of 10 or 12 rounds, with a slightly shorter length and width than the PM.
Pistols such as the above are several times superior to the PM in terms of combat and performance qualities, and they all fire the more effective, most widely used 9mm Parabellum cartridges in the world. It is impossible not to agree with such arguments, especially when you know the features of each of the given pistols. Modern models of approximately the same dimensions are much lighter, much more convenient to hold and handle than the PM, and surpass it in shooting accuracy and firepower. Proponents of the advisability of carrying a Makarov pistol for self-defense point to its high reliability in extreme operating conditions and simplicity of design. Arguments are made that it is quite possible to learn to shoot from a PM with very good accuracy if you train enough, that it is quite convenient and not burdensome to carry it secretly, and the effectiveness of the cartridges used has been proven for decades practical application in law enforcement agencies and armed forces of Russia and the former USSR.
Even now, when Russian special forces have modern pistols, many prefer the old and proven PM, despite the relatively large length and insufficient smoothness of the trigger, greater weight than modern models and a slightly smaller magazine capacity. However, supporters of the PM generally agree that its cartridge is only effective if the enemy does not use individual means protection. After all, even inexpensive modern lightweight Kevlar body armor perfectly protects against PM shots. But here it should be clarified that employees of the Ministry of Internal Affairs do not encounter an enemy using NIB, and special forces soldiers have the opportunity to choose weapons for a more powerful and effective cartridge. But why today are Makarov pistols still in very stable and good demand in those countries of the world where citizens have the opportunity to choose any modern compact pistol, like those given as an example? This happens for several reasons. It should be clarified that Makarov pistols are most popular in the Baltic countries, other states that were formerly part of the USSR, as well as in Eastern Europe at all.
Many of those who purchase a Makarov pistol are former law enforcement officers and are very familiar with this weapon, having gotten used to it and having learned to shoot it well. The owner of a Makarov pistol about his weapon: “I have a German PM. Very good gun! In terms of strength, in my opinion, it is not inferior to, and probably superior to, Izhevsk pistols from the times of the USSR. The quality of surface treatment and bluing is significantly higher than that of production from all those countries in which PM was produced. The finishing of the internal surfaces is excellent. There are no roughnesses or traces of mechanical processing. Firing accuracy is generally the same as that of most PMs.” However, the fundamental factor when purchasing a PM is not only its reliability, but also its low cost. A significantly more affordable price is often the decisive argument. At the same time, almost all leading experts in the field of personal weapons and their use, including the United States, point to an excellent combination of price and quality of the weapon itself. The Makarov pistol provides the buyer with excellent qualities of a compact personal weapon at a very affordable price.
For this reason, PMs are bought both in Western European countries and in the USA, where the level of well-being of the population is higher and people have the opportunity to purchase much more modern, but also more expensive weapons. Don’t forget about the huge selection of pistols in the USA. A resident of California about the popularity of PM: “Makarov is respected in America. I can judge because they don’t linger in our stores; they are quickly bought up, despite the availability of almost anything. I don’t know how it is in other states, it will only appear in our store, after 2-3 days it’s already taken away. In general, there is an opinion here that Russian weapons are reliable.” In addition, the owner of the PM about his pistol: “Of course, I got used to the PM for about two months until I shot it. But now I wear it every day. In the city, that's it. Small, 8 rounds in the magazine and one in the chamber, and most importantly, reliable. I'm not afraid that there will be problems with him. Psychologically, it is very important to carry a weapon that you trust.” The Makarov pistol, or as it is now called in the USA - Russian Mak, together with the Kalashnikov assault rifle in the West are the standard of reliable, functional, unpretentious, practical and effective weapons.

After installing the magazine and chambering the cartridge, the pistol can be put on safety. In this case, the hammer moved away from the firing pin, the trigger moved forward, and the bolt are blocked. With safety on, the PM is ready to wear. The safety flag, which is located on the back of the bolt on the left side, must be moved down before firing. The trigger will be on the safety cock, the PM will become a self-cocking method ready to fire.
The first pull of the trigger requires more force - about 3.5 kg, as the hammer is cocked. Subsequent shots require little effort - about one and a half kilograms. Cocking the hammer after the pistol is released from the safety lever can be done manually to make the shot more accurate. The trigger can be removed from the combat cock - it must be held thumb and pull the trigger.
After all the cartridges have been used up, the bolt is installed on the slide stop; it can be removed using the lever on the frame on the left side. The 9 mm caliber Makarov pistol cartridge consists of the following parts: a sleeve, a primer, a powder charge, and a bullet. Outside, near the bottom of the sleeve, there is a groove for hooking the ejector. The charge is smokeless pyroxylin powder. The Makarov pistol bullet is a bimetallic (clad) shell with a pressed-in steel core. The bullet and steel core are separated by a lead jacket.

Disassembly and assembly of the Makarov PM Pistol
Disassembly of a Makarov pistol can be complete or incomplete. For regular cleaning, lubrication and inspection, the gun must be partially disassembled. To do this you need to do the following actions in this order:
1. Removing the magazine from the base of the handle;
2. Removing the pistol from the safety catch;
3. Lowering the trigger guard down and moving it to the left;
4. Separating the shutter from the frame;
5. Returning the trigger guard to its place;
6. Removing the return spring from the barrel.
To assemble the pistol after not complete disassembly you must perform the above steps in reverse order.
Complete disassembly of the PM should be used in cases where you need to clean the gun from heavy contamination - for example, when it was in the rain or snow, and also when you switch to a new lubricant or make repairs. For complete disassembly you need:
1. Carry out partial disassembly of the pistol;
2. Separate the sear and bolt stop from the frame;
3. Separate the handle from its base and the mainspring from the frame;
4. Separate the trigger from the frame;
5. Separate the trigger rod with the cocking lever from the frame;
6. Separate the trigger from the frame;
7. Separate the safety and firing pin from the bolt;
8. Separate the ejector from the bolt;
9. Disassemble the store.

To reassemble the pistol after complete disassembly, perform all operations in reverse order.
You should not often completely disassemble and reassemble the pistol, as this leads to wear of its elements.
Pistol characteristics (TTX)
The technical characteristics of the Makarov pistol are as follows:
Its weight without cartridges is 0.73 kg, the loaded pistol weighs 0.81 kg.
The length of the pistol in millimeters is 161.5, including the barrel length - 93.5. Width and height are 30.5 and 126.75, respectively.
This is a pistol with a combat rate of fire of 30 rounds per minute. starting speed bullet is 315 meters per second.
Characteristics of the PM relative to the firing range, in meters: aiming range - 50, maximum - up to which the bullet retains its lethal effect - 350. The pistol has an open sight.
A standard Makarov pistol magazine contains 8 rounds.
To find out exactly how many cartridges are in the magazine, pay attention to the modification of the PM, as this number may differ. The Makarov pistol uses a 9x18 mm PM cartridge. The caliber of the Makarov pistol in terms of rifling is 9.27 ±0.075; across fields - 9.00 ±0.06. The barrel has 4 grooves with a width of 4.5 ±0.2 mm, the rifling pitch is 260 ±20 mm. The cartridge weighs 10 g, the bullet weighs 6.1 g. The length of the cartridge is 25 mm. For firing from the PM, cartridges with conventional or tracer bullets can be used. The pistol fires in single shots.
Pointing Pistol performance characteristics Makarov, it is worth noting his good accuracy. If you shoot at 25 meters using standard 57-N-181 cartridges, the dispersion radius of the R100 is at 75 mm. When shooting at 50 meters, this figure is 160 mm, at 10 meters - only 35 mm. To check the firing of a pistol, shooting at 25 is used in a black circle with a diameter of 25 cm, which is mounted on a shield, the height of which is 1 m and width - 50 cm. The accuracy of the combat is within the norm if 4 holes are within the boundaries of a 15-centimeter circle. In this case, to meet the requirements, it is necessary that the average point of impact deviate from the control point by a maximum of 5 cm.


Buy a Makarov pistol in Ukraine
Today you can only buy a Makarov pistol if you have a weapons permit in hand. Pneumatic Makarov does not require permits; you can buy it without even leaving your home. Moreover, there is no need to search for a long time on the Internet where it is more profitable to buy a Makarov pistol and how much a Makarov pistol costs. To buy different versions of Makarov, you just need to go to our website. In the website's catalog, you can select a weapon by noting the characteristics you need - for example, pistol type, caliber, cocking type, handle material, type of ammunition, muzzle velocity, magazine capacity.
Here you can evaluate the cost of the selected Makarov pistol from a particular manufacturer and choose the best option for you. Our website is a simple solution for those who want to buy a Makarov combat pistol and its other versions - including the pneumatic PM - MP-654K. The price of a Makarov pistol in Ukraine may differ, taking into account the modification of the pistol, but on the website you can always compare prices for a pistol of a specific model.
In the previous articles of the series dedicated to our famous “thirty-four”, the author briefly examined the stages of the evolution of German medium tanks. The Wehrmacht had two of these at the time of the invasion of the USSR: T-III and T-IV. But the first one turned out to be too small and did not have reserves for further improvement: even in its most “advanced” version, it had a maximum of 50 mm armor (though reinforced in the frontal part with an additional 20 mm plate) and a 50 mm long-barreled gun, the capabilities of which, however, , were no longer considered sufficient to combat the latest Soviet armored vehicles.
 IN last years The concept of loitering ammunition has gained some popularity. The development of electronics makes it possible to implement it different ways, including the most interesting. Not long ago, an original version of loitering ammunition was proposed by the Australian company DefendTex. The Drone-40 product is made in the dimensions of a 40 mm grenade for underbarrel grenade launcher, but is capable of performing UAV tasks.
 During the interwar period in England, light, medium, infantry and cavalry tanks. Light tanks were represented by Mk.VI with light armor and machine gun armament, medium - Medium Mk.II with light armor and a 47-mm cannon, cavalry - Mk.II, Mk.III, Mk.IV, Mk.V with medium armor ( 8-30 mm) and a 40 mm gun.
 In the early eighties, a new “family of scatterable mines”, Family of Scatterable Mines / FASCAM, entered service with the US Army. To use this line of ammunition, several remote mining systems have been developed.
And one more article about the pneumatic Makarov. Every self-respecting company is engaged in the production of this legend of the domestic arms industry in pneumatic design. The main representatives on the market are Umarex, KWC (and other Taiwan) and our domestic one from IzhMech. Today we will look at how to properly “dismember” the MP-654k, i.e. how to disassemble a Makarov air pistol.
Device
The pneumatic replica is produced on the basis of the original combat pistol, with many parts and mechanisms remaining unchanged. Therefore, the design of the Makarov air pistol largely coincides with the original. Before you climb inside, I suggest you look at the interactive diagram of how the combat PM works:
PM operation scheme. Click "DEVICE" to get started
PM Information Poster (click to enlarge)
Now let’s apply diagrams of the pneumatic Makarov. A little different, but overall still the same.


Diagram of the Makarov MP-654k air pistol (general structure and magazine)
Key points about the design of this Makarov:
- The general diagram of all mechanisms of the pneumatic Makarov is shown in the figure above.
- The bullet is ejected from the barrel due to the energy of the compressed gas of the cartridge located in the magazine. The gas portion per shot is cut off due to the operation of the firing mechanism.
- The bullets are fed to the barrel line by a spring in the magazine.
- The USM allows firing by self-cocking or pre-cocking.
- The safety is located on the left side of the bolt. When switched to the safety mode, the trigger is released safely without firing a shot, ensuring that the trigger does not hit the firing pin.
- The gun can use two types of cans - 7 g. (when using the supplied adapter) and 12 g.
Incomplete disassembly
A pistol, like a combat pistol, allows for partial and complete disassembly. Incomplete disassembly on this version is used mainly for “training” in handling the combat model. Due to the “pneumatic” nature of the pistol in the field, incomplete disassembly can be reduced due to the absence of the need to check the chambered cartridge. Basic moments:
- Pull out the magazine
- Pull the trigger guard down
- Separate the shutter
- Remove the return spring
Complete disassembly
In case of serious contamination, “bathing”, tuning or breakdown (for example, the mainspring flying out), the Makarov air pistol is completely disassembled. Disassembly is usually carried out before a breakdown is identified, so many steps can be skipped. For a complete understanding of the process, the following video is offered:

Incomplete disassembly
- Shop
- Gate
- Return spring
Gate
- Fuse
- Drummer
Frame (numbering according to the device diagram)
- Handle screw (11)
- Lever
- Gate valve (12)
- Mainspring (10)
- Sear (7)
- Shutter lag
- Trigger (9)
- Traction (5)
- Trigger (14)
- Trigger guard
- Barrel (3)
- Barrel nut
Shop
- Clamp screw
- Store head
- Spring
- Valve
Assembly of the Makarov air pistol is carried out in the reverse order. In terms of disassembly, the MP-654k is not a complex pneumatic product, so you can simply make do with common sense and available tools. We study, use and enjoy. And may your weapon last as long as possible.
Makarov Pistol (PM) - Complete Guide
The automatic operation of the pistol operates on the basis of the recoil of a free bolt, made in the form of a movable barrel casing. The bolt return spring fits directly onto the barrel. The hammer-type impact mechanism has an open hammer and a two-pronged mainspring located in the handle behind the magazine.
The trigger mechanism allows only single fire. The presence of self-cocking in the design allows the first shot to be fired, if there is a cartridge in the chamber, without first cocking the hammer. This increases the combat readiness of the weapon without compromising the safety of its carrying. A safety lever at the rear of the bolt simultaneously locks the trigger and the bolt with the frame. The safety can be turned off with the thumb of the hand holding the weapon, i.e. the gun can be controlled with one hand.
A flat, single-stack 8-round magazine is housed in the handle. After the cartridges are used up, the bolt, with the help of the magazine feeder and the bolt stop, stops in the rearmost position. For shooting, cartridges with conventional or tracer bullets are used.
Purpose and combat properties of the pistol
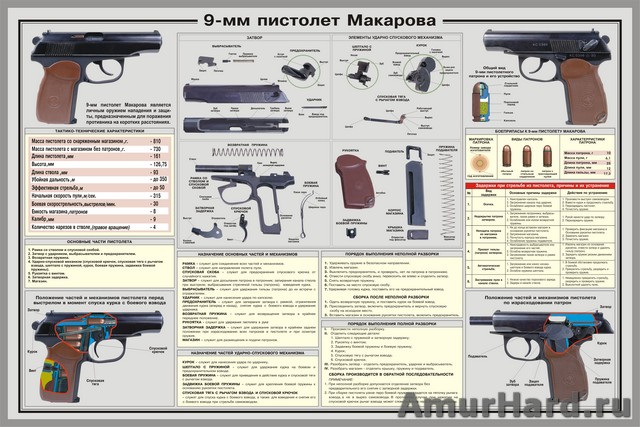
The 9-mm Makarov pistol (Fig. 1) is a personal weapon of attack and defense, designed to defeat the enemy at short distances.

Rice. 1. General view of the 9 mm Makarov pistol
Pistol fire is most effective at distances up to 50 m. The destructive power of the bullet remains up to 350 m.
The pistol fires in single shots.
The pistol's combat rate of fire is 30 rounds per minute.
The weight of the pistol with a loaded magazine is 810 g.
For pistol shooting, 9mm /9x18/ pistol cartridges are used. The initial speed of the bullet is 315 m/sec.
When firing, cartridges are fed into the chamber from a magazine with a capacity of 8 rounds.
WEIGHT AND LINEAR DATA OF 9 - mm MAKAROV PISTOL (PM):
-
Weight of pistol with magazine without cartridges 730 g
- The weight of the pistol with a magazine loaded with eight rounds is 810 g
- Gun length 161 mm
- Gun height 126.75 mm
- Barrel length 93 mm
- Barrel caliber 9 mm
- Number of grooves 4
- Magazine capacity 8 rounds
- Cartridge weight 10 g
- Bullet weight 6.1 g
- Chuck length 25 mm
- Combat rate of fire 30 rounds per minute
- Initial flight speed zero 315 m/sec General design and operation of pistol parts.
The pistol is simple in design and handling, small in size, comfortable to carry and always ready for action. The pistol is a self-loading weapon, since it is reloaded automatically during shooting. The operation of the automatic pistol is based on the principle of using the recoil of a free shutter. The bolt and barrel have no clutch. The reliability of locking the barrel bore when fired is achieved by the large mass of the bolt and the force of the return spring. Thanks to the presence of a hammer-type self-cocking trigger mechanism in the pistol, you can quickly open fire by directly pressing the tail of the trigger without first cocking the hammer.
Safe handling of the pistol is ensured by reliably operating fuses. The pistol has a safety located on the left side of the slide. In addition, the trigger is automatically cocked under the action of the mainspring after the trigger is released (" lights out" trigger) and when the trigger is released.
The trigger, under the action of the curved (bounce) end of the wide feather of the mainspring, is rotated at a certain angle from the bolt (this is " lights out" trigger) so that the nose of the sear is in front of the trigger safety cock.
After the trigger is released, the trigger rod, under the action of the narrow feather of the mainspring, will move to the rear extreme position. The cocking lever and the sear will go down, the sear, under the action of its spring, will press against the trigger and the trigger will automatically engage the safety cock.

Rice. 2. Main parts and mechanisms of the pistol:
1 - frame with barrel and trigger guard; 2 - bolt with firing pin, ejector and safety catch: 3 - return spring: 4 - parts of the trigger mechanism; 5 - handle with screw; 6 - shutter stop; 7 - store
The pistol consists of the following main parts and mechanisms (Fig. 2):
frames with barrel and trigger guard;
bolt with firing pin, ejector and fuse;
return spring;
trigger mechanism;
handles with screw;
shutter stop;
store.
Each pistol comes with accessories: a spare magazine, a wiper, a holster, a pistol strap.
To fire a shot, you must press the trigger with your index finger. At the same time, the trigger strikes the firing pin, which breaks the cartridge primer. As a result, the powder charge ignites and forms a large number of powder gases. The bullet is ejected from the barrel by the pressure of the powder gases. The bolt, under the pressure of gases transmitted through the bottom of the sleeve, moves back, holding the sleeve with the ejector and compressing the return spring. When the cartridge meets the reflector, it is thrown out through the shutter window.
When the bolt moves to the rearmost position, it turns the trigger on the trunnions back and puts it in cocking position. Having moved back all the way, the bolt returns forward under the action of the return spring. When moving forward, the bolt rammer pushes the next cartridge out of the magazine and sends it into the chamber. The bore is locked with a blowback bolt; the gun is ready to fire again.
To fire the next shot, you need to release the trigger and then press it again. So the shooting will continue until the cartridges in the magazine are completely used up.
Once all the cartridges from the magazine have been used up, the bolt locks into the slide stop and remains in the rear position.
Disassembly of the pistol can be incomplete or complete. Partial disassembly is carried out for cleaning, lubricating and inspecting the gun, complete - for cleaning when the gun is heavily soiled, after it has been exposed to rain or snow, when switching to a new lubricant, as well as during repairs.
Frequent complete disassembly of the pistol is not allowed, as it accelerates the wear of parts and mechanisms.
When disassembling and assembling the pistol, the following rules must be observed:
- Remove the magazine from the base of the handle (Fig. 3). Holding the pistol by the handle with your right hand, with the thumb of your left hand, pull the magazine latch back as far as it will go, while simultaneously pulling back the protruding part of the magazine cover with the index finger of your left hand, remove the magazine from the base of the handle.

Rice. 3. Removing the magazine from the base of the handle
Check to see if there is a cartridge in the chamber, to do this, turn off the safety (move the flag down), move the bolt to the rear position with your left hand, place it on the bolt stop and inspect the chamber. Press the shutter stop with your right thumb to release the shutter.
Separate the shutter from the frame. Taking the pistol in your right hand by the handle, with your left hand pull the trigger guard down (Fig. 4) and, tilting it to the left, rest it against the frame so that it is held in this position. During further disassembly, hold it in this position with the index finger of your right hand.

Rice. 4. Pulling the trigger guard
With your left hand, move the bolt to its rearmost position and, lifting its rear end, allow it to move forward under the action of the return spring. Separate the bolt from the frame (Fig. 5) and put the trigger guard in its place.

Rice. 5. Separating the shutter from the frame
Remove the return spring from the barrel. Holding the frame with your right hand by the handle and rotating the return spring towards you with your left hand, remove it from the barrel.
Reassemble the pistol after partial disassembly in the reverse order.
Place the return spring on the barrel.
Taking the frame by the handle in your right hand, with your left hand you must put the return spring onto the barrel with the end in which the outermost coil has a smaller diameter compared to other coils.

Rice. 6. Inserting the free end of the return spring into the valve channel
Attach the shutter to the frame. Holding the frame by the handle in your right hand and the bolt in your left, insert the free end of the return spring into the bolt channel (Fig. 6) and move the bolt to the rearmost position so that the muzzle of the barrel passes through the bolt channel and protrudes outward (Fig. 7 ). Lower the rear end of the shutter onto the frame so that the longitudinal protrusions of the shutter fit into the grooves of the frame, and, pressing the shutter against the frame, release it. The bolt, under the action of the return spring, vigorously returns to the forward position. Turn on the fuse (raise the flag up).

Rice. 7. Attaching the shutter to the frame
Note. To attach the shutter to the frame, it is not necessary to pull down and twist the trigger guard. At the same time, when moving the bolt to the rearmost position, it is necessary to lift its rear end up as far as possible so that the lower front wall of the bolt does not stick into the ridge of the trigger guard, which limits the movement of the bolt back.

Rice. 8. Inserting the magazine into the base of the handle
Insert the magazine into the base of the handle. Holding the pistol in your right hand, use the thumb and forefinger of your left hand to insert the magazine into the base of the handle through the lower window of the base of the handle (Fig. 8). Press the magazine cover with your thumb so that the latch (the lower end of the mainspring) jumps over the protrusion on the wall of the magazine; there should be a click. Hitting the magazine with the palm of your hand is not allowed.
Check the correct assembly of the gun after partial disassembly. Turn off the safety switch (move the flag down). Move the shutter to the rear position and release it. The shutter, having moved slightly forward, engages the slide stop and remains in the rear position. Press the shutter stop with your right thumb to release the shutter. The bolt, under the action of the return spring, must vigorously return to the forward position, and the trigger must be cocked. Turn on the fuse (raise the flag up). The trigger must be released from cocking and locked.
Complete disassembly of the pistol is carried out in the following order.
Carry out partial disassembly of the pistol, guided by art. 7.
Separate the sear and bolt stop from the frame. Take the gun in your left hand; holding the trigger head with the thumb of your left hand and pressing the tail of the trigger with your index finger, smoothly release the trigger.

Rice. 9. Removing the sear spring hook from the bolt stop
Use the rubbing protrusion to remove the hook of the sear spring from the bolt stop (Fig. 9). Using the index finger and thumb of your right hand, turn the sear forward until the flat on the right pin coincides with the slot of the trunnion socket in the frame; then lift the sear and slide stop up and separate them from the frame (Fig. 10).

Rice. 10. Separating the sear and slide stop from the frame
Separate the handle from the base of the handle and the mainspring from the frame. Using a cleaning blade, unscrew the screw and, moving the handle back, separate it from the base of the handle (Fig. 11).

Rice. 11. Separating the handle from the base of the handle
Pressing the mainspring with the thumb of your left hand to the base of the handle, move down and separate the mainspring bolt from the base of the handle and remove the mainspring from the boss of the handle base (Fig. 12).

Rice. 12. Separating the mainspring from the frame
Notes:
In combat conditions, if there is no wiping at hand, the screw can be unscrewed with a bolt stop reflector.
In pistols of the first releases, the mainspring is attached without a bolt.
Separate the trigger from the frame. Holding the frame in your left hand and turning the trigger to the extreme forward position, use the index finger and thumb of your right hand to turn the trigger forward until the flats on its pins coincide with the slots in the pin sockets in the frame, move the trigger towards the barrel and remove it (Fig. 13).

Rice. 13. Separating the trigger from the frame
Separate the trigger rod with the cocking lever from the frame. Holding the frame in your left hand, lift the rear end of the trigger rod with your right hand (Fig. 14) and remove the pin from the trigger hole.

Rice. 14. Separating the trigger rod with the cocking lever from the frame
Separate the trigger from the frame. Holding the frame in your left hand, pull the trigger guard down with your right hand, as is done when incomplete disassembly pistol; turning the tail of the trigger forward, remove the trigger pins from the pin sockets in the frame and separate the trigger from the frame. Place the trigger guard in its place.
Separate the safety and firing pin from the bolt. Taking the bolt in your left hand, turn the safety lever upward with the thumb of your right hand; then, using the index finger and thumb of your right hand, move the flag out of the socket slightly to the side, turn it further back and remove it from the shutter socket (Fig. 15).

Rice. 15. Separating the fuse from the bolt
Lightly strike the palm of your right hand with the back end of the bolt to remove the firing pin from the bolt.
Separate the ejector from the bolt (Fig. 16). Place the bolt on the table (bench), with your right hand, using the rubbing protrusion, press the ejector bend and, at the same time, pressing the front part of the ejector with the index finger of your left hand and turning it around the hook, remove it from the groove; After this, carefully remove the bend with the spring from the bolt socket.

Rice. 16. Separating the ejector from the bolt
Disassemble the store. Taking the magazine in your left hand, use the thumb and forefinger of this hand to press the feeder spring towards the feeder, with your right hand remove the magazine cover by its protruding part (Fig. 17) and remove the feeder spring and feeder from the magazine body.

Rice. 17. Disassembling the store
Reassemble the pistol after complete disassembly in the reverse order.
Assemble the store. Holding the magazine body in your left hand so that the protrusion for the magazine latch is in front and at the top, insert the feeder into the magazine body with your right hand. Insert the feeder spring into the magazine body with the unbent end down and, pressing the spring with the thumb of your left hand (Fig. 18), with your right hand, push the cover onto the curved ribs of the body so that the bent end of the spring pops into the hole in the cover.

Rice. 18. Store assembly
Attach the ejector to the bolt (Fig. 19). Place the bolt on the table (bench), and with your right hand insert the ejector spring with the bend (with the bend outward) into the bolt socket.

Rice. 19. Attaching the ejector to the bolt
Place the ejector in the groove with the hook to the shutter cup and, holding it with the index finger of your left hand at the hook, press the oppression wiper into the socket; simultaneously pressing the ejector towards the bend and down (turning around the hook), lower its heel into the bolt socket so that the head of the bend is located above the ledge of the ejector heel.
Attach the firing pin and safety to the bolt. Take the bolt in your left hand with the back end facing you and insert the firing pin into the bolt channel so that its cut at the rear faces the fuse socket. Using the thumb and forefinger of your right hand, insert the fuse into the bolt socket (Fig. 20) and turn its flag down until it stops.

Rice. 20. Attaching the fuse to the bolt
Attach the trigger to the frame. Holding the frame in your left hand, pull the trigger guard with your right hand and skew it as is done when partially disassembling the pistol; insert the trigger head into the window of the frame stand so that its trunnions fit into the trunnion sockets of the frame; put the trigger guard in its place.
Attach the trigger rod with the cocking lever to the frame. Holding the frame in your left hand and moving the tail of the trigger back, insert the trigger rod pin into the trigger hole and lower the rear end of the rod into the frame onto the back wall of the base of the handle.
Attach the trigger to the frame. Holding the frame by the base of the handle with your left hand and turning the trigger to the extreme forward position, tilt the trigger head forward with your right hand, insert its pins into the pin sockets in the frame (Fig. 21) and turn the trigger head back.

Rice. 21. Attaching the trigger to the frame
Attach the mainspring to the frame and the handle to the base of the handle. Place the gun on the palm of your left hand; turning the trigger forward and the cocking lever up, insert the feathers of the mainspring into the frame window with your right hand and put the spring with the hole on the boss of the base of the handle so that the wide feather of the mainspring is located in the recess of the trigger, and the narrow feather is on the heel of the cocking lever.
Turn the pistol so that the back wall of the base of the handle is facing towards you, and, holding the mainspring by the magazine latch with the thumb of your left hand, and the front wall of the base of the handle with your index finger, put on the mainspring bolt with the thumb and forefinger of your right hand (Fig. 22 and 23 ).

Rice. 22. Attaching the mainspring to the frame

Rice. 23. Securing the mainspring with a bolt
Check that the mainspring is installed correctly by lightly pressing the tail of the trigger several times. If the trigger moves back, then the spring is installed correctly. Place the handle on the base of the handle and screw in the screw until it stops, then loosen the screw half a turn.
Attach the bolt stop and sear to the frame. Holding the frame in your left hand, insert the slide stop into the cutout of the frame with your right hand (Fig. 24); take the sear so that the flat on its right trunnion faces forward; first insert the left sear pin (on which the spring is located) into the trunnion socket of the frame, and then insert the right sear pin into the trunnion socket in the frame. Turn the sear back. Using the rubbing protrusion, place the hook of the sear spring onto the bolt stop.

Rice. 24. Attaching the shutter stop and sear to the frame
Note. It is forbidden to cock the hammer by pressing the tail of the trigger and release the hammer when the bolt is not attached to the frame.
Carry out further assembly, guided by art. 8.
Check the correct operation of the parts and mechanisms of the gun after assembly, as specified in Art. 49. (Inspection of the assembled pistol)
Cleaning and lubricating the gun
The pistol must be kept clean and in good working order at all times. This is achieved by timely and proper cleaning and lubrication, careful handling of the gun and proper storage of it.
Pistols are cleaned:
in a combat situation, during maneuvers and long-term exercises in the field - daily during a lull in the battle or during breaks between classes;
after exercises, orders and training in the field without shooting - immediately after the end of the exercises, orders or classes;
after shooting - immediately after shooting, it is necessary to clean and lubricate the barrel bore and chamber; Perform final cleaning of the pistol upon returning from shooting; in the next 3 - 4 days, clean the gun daily;
if the pistol is not in use, at least once every 7 days.
Apply lubricant only to a well-cleaned and dry metal surface immediately after cleaning to prevent moisture from affecting the metal.
Soldiers and sergeants armed with pistols clean and lubricate pistols under the guidance of the platoon commander (company sergeant major, battery). He determines the degree of disassembly of the gun, the correctness and quality of cleaning, gives permission for lubrication and assembly, and checks the correctness of lubrication and assembly.
Officers clean and lubricate pistols themselves.
In a barracks or camp setting, pistols are cleaned in specially designated areas on tables equipped or adapted for this purpose, and in a combat or field situation - on mats, boards, plywood, etc., previously cleaned of dirt and dust.
To clean and lubricate the gun, use:
liquid gun lubricant - for cleaning the gun and lubricating its parts and mechanisms at air temperatures from +5 to -50 o C;
gun lubricant - for lubricating the barrel bore, parts and mechanisms of the gun after cleaning them; this lubricant is used at air temperatures from +5 o C and above;
RFC solution (barrel cleaning solution) - for cleaning barrel bores and other parts of the pistol exposed to powder gases;
rags or paper KV-22 - for wiping, cleaning and lubricating the gun;
tow (short flax fiber), cleared of kernels, - only for cleaning the bore.
To make it easier to clean grooves, cutouts and holes, you can use wooden sticks.
Cleaning the pistol with an RFS solution is carried out only after shooting at the shooting range or in the barracks. If after shooting the pistol was cleaned with liquid gun lubricant, then upon returning to the barracks, clean the pistol with an RFC solution.
In field conditions, the pistol can be cleaned only with liquid gun lubricant.
Note.
The RHS solution is prepared in the department in the following composition:
water suitable for drinking - 1 l;
ammonium carbonate - 200 g;
potassium dichromate (chrompic) - 3.5 g.
The solution is prepared in the amount necessary to clean the weapon within one day. A small amount of RFS solution can be stored for no more than 7 days in bottles, sealed with a stopper, in a dark place and away from heating devices. It is prohibited to pour RFC solution into oil cans.
Clean the gun in the following order:
Prepare cleaning materials and lubricants.
Inspect the accessory as specified in Art. 58 (Inspect the Wipe, Holster and Pistol Strap), and prepare it for use in cleaning.
Disassemble the gun.
Clean the bore. Pass tow or rags through the wiping slot; The thickness of the tow layer should be such that the wipe with tow is introduced into the barrel bore with a slight hand effort. Soak the tow with liquid gun lubricant. Introduce the rub into the bore from the muzzle.
Place the pistol frame on the table and, holding it with your left hand, smoothly move the wipe along the entire length of the barrel several times with your right hand. Change the tow and repeat the cleaning again. Rub thoroughly. Wipe the bore dry first with tow and then with a clean, dry rag.
Inspect the rags; if traces of soot or rust are noticeable on the rags, wipe the barrel bore again with tow soaked in liquid gun lubricant, and then with dry tow or rags. Repeat cleaning the bore until the rag removed from the bore is clean. Clean the chamber in the same way. The chamber must be cleaned only from the breech by rotating the wiper with tow (rags) pressed against the ledge of the chamber.
Cleaning with the RChS solution is carried out in the same order as with liquid gun lubricant, and continues until carbon deposits are completely removed and tombakization, i.e. until a brush or tow moistened with a solution comes out of the barrel bore without signs of soot or greenery. After this, wipe the bore with dry tow or a rag. The next day, check the quality of the cleaning performed and, if carbon deposits are found on it when wiping the barrel bore with a clean rag, clean again in the same order. After cleaning the rifled part of the bore, clean the chamber in the same manner.
Carefully inspect the bore and chamber against the light. When inspecting, pay special attention to the chamber and the corners of the rifling, in which no dirt or carbon deposits should remain.
Clean the pistol frame, barrel and trigger guard. Wipe the parts dry with a rag until dirt and moisture are completely removed. Remove rust with tow or rags soaked in liquid gun lubricant.
Clean the bolt, return spring, bolt stop and parts of the firing mechanism. If the pistol is cleaned after shooting, then clean the bolt cup with tow or rags soaked in liquid gun lubricant or RFC solution until the carbon deposits are completely removed. After cleaning, wipe it dry. If the pistol has not been fired and there is no carbon deposits or rust on the bolt cup, then wipe it with a dry cloth.
Wipe the remaining metal parts and mechanisms dry with a rag until dirt and moisture are completely removed, using wooden sticks for this.
Clean the bolt, bolt stop and parts of the trigger mechanism in assembled form after training and training without shooting, and in disassembled form after shooting, leaving the pistol in the rain and heavily soiled.
Wipe the handle with a dry rag or tow.
Clean out the store. The magazine is cleaned after training and training in assembled form, and after shooting, the pistol is exposed to the rain and is heavily soiled - in disassembled form. After outfits and activities, wipe the store dry with a rag until dirt and moisture are completely removed. After firing, remove carbon deposits from the feeder with tow or rags soaked in liquid gun lubricant or RSF solution. After cleaning, wipe the feeder dry.
Wipe the holster with a dry cloth both from the inside and outside until dirt and moisture are completely removed.
Wipe the wipe dry.
Lubricate the bore. Pass a rag through the wiping slot. Soak a rag with lubricant. Introduce the rub into the barrel bore from the muzzle and smoothly move it two to three times along the entire length of the barrel bore to evenly cover the rifling and bore margins with a thin layer of lubricant. Lubricate the chamber from the breech by rotating and wiping with a rag.
Lubricate other metal parts and mechanisms of the gun. Lubricate the outer surfaces using an oiled rag. To lubricate channels, sockets and holes, use an oiled rag wound on a wooden stick. Apply the lubricant in a thin, even layer. Excessive lubrication on gun parts will cause contamination and may cause gun malfunction.
Do not lubricate the holster, but only wipe it dry with a rag and dry it.
Lubricate the wipe.
After lubrication is completed, assemble the gun, inspect it, check the correct assembly and operation of the parts and mechanisms of the gun.
A gun brought from a frost into a warm room must not be lubricated until it is " sweats"; when drops of water appear, you need, without waiting for the moisture to dry, wipe the parts and mechanisms of the gun dry and lubricate them.
A pistol handed over for long-term storage must be thoroughly cleaned, the barrel bore and trigger mechanism lubricated with liquid gun lubricant, wrapped in one sheet (layer) of inhibited paper and two sheets (layers) of waxed paper and sealed in a cardboard box.
Lubricate the parts and mechanisms of the gun at an outside temperature of +5 o C and below only with liquid gun lubricant.
A 9-mm pistol cartridge (Fig. 44) consists of a cartridge case, a primer, a powder charge, and a bullet.

Rice. 44. Common type of 9 mm pistol cartridge and its design:
1 - sleeve; 2 - capsule; 3 - powder charge; 4 - bullet; 5 - bimetallic (clad) shell; 6 - steel core; 7 - lead shirt
The sleeve serves to place the powder charge and connect all parts of the cartridge; during a shot, it prevents the breakthrough of gases from the barrel bore through the chamber.
At the bottom of the sleeve there are: a slot for a primer; an anvil on which the primer is struck; two seed holes through which the flame from the percussion composition of the primer penetrates the powder charge. Outside, at the bottom of the sleeve, there is an annular groove for hooking the ejector.
The charge consists of smokeless pyroxylin powder.
The capsule serves to ignite the powder charge. It consists of a brass cap with impact compound pressed into it and a foil circle covering the impact compound. When the striker strikes, the impact composition ignites.
The bullet consists of a bimetallic (clad) shell into which a steel core is pressed. There is a lead jacket between the bullet and the steel core.
Cartridges for loading the pistol are loaded into an 8-round magazine. The magazine is loaded by inserting and retracting the cartridges by hand.
The cartridges are sealed in standard wooden cartridge boxes of 2560 pcs. in everyone. Each box contains two rolled-up iron or sealed galvanized boxes, in which cartridges are placed in cardboard packs, 16 cartridges per pack. One iron box holds 80 cardboard packs.
On the side walls wooden boxes There are inscriptions indicating the nomenclature of the cartridges placed in these boxes: the batch number of the cartridges, the month and year of manufacture of the cartridges and gunpowder, the manufacturing plant, the brand and batch of gunpowder, the number of cartridges in the box.
The weight of one box of cartridges is about 33 kg.
OPERATION OF PISTOL PARTS AND MECHANISMS
Position of pistol parts and mechanisms before loading
The parts and mechanisms of the pistol are in the following position before loading.
The shutter under the action of the return spring is in the extreme forward position; the bolt cup rests against the breech section of the barrel, as a result of which the barrel is locked with a free bolt. The longitudinal protrusions of the shutter fit into the grooves located in the rear of the frame. The bolt and frame are locked with a safety rib.
The trigger, under the action of the wide feather of the mainspring, is lowered and rests with its front plane against the fuse protrusion so that it cannot move forward.
The sear is raised upward by the shelf of the ledge on the safety axis and is held in this position so that there is a small gap between the safety cocking of the hammer and the nose of the sear.
The trigger rod with the cocking lever is moved to the rearmost position under the action of the narrow mainspring; The cocking lever is recessed into the frame and its self-cocking protrusion is engaged with the trigger's self-cocking tooth so that when the tail of the trigger is pressed, the hammer is not cocked, but has some free movement back.
The magazine is inserted into the base of the handle. The feeder is at the top and rests against the ridge of the bolt. The feed tooth presses on the bolt stop.
The fuse box is in the " prevention". In this case, the protrusion of the fuse is lowered down and comes into contact with the front plane of the trigger; the shelf of the ledge on the axis of the fuse, by acting on the sear tooth, raises the sear up and holds it in this position; the fuse hook enters the trigger recess and, resting against its protrusion, locks the trigger in position " prevention"so that it cannot be cocked; the safety rib has gone beyond the left protrusion of the frame and locks the bolt with the frame.
Operation of pistol parts and mechanisms during loading
To load the pistol you need:
equip the magazine with cartridges;
insert the magazine into the base of the handle;
turn off the fuse (turn the flag down);
move the shutter to the rearmost position and release it sharply.
When loading the magazine, the cartridges are placed on the feeder one on top of the other in one row, compressing the feeder spring; As the magazine is filled with cartridges, the feeder spring compresses and, pressing the feeder from below, lifts the cartridges upward. The upper cartridge is held by the curved edges of the side walls of the magazine body.
When a loaded magazine is inserted into the base of the handle, the magazine latch slides over the protrusion on the wall of the magazine and holds the magazine in the base of the handle. The upper cartridge rests against the ridge of the bolt. The feeder is located at the bottom; its tooth does not act on the bolt stop.
When the safety is turned off (turning the flag down), the safety protrusion rises and releases the trigger. When turning the safety, its hook, coming out of the trigger recess, releases the trigger protrusion, which ensures free retraction of the trigger. The shelf of the ledge on the safety axis releases the sear, which falls slightly down under the action of its spring, and the nose of the sear becomes in front of the safety cocking of the trigger (the trigger is on the safety cocking). When you turn the safety, its edge comes out from behind the left protrusion of the frame and separates the bolt from the frame. In this case, the shutter can be pulled back by hand.
When the shutter is pulled back, the following happens:
The shutter, moving along the longitudinal grooves of the frame, turns the trigger. The sear, under the action of a spring, jumps its nose behind the cocking cock. The rearward movement of the shutter is limited by the ridge of the trigger guard. The return spring is under maximum compression.
When the trigger is turned by the front part of the annular recess, it shifts the trigger rod with the cocking lever forward and slightly upward, due to which part of the free play of the trigger is selected. When the cocking lever is lifted up, its cutout approaches the protrusion of the sear.
The magazine feeder, under the action of the feeder spring, lifts the cartridges up so that the upper cartridge becomes in front of the bolt rammer.
When the bolt is released, the return spring sends the bolt forward. Moving along the longitudinal grooves of the frame, the bolt rammer moves the upper cartridge into the chamber. The cartridge, sliding along the curved edges of the side walls of the magazine body and along the bevel on the tide of the barrel and in the lower part of the chamber, enters the chamber and rests with the front cut of the sleeve against the chamber ledge; The barrel bore is locked with a blowback bolt. The second cartridge, under the action of the feeder spring, is lifted up by the feeder until it stops against the bolt ridge.
When the bolt reaches its extreme forward position and sends the cartridge into the chamber, the ejector hook slides into the annular groove of the cartridge case.
The trigger is cocked.

Rice. 45. Position of parts and mechanisms of the pistol before firing:
The pistol is ready to fire (Fig. 45).
Operation of parts and mechanisms of a loaded pistol when the safety is turned on
If it is not necessary to fire a shot, then, without releasing the trigger, you should turn on the safety by turning its flag up all the way so that the red circle is covered by the safety flag.
When the flag is turned, the fuse protrusion lowers and before the sear begins to rise, it stands in the path of the trigger movement; the fuse axis raises the sear with the shelf of the ledge, as a result of which the sear rotates and releases the trigger; the trigger, under the action of the wide feather of the mainspring, turns and strikes the fuse protrusion; The fuse rib, turning, extends beyond the left protrusion of the frame and locks the bolt with the frame. The safety hook, lowering, enters the hammer recess and locks it so that it is impossible to cock the hammer.
If you turn off the safety in this position, the trigger thanks to " lights out"automatically becomes on the safety cock. In this case, the pistol is ready to immediately open fire by self-cocking. The safety of handling the pistol in the event of accidental impacts is ensured by automatically setting the hammer to the safety cock.
If the trigger is released not by the safety, but manually, i.e. by pressing the tail of the trigger with the index finger of the right hand while holding the trigger head with the thumb of the same hand, then the trigger after releasing the trigger is also automatic (thanks to " lights out") becomes on safety alert.
Operation of pistol parts and mechanisms when fired
To fire a shot, you must turn off the safety, cock the hammer and press the tail of the trigger with your finger.
When the safety is turned off and the hammer is cocked, the parts and mechanisms of the pistol operate as described in Art. 35. (Operation of pistol parts and mechanisms during loading).
When you press the tail of the trigger with your finger, the trigger rod moves forward, and the cocking lever, connected to the rear end of the trigger rod, rotates on the rear trunnion of the trigger rod and rises until its cutout rests against the protrusion of the sear; then the cocking lever lifts the sear and disengages it from the cocking hammer. The release protrusion of the cocking lever fits into the bolt recess.
The trigger is released from the sear and, under the action of the wide feather of the mainspring, sharply turns forward on the trunnions and hits the firing pin.
The firing pin moves forward energetically and breaks the cartridge primer with its striker; a shot occurs.
The pressure of the resulting gases forces the bullet out of the barrel; at the same time, the gases press on the walls and bottom of the sleeve. The cartridge case expands and is pressed tightly against the walls of the chamber. The gas pressure at the bottom of the cartridge case is transferred to the bolt, causing it to move backward. The operation of pistol parts and mechanisms after a shot.
The bolt moves back along with the cartridge due to the pressure of the powder gases on the bottom of the cartridge case. At the beginning of the backward movement (at a length of 3.5 mm)
The bolt with its protrusion displaces the release protrusion of the cocking lever to the right, thereby disengaging it from the sear (disconnection occurs).
The released sear is pressed against the trigger under the action of a spring; when the trigger turns back all the way, the nose of the sear jumps behind the cocking of the trigger and holds it until the next shot.
With further movement of the bolt back, the release protrusion of the cocking lever slides along the groove of the bolt; the cartridge case, held by the ejector in the bolt cup, hits the reflector and is thrown out through a window in the bolt wall.
The feeder delivers the next cartridge and places it in front of the bolt rammer.
The bolt, having reached the rearmost position, returns to the forward position under the action of the return spring; The bolt rammer pushes the next cartridge out of the magazine and sends it into the chamber. When the bolt reaches its extreme forward position and sends the cartridge into the chamber, the ejector hook slides into the annular groove of the cartridge case.
The cocking lever rests on the sear (on the side), and the release ledge is located opposite the recess on the bolt. The pistol is ready for the next shot.
To fire the next shot, you must release the tail of the trigger and press it again.
When the tail of the trigger is released, the trigger rod with the cocking lever moves back under the action of the narrow feather of the mainspring, at the same time the cocking lever moves down and with its cutout goes under the protrusion of the sear.
When you press the tail of the trigger, the cocking lever raises the sear and again releases the hammer from the sear. The next shot occurs.
If the bolt does not reach the extreme forward position (the cartridge is dented), then the release protrusion of the cocking lever will not fit into the recess on the bolt, as a result of which the cocking lever will not engage with the sear and, when the trigger is pressed again, will not turn the sear and will not release the hammer . This eliminates the possibility of a shot if the cartridge is not completely chambered. Operation of pistol parts and mechanisms when firing by self-cocking.
If shooting is carried out without first cocking the hammer, then when you press the tail of the trigger, the hammer is cocked automatically (Fig. 46). In this case, the cocking lever, having engaged its self-cocking protrusion with the self-cocking tooth of the hammer, cocks the hammer. The trigger, without being cocked (since the sear at the moment of release is raised to the upper position by the protrusion of the cocking lever), breaks away from the self-cocking protrusion of the cocking lever and hits the firing pin; a shot occurs.
Rice. 46. Position of the pistol clocks before firing a self-cocking shot:
1 - shutter; 2 - ejector; 3 - return spring; 4 - trigger; 5 - trigger rod; 6 - store; 7 - mainspring; 8 - sear with a spring; 9 - cocking lever; 10 - trigger
The operation of pistol parts and mechanisms when cartridges are consumed from the magazine
When all the cartridges from the magazine are used up, the magazine feeder lifts the front end of the bolt stop up with its tooth. The bolt, resting its tooth against the protrusion of the bolt stop, stops in the rear position.
The trigger is cocked.
The feeder spring has the least compression. The bolt remains in the rear position even after the magazine is removed from the base of the pistol grip, held by the bolt stop.
The bolt is released from the slide stop (with the magazine removed or inserted) by pressing the slide stop button with your finger.
Delays when firing a pistol and how to eliminate them
Pistol at correct handling with it, careful care and conservation is a reliable and trouble-free weapon.
However, during prolonged operation due to wear of parts and mechanisms, and more often due to careless handling and inattentive maintenance, delays in shooting may occur.
To prevent delays when firing a pistol and ensure trouble-free operation of the pistol, you must:
properly prepare the pistol for shooting;
inspect, clean and lubricate the gun in a timely manner and in compliance with all rules; Take special care to ensure that the rubbing parts of the gun are clean and lubricated;
repair the pistol in a timely manner;
inspect cartridges before shooting; Do not use faulty, rusty or dirty cartridges for shooting;
during shooting and when moving, protect the pistol from contamination and impacts;
If the pistol was in severe frost for a long time before firing, then before loading it, vigorously pull the bolt back several times with your hand and release it, and after each retraction and release of the bolt, release the trigger by pressing on the tail of the trigger.
If there is a delay during shooting, it must be eliminated by reloading the pistol. If recharging does not eliminate the delay, then it is necessary to find out the cause of the delay and eliminate it as indicated below.
Delays Cause of delays How to eliminate delays
Misfire. The bolt is in the forward position, the trigger is pulled, but the shot does not fire 1. The cartridge primer is faulty. 1. Reload the pistol and continue shooting.
Thickening of the lubricant or contamination of the channel under the firing pin. 2. Inspect and clean the gun.
The handle screw is not fully screwed in (in pistols without a mainspring bolt). 3. Screw in the handle screw until it stops.
The output of the firing pin or the nick on the firing pin is small. 4. Send the gun to a workshop
Failure to cover the cartridge with the bolt. The shutter stopped before reaching the extreme forward position; The trigger cannot be pulled 1. Contamination of the chamber, frame grooves and bolt cup. Push the bolt forward with a hand push and continue shooting. Inspect and clean the gun
Difficult ejector movement due to contamination of the ejector spring or bender
Failure to feed or not advance a cartridge from the magazine into the chamber. The bolt is in the forward position, but there is no cartridge in the chamber; the bolt stopped in the middle position along with the cartridge, without delivering it to chamber 1. Contamination of the magazine and moving parts of the pistol. 1. Reload the pistol and continue shooting. Clean the gun and magazine.
The upper edges of the magazine body are bent 2. Replace the faulty magazine
Sticking (pinching) of the cartridge case by the bolt. The cartridge case was not thrown out through the window in the bolt and became wedged between the bolt and the breech end of the barrel 1. Contamination of the moving parts of the pistol. 1. Throw away the stuck cartridge case and continue shooting.
Malfunction of the ejector, its spring or reflector 2. If the ejector with spring or reflector is malfunctioning, send the gun to a workshop
Automatic firing 1. Thickening of the lubricant or contamination of parts of the trigger mechanism. 1. Inspect and clean the gun.
Wear of the hammer cocking or sear nose. 2. Send the gun to the workshop.
The sear spring is weakened or broken. Same
Touching the ledge shelf of the sear tooth fuse The same
INSPECTION, PREPARATION FOR SHOOTING OF A PISTOL AND CARTRIDGES, CARE FOR THEM AND THEIR SAVING
General provisions
To determine the condition of the weapon, its serviceability and combat readiness, periodic inspections of pistols are carried out within the time limits established by the Internal Service Charter.
The pistol is inspected either assembled or disassembled. The degree of disassembly is determined before each inspection.
Simultaneously with the inspection of the pistol, the holster, spare magazine, wiper and pistol strap are inspected.
Every soldier armed with a pistol must inspect the pistol daily, before leaving for training, before firing, and during cleaning.
Before going to class and immediately before shooting, inspect the pistol in assembled form, and during cleaning, in disassembled and assembled form.
When inspecting the pistol daily, you must check:
are there any rust, dirt, scratches, nicks or cracks on the metal parts; what condition is the lubricant in;
whether the bolt, magazine, trigger mechanism, safety and bolt stop function properly;
are the front and rear sights in good working order?
whether the magazine is held at the base of the handle;
Is the bore clean?
Malfunctions of the pistol must be corrected immediately; If they cannot be corrected in the unit, the pistol must be sent to a repair shop.
Typical malfunctions that cause abnormal pistol firing are as follows:
the front sight is broken or bent - the bullets will deviate in the direction opposite to the movement of the top of the front sight;
the rear sight is offset - bullets will deviate in the direction that the rear sight is offset;
nicks on the muzzle of the barrel - bullets will deviate in the direction opposite to the nicks;
fraying of the bore (especially in the muzzle), wear (rounding) of the rifling fields, scratches and nicks in the bore, wobbling of the rear sight - all this increases the dispersion of bullets. Inspection of the assembled pistol
When inspecting the assembled pistol, check:
Are there any rust deposits, scratches, nicks or cracks on the parts of the gun? Do the numbers on the bolt, safety and magazines match the numbers on the frame?
Are there any nicks on the front sight and in the rear sight slot that interfere with aiming? Is the rear sight firmly held in the bolt groove and does the mark on the rear sight coincide with the mark on the bolt.
Is it easy to switch the fuse from one position to another and is it securely fixed in the extreme positions?
Does the trigger have a release: when the trigger is pulled and the trigger is pulled all the way back, the trigger head, when pressed with a finger, should move forward, and after the pressure stops, vigorously return to its original position; when the trigger is released and the pressure on the trigger head stops, the hammer should be in the safety cocking position and in this position, under sufficiently strong hand pressure, should not break off the safety cocking and move forward.
Is the trigger guard securely held in the frame and is it set in an angled position to release the bolt?
Is the handle screw tightened?
Is there any dirt, rust or other defects in the bore? To do this, you need to place the shutter on the slide stop and look into the barrel from the muzzle, inserting white paper into the shutter window.
Are the walls and upper edges of the magazine body bent and does the feeder move freely in the magazine?
Does the magazine (spare magazine) slide in and out of the grip base freely and is held securely by the magazine latch?
Are the parts and mechanisms of the gun working correctly? To check, you need to do the following work.
Place the safety catch in the fire position (lower down), pull the bolt back by hand until it stops and release it; The bolt, having moved slightly forward, should remain in the rear position under the action of the bolt stop. Press the shutter stop button; the bolt, under the action of the return spring, must vigorously return to the forward position, and the trigger must be cocked. Press the tail of the trigger; the trigger must be released from cocking and hit the firing pin.
Remove the magazine from the base of the pistol grip and equip it with training cartridges; insert the magazine into the base of the pistol grip, pull the bolt back and release it; in this case, the bolt, under the action of the return spring, must reach the extreme forward position and send the cartridge into the chamber; When the bolt is pulled back again, the cartridge must be vigorously reflected outward through the window in the bolt.
Turn the fuse box up to the “safety” position; in this case, the trigger must be released from the cocking mechanism, strike the safety protrusion and remain in a position slightly retracted; after this, the bolt must be locked, the trigger should not be cocked either by direct action of the thumb on it, or by pressing the tail of the trigger (self-cocking).
Place the safety switch in the “fire” position and press the tail of the trigger; in this case, the hammer must be cocked and, without being cocked, strike the firing pin.
Put the hammer on cock and press the trigger head from behind; at the same time, he should not break from the combat platoon. Then press the tail of the trigger; in this case, the trigger must be released from the cocking position and deliver an energetic blow to the firing pin.
If there are spring scales, check the hammer release force. The hammer must be released from a trigger force of at least 1.5 kg and no more than 3.5 kg.
Is the trigger blocked by the safety protrusion when the safety is turned before the sear begins to rise? Perform the check as follows.
Move the safety switch to the " position fire". Put the trigger on the combat cock. Holding the pistol in your right hand with the barrel down and observing the sear through the groove in the bolt, slowly move the safety lever up with the thumb of your right hand until the sear begins to rise.
Having thus determined the position of the fuse at the moment the sear begins to rise (i.e., at the moment the shelf of the fuse ledge touches the sear tooth), holding the trigger with the thumb of your right hand, press the trigger with your index finger and, without releasing it, slowly bring the trigger to the forward position . In this case, the trigger should rest against the fuse protrusion, i.e. be blocked by a fuse (Fig. 48), as a result of which the shot does not occur.

Rice. 47. Scheme for blocking the trigger with the fuse protrusion:
1 - sear tooth; 2 - fuse ledge shelf; 3 - fuse protrusion
Inspection of the pistol in disassembled form
When the pistol is disassembled, each part and mechanism is examined in detail separately in order to check whether there is any chipped metal, broken threads, scratches and nicks, bents, rashes, rust and contamination, and whether all parts have the same numbers.
When inspecting the frame with the barrel and trigger guard, pay special attention to the condition of the barrel bore.
Inspect the bore from the muzzle and breech. At the same time, check the cleanliness of the bore, chamber and serviceability of the breech section of the barrel.
Barrels can be with chrome-plated or non-chrome-plated bore and chamber.
When examining a non-chromed bore, the following disadvantages may be observed.
A rash is the primary damage to metal by rust. The rash looks like dots and specks, located locally or over the entire surface of the bore.
Rust is a dark coating on metal. Rust, invisible to the eye, can be detected by wiping the bore with a clean rag, on which rust leaves yellowish stains.
Rust marks are dark, shallow stains that remain after rust has been removed.
Sinks are significant depressions in the metal caused by prolonged exposure to rust. It is prohibited to delete them in the department.
Copper plating - appears when shooting clad bullets coated with tombac. Copper plating is observed in the form of a light copper coating on the walls of the bore. Can only be removed by a repair shop.
Scratches are dashes, sometimes with a noticeable rise of metal along the edges.
Removing scratches in the bore is not allowed.
Nicks are more or less significant depressions, sometimes with metal rising.
Barrel swelling - noticeable in the barrel bore in the form of a transverse dark solid ring (semi-ring) or detected by a metal convexity on the outer surface of the barrel. Inflating the trunk is not allowed.
When determining the quality condition of chrome-plated barrels, follow the Instructions for the Categorization of Artillery Weapons.
When inspecting the bolt with ejector, firing pin and fuse, pay special attention to the condition of the internal grooves, sockets and protrusions, which should not be dirty and should not have nicks. Check whether the firing pin moves freely in the bolt channel, whether the ejector is vigorously pressed against the bolt cup, and whether the ejector hook and the firing pin are not crushed.
When inspecting the fuse, check whether the latch is recessed, whether there are large bruises on the hook for locking the trigger, whether the pin is worn, and whether the rib of the fuse is worn.
When inspecting the return spring, check whether there are burrs, rust, bends, dirt or breaks on it, and whether it is firmly held on the barrel.
When inspecting parts of the trigger mechanism, pay special attention to the serviceability of the hammer, sear, and trigger rod with the cocking lever. When inspecting the trigger rod, check for significant wear on the release lug of the cocking lever; The cocking lever must rotate without jamming on the trigger rod pin. Check for any crumbling and wear of the combat and safety cocking of the hammer, stretching of the sear spring and wear of its nose. The mainspring feathers must not be broken.
When inspecting the handle with the screw, check for cracks and chips, for stripped threads on the screw, for dirty grooves and recesses, and for dirt in the metal bushing for the screw.
When inspecting the bolt stop, make sure it is in good condition. The bolt stop must not be bent or broken. Check if there is any chipped metal on the reflector.
When inspecting the magazine, pay special attention to the serviceability of the feed tooth and the protrusion for the magazine latch; check that the top edges of the magazine body are not bent.
Inspection of the wipe, holster and pistol strap
When inspecting, check whether the rubbing is not bent, whether there are nicks or scratches on it. There should be no chipped metal on the blade. The rubbing protrusion must not be bent.
When inspecting the holster, check for tears or broken seams, the presence of loops, a clasp and an auxiliary strap.
Check the condition of the pistol strap.
Inspection of live ammunition
Inspection of live ammunition is carried out in order to detect malfunctions that could lead to delays in firing the pistol.
Cartridges are inspected before shooting, when joining a squad, and by special order.
When inspecting cartridges, you need to check:
are there any rust and green deposits on the cartridges, especially on the primer, bruises or scratches that prevent the cartridge from entering the chamber; whether the bullet is pulled out of the case by hand and whether the primer protrudes above the surface of the bottom of the case; cartridges with the indicated defects must be selected and returned,
Are there any training cartridges among the live ammunition?
If the cartridges become dusty or dirty, covered with a slight green coating or rust, they must be wiped with a dry, clean rag.
Preparing the pistol for shooting
Preparing a pistol for shooting is carried out in order to ensure trouble-free operation of the pistol during shooting and maintain its normal firing. To do this you need:
inspect the pistol disassembled in accordance with Art. 50 - 57; (Inspection of the pistol in disassembled form)
inspect the assembled pistol in accordance with Art. 49; (Inspection of the assembled pistol)
inspect the cartridges as specified in Art. 59 and 60; (Inspection of live ammunition)
equip the magazine with cartridges as specified in Art. 86; (See section " Shooting rules " - " Rules and techniques for shooting from a PM pistol " - " Getting ready to shoot ")
immediately before shooting, clean and wipe the barrel bore dry.
Storing a pistol and ammunition
The pistol must always be in good condition. Storage of the pistol and accessories is entrusted to the soldier armed with the pistol, who is obliged to handle the pistol carefully and inspect it daily.
In barracks and camp settings, pistols are stored unloaded and removed from holsters in cabinets or boxes with nests in accordance with the Internal Service Charter. Spare magazines are stored in slots next to the pistols.
For short-term placement in locality Keep the gun with you in apartments.
During field training, on a hike, when moving around railway and on cars, the pistol must be carried in a holster on a belt, which must be firmly fastened and properly adjusted so that the holster does not hit hard objects.
To prevent swelling or rupture of the barrel when shooting, it is prohibited to plug or cover the barrel bore with anything.
In all cases not related to shooting, the safety catch must be in the " prevention". When the fuse is set to " fire" or " prevention"The fuse box must be set to its lowest or highest position.
If, if necessary, the pistol will be placed in a damp holster, then at the first opportunity, remove the pistol from the holster, wipe, clean, lubricate it and dry the holster.
In hot areas with dust in the air, as well as in coastal areas with high air humidity, store the gun according to special instructions.
Cartridges should be stored in a dry place and, if possible, protected from sunlight; when handling them, avoid damage, protect them from shock, moisture, dirt, etc.
CHECKING THE COMBAT OF THE PISTOL AND BRINGING IT TO NORMAL COMBAT
General provisions
All pistols must be brought to normal combat.
Checking the pistol's engagement is carried out:
when the pistol arrives at the unit;
after repairing or replacing parts of the pistol that may affect its operation;
when abnormal deviations of bullets are detected during shooting.
In a combat situation, each commander is obliged to use every opportunity to periodically check the firing of pistols.
Checking the combat and bringing the pistol to normal combat
Pistol firing is checked by officers or excellent shooters in the presence of military personnel to whom pistols are assigned. Senior commanders up to and including the unit commander are required to ensure that the rules for checking the combat of pistols are strictly observed and that they are brought to normal combat.
Before checking the combat, pistols are carefully inspected and any defects found are corrected. During the inspection, a weapons technician (master) with the necessary tools must be present.
The combat test is carried out in favorable conditions: in clear weather with no wind or in a closed shooting range, or in a shooting range protected from the wind.
The pistol's combat is checked by shooting at 25 m with cartridges from the same batch.
Shooting is carried out at a black circle with a diameter of 25 cm, mounted on a shield 1 m high and 0.5 m wide.
The aiming point is the middle of the lower edge of the black circle or the center of the circle. The aiming point should be approximately at the height of the shooter's eyes.
Along a plumb line above the aiming point, the normal position of the midpoint of impact is marked (with chalk or colored pencil), which should be 12.5 cm higher than the aiming point or coincide with it if the aiming point is the center of the circle. The marked point is the control point.
Checking the firing of a pistol is carried out from a standing position with your hand or from a support (turf, a bag filled with sawdust) placed on some local object or stand.
When shooting from a rest, the hand with the pistol should be suspended and not touch the rest.
To check the pistol's engagement, the sighter fires four shots in a row, aiming carefully and uniformly. At the end of the shooting, the shield is inspected and the accuracy of the pistol’s firing and the position of the midpoint of impact are determined by the location of the holes.
The accuracy of a pistol's firing is considered normal if all four holes (at least three, if one of the holes deviates sharply from the rest) fit into a circle (dimension) with a diameter of 15 cm.
If the combat accuracy is satisfactory, the commander determines the midpoint of the impact and measures the amount of its deviation from the control point using a centimeter ruler. For ease of measurement, two lines are drawn through the control point (with chalk or colored pencil) - vertical and horizontal.
To determine the average point of impact for four holes, you need to connect any two holes with a straight line and divide the distance between them in half; connect the resulting division point with the third hole and divide the distance between them into three equal parts; connect the division point closest to the first two holes with the fourth hole and divide the distance between them into four equal parts. The point located three divisions from the fourth hole will be the middle point of impact (Fig. 48).

Rice. 48. Determination of the average point of impact based on four holes
With a symmetrical arrangement of holes, the average point of impact can be determined in the following way:
a) connect adjacent holes in pairs, connect the midpoints of both straight lines again and divide the resulting line in half; the division point will be the middle point of impact (Fig. 49);

Rice. 49. Determination of the average point of impact using four symmetrically located holes
b) connect the holes in pairs crosswise with straight lines; the point of intersection of these lines will be the midpoint of the hit (Fig. 50).

Rice. 50. Determination of the average point of impact using four symmetrically located holes
To determine the average point of impact for three holes, you need to connect two holes with a straight line; connect the middle of this line with the third hole; divide the new line into three equal parts; the point closest to the first line will be the middle point of impact (Fig. 52).

Rice. 51. Determination of the average point of impact using three holes
Having determined the average point of impact, the commander measures the magnitude of its deviation from the control point. The midpoint of impact should not deviate more than 5 cm from the control point in any direction. If the average point of impact deviates from the control point by more than 5 cm, then the pistol is handed over to the weapons technician (master) for appropriate movement or replacement of the rear sight; the rear sight is replaced with a lower (high) one if the midpoint of impact is above (below) the control point; The rear sight moves to the left (right) if the middle point of impact is to the right (left) of the control point.
Increasing (decreasing) the height of the rear sight or moving it to the right (left) by 1 mm changes the position of the average point of impact in the corresponding direction by 19 cm.
Note. It is prohibited to file down the front sight of the pistol.
Bringing a pistol to normal combat is considered complete when the pistol, both in terms of accuracy and in relation to the position of the midpoint of impact, satisfies the requirements of normal combat.
After bringing the pistol to normal combat, the rear sight is secured with a core; The old mark on the rear sight is cleared, and a new mark is stamped in its place.
Note. It is prohibited to clean the marks on the shutter wall.