How to make a hunting bow at home. How to make a collapsible bow
Making onions is a process that requires precise adherence to technology. Only in this case, you can count on a good result. With a well-made bow, you can send arrows straight to the target, while it must be powerful enough to hit the game, which as a result will become the prey of the hunter.
Taking on its manufacture with their own hands is primarily for those who already have experience in hunting with such weapons, however, with the right approach to business, anyone can cope with the task. Consider how to make a bow for hunting with your own hands, using materials and tools that are available to everyone.
Varieties of bows
The main parts of such weapons are the bow and bowstring. By design, bows can be divided into two main groups:
- simple - for these models, the arc is made of one material - wood or PVC;
- composite, or composite - the arcs of such bows are made of several materials.
The form is distinguished:
- classic bows - the arc of such a hunting weapon has one bend, in a bent form it has a D-shaped appearance;
- recursive - their arc bends three times and has an M-shape.
Also, bows can be divided into simple and collapsible. The arcs of the former are made from a single piece of material, while the latter consist of several parts.
From natural materials for the manufacture of composite arches, wood can be used - for the middle part, horn - for the inside, as well as tendons that are attached to the outside. This three-piece design provides the weapon with good elasticity, flexibility and power.
Today in the manufacture of collapsible bows industrial production high-strength modern materials, with optimal properties - fiberglass and carbon fiber, aluminum and magnesium alloys, and so on.
The device of such a weapon can be quite complicated, but making it yourself at home is a task that requires some experience, as well as a lot of time and effort.
With your own hands it is better to make a simple non-separable bow. With the right approach to business and the observance of technology, its accuracy and power will be enough for hunting.
Tools and materials
To make such a bow you will need minimum set tools:
- hacksaw;
- plane;
 To give the arc the desired bend, it is better to use a special slipway. It can also be made independently from a board and several bars.
To make a simple non-separable bow with your own hands, you need:
- wood or PVC tube to make an arc;
- strong rope, rawhide ribbon, wire, thick fishing line for making a bowstring;
- thick rope or other suitable material for the handle.
While pulling the bow, his shoulders should bend, while the bowstring practically does not stretch.. The arrow is sent to the target precisely due to the force of the arc of the weapon, which straightens at the moment of the shot.
How to make a bow out of wood?
Consider how to do Hunter bow from wood. best material yew is considered for this - it was from it that in the Middle Ages they were made the best examples similar weapons. However, it is difficult to get such a tree, so other species are usually used instead. It can be:
- hazel;
- juniper;
- Rowan;
- ash;
- larch;
- cedar.
A good bow rod should:
- not have cracks, it is also better to select rods without knots, but the presence of a small amount of them on the surface is not critical, the main thing is not to try to cut them when processing the rod;
- have a length of one meter to one and a half meters;
- be dry;
- be direct.
 For the manufacture of a bow, you can also use several thin rods of the same length, while they must be securely fastened by pulling in several places with electrical tape or other suitable material. This option is suitable if you need to quickly make a bow in field conditions from what you can find at hand.
Wood harvesting
Harvest wood to make a hunting bow with your own hands, better in winter, at a temperature of -10 degrees or slightly lower. If you look for a suitable rod in the fall, you won’t have to wander through the snowdrifts in search. It is necessary to cut it off, while the length of the rod should be several tens of centimeters longer than the estimated length of the bow. This is necessary, since the ends of the rod may crack during drying.
Before making a bow, the wood needs to be dried for a long time, on average three months is enough. For this, a room with room temperature is suitable in which the bar must be hung.
At the same time, it is not necessary to remove the bark, and it is better to paint or varnish the ends, which will not allow moisture to evaporate, then the future arc will dry out evenly along the entire length. A rod that has a slight curvature can be straightened over the steam.
In field conditions, drying can be done quickly with the help of a fire, the main thing is to do it carefully, do not lower the wood too close to the fire and do not dry it out. Such an onion will be more fragile and less durable than dried at room temperature.

Making a bow from a wooden rod
When the rod is dried, it must be processed with a planer, while the shoulders should not become cylindrical, but flat. The arc of a simple collapsible bow does not consist of a single piece of wood or PVC, but of two separate arms that are attached to the top and bottom of the handle. The handle in this case is easiest to make from a wooden block or cylinder of suitable thickness. At the same time, in the central part they can be turned, making a comfortable grip under the arm.
If it is intended to make a simple bow with an arc from a single piece of wood, and not with two separate limbs, the rod in the middle should be left round in section.
It is important that the shoulders have the same length, width and thickness, only in this case the force on them will be distributed evenly, and the bow will hit accurately.
Then the workpiece must be given the desired shape - in the form of a simple arc or M-shaped. To do this, the wood is heated over steam and fixed for a while in a special slipway, which will fix the desired shape. Such a device can be made from a board by attaching several bars to it. It takes about a week to keep the bow in the slipway.
When the arc is ready, notches must be made at its end and the bowstring must be fixed. You also need to braid the handle. To get a reliable installation, the fixation points of the bowstring and the handle must be glued.
Making a bow from skis
Skis are a great material for making a bow bow, which often does not even need to be processed. Therefore, if there is a suitable pair available that is unusable, there is no need to harvest rods or look for other material. You can use both wooden and plastic skis, the second option is preferable.
To make a bow, you need to saw off the two ends of the skis of a suitable length, which will be the shoulders, and fasten them to the handle. The handle itself can also be made from skis by fastening the cuts of the desired length in several layers and processing them so that a comfortable grip is obtained. After that, you only need to fasten the bowstring, and the bow is ready for use.
 The optimal length of the finished product is about 1.3 m. If a bow made from skis exceeds a length of 1.4-1.5 m, its power will be insufficient, since such a long arc cannot give the arrow sufficient momentum. Also, the shoulders should be narrow - so, in order to make an arc from wide skis, they must be turned from both edges.
Making a composite bow, each limb of which must be made from several different materials rather than one, is a more complex process. However, such a weapon is made according to the same principles as a simple homemade bow for hunting. If you approach the matter correctly, a bow made with your own hands will hit powerfully and accurately, and at the same time it will be able to serve for quite a long time.
Komrad Hobbit started interesting topic Well, at least it's interesting to me. "Onion". Degree of need and possible application this weapon, everyone decides for himself, but in my opinion the topic is interesting and worthy of attention.
In search of information, I went to the Internet. Well, in general, people write a lot of things, something deserves attention, something does not. I wanted to find an option that was cheap and cheerful. To spend a minimum of effort and time, and at the output to get a more or less worthy result. Found. That's what I want to post.
Next comes the copy-paste.
There is enough information on the net about the manufacture of bows, bowstrings, arrows and quivers, but this is all quite scattered, so I decided to collect a description of the entire manufacturing process in one place. I will try to detail it with photos.
So the task is to make a bow, having a minimum of tools at home, quickly enough and with acceptable performance characteristics. As the first model, the compound longbow model is best suited. We will do it. For a complete set, we need to make: a handle, shoulders, a bowstring, arrows, and, if you really want to, a quiver. And do it cheaply.
The necessary set of tools is a drill or a screwdriver, a knife, a planer, an electric jigsaw or a saw, lots and lots of sanding paper.
Part one: the handle.
To make it, we need a bar of decent wood 30 * 50 mm, about 40 cm long. It must be chosen responsibly, pine will not work on it, you need at least birch, beech is better. We look at the annual rings of the workpiece. They should go along the wide side.
We mark the handle 4 times by 10 cm, as you can see in the photo, this is one of the design options, you can come up with something of your own. We cut the handle with a jigsaw or saw, drill 6 mm holes for furniture bolts and 3 mm blind holes along the edges and insert pieces of nails so that they stick out by five millimeters.
It makes no sense to immediately process the handle completely, the bow will still be adjusted, so we will leave the skinning for later. 
Part two: shoulders.
The most controversial part is in materials, technologies and sizes.
I have tried many technologies - skis, veneer, composite shoulders, but it's not that. Absolutely by accident, at a local furniture factory, I found a Klondike of blanks for shoulders. This happiness is called an elastic element and is a plywood, where all the layers go along, with dimensions: length 120 cm, width 50 mm, thickness 12 mm, slightly varnished and has a large radius of curvature. In short, for the shoulders of the bow, that's it! I forgot to say - the price is just a song, about 10 rubles for a set of shoulders! Similar products can be found in offices that assemble furniture.
We mark the workpieces brought home as follows - we mark 15 mm obliquely from each edge, draw a cut place using the second workpiece (very convenient, given the curvature of the workpiece) and use a jigsaw from one piece of wood to make two!
Now is the time to decide on the size of the future miracle! English longbow - the prototype of the product was quite long. Less than 120 cm it makes no sense to do it, because. there will be a large bending angle of the shoulders, which means they will quickly fail. Also, the longbow has a more uniform force when pulling the bowstring. Our bow will be collapsible, so there is no need to worry about how to transport it. We arrived at the dacha / picnic / kebabs, assembled, shot, disassembled, brought home, put in a closet. For quick assembly / disassembly, only two hex keys are needed.
Something I digress. We have already decided that the length of the bow will be 160 cm (just kidding, decide for yourself).
Based on this, the length of the shoulders will be 70 cm, i.e. bow length minus 20 cm between the shoulders on the handle and divide in half. I last time I made bows (they are in the pictures) of 180 cm each. I didn’t measure the force, but it was convenient to shoot for both children and their parents.
We put the two blanks obtained together, we are surprised at the curvature of our hands, we select the part that will become the shoulders, we measure, saw off the excess. We apply it to the handle, drill a hole for a furniture nut with the largest hat (50 mm bolts and nuts for them are available in stores selling furniture fittings, for a ruble per bolt). Having taken out the pieces of the nail from the handle, we collect the bow and rejoice!
Shoulders are best marked with up arrows, like me, because they are not interchangeable! Now we insert one piece of the nail into the handle, assemble the bow, align the bow symmetrically and lightly press the handle, the nail will mark the place in the shoulder for the hole, drill a blind hole about 5 mm. We do the same with the second shoulder.
Now it's time for the long-awaited skinning! We cut out seats for the bowstring at a distance of 3 cm from the edge, cut out the handle, align the shoulders with a planer, cover all this beauty with varnish or paint. In short, creative freedom. One important point- the edge of the handle must be filled up so that there is a gap of 1-1.5 mm between the handle and the shoulder, otherwise there is a chance to break the shoulder in this place! 
Part three: bowstring.
Make a bowstring with the necessary characteristics and a decent appearance easily! Forget about Kevlar, Dacron and others like them! These materials, not only can you find horseradish, have one advantage, it is also the main drawback - they do not stretch! Those. if your children/slightly drunken comrades try to play with such a bowstring without an arrow, there is a real chance to change the limbs of the bow for new ones!
In short, we go to a fishing store and buy a spool of Chinese nylon thread for 25 rubles. Threads come in different thicknesses, I liked those that are thicker. We also need a board / bar longer than the future bowstring and two large nails without a hat. I used two bars sewn with self-tapping screws. It is better to wrap the future bowstring with a spool spool sewing machine Mom. And if you cut out a U-shaped plate, drill a hole for the thread in the middle of the shelf and fix the coil in this fixture with a screw, winding the bowstring will be a pleasure!
It's time to decide on the length of the bowstring! Instead of a bowstring, we tie a rope, measure it with a tape measure, that's it! Remember that over time, under load, the bowstring will stretch.
We mark the measured distance on the previously prepared board / bar. We drill two holes, insert two nails without hats. We also mark the middle of the distance and 5 cm from the center in both directions. We tie a nylon thread to one of the nails, with a slight uniform tightness we wind it so that the total thickness of the bowstring is about 3 mm. We tie the ends of the bowstring and stretch the knot so that it stands about 5 cm from the center, only carefully, the bowstring can fly off the nail. 

We take a device for winding, leave a tail of about 20 cm, start wrapping both strands of the bowstring in turn, wrap it around 10 cm each, wrap the tail together with the strand, after finishing we tie the winding with a simple knot. So we get the blanks of the bowstring loops. 


We shift the loops back to the nails, wrap the loops, beautifully closing the ends of the braid, wrap 10 cm in the middle under the bowstring, close the ends. Everything, the string is ready!
Now how do you dress her? We dress on one shoulder of the bow, but not in the cut, but further. Then we hook the bowstring into the cut of the second shoulder, rest this shoulder on the floor so that it lies flat on the floor, resting on the bow handle, squeeze the second shoulder up and insert the bowstring into the cut. It is more convenient to do this together.
Part four: arrow.
An equally important detail of the shooting complex, so we do it carefully, although they are lost, broken, etc. on the shooters. We go to the hardware store and buy a bead 10 * 10 mm. We buy a lot of it, because. consumable material. We select carefully, straight, without knots. I took 4 rubles per meter.
It's time to decide on the length of the future arrow. For this, we rise left hand with the index finger extended, pull to the left parallel to the ground, look at this finger. The length of the arrow is the distance from the tip of the finger to the chin!
The blank for the arrow should be 5 cm longer than the future product.
We remove the edges of the glazing bead with a planer, bring it to a round state using the following device.
At the base are two suitable boards / pieces of plywood, pieces of a glazing bead with knots are nailed along the edge of one. A hefty evil skin on a rag basis is glued to both parts of the device. The length of the fixture is comparable to the length of the arrow, the width is about 10 cm. If desired, both parts can be sewn with a piece of leather along one side. 

The principle of rounding is very simple, we clamp the workpiece into a screwdriver and at high speeds a couple of minutes of reciprocating movements. After that, in the hands, using sanding paper 100, 200, 600, only it is better to hold the paper through a rag so as not to get burned. As a result, we get an amazing quality arrow shaft with a diameter of about 9 mm. I tried a 500 watt drill, not that it twists the workpiece into a spiral.
cut off<технологический хвостик>, we make a cut perpendicular to the annual rings to a depth of 8-10 mm, we expand the cut with a flat file, we round the edges of the cut with it, we cut off 1-1.5 mm from above and below at a length of about 2 cm.
Part five: plumage.
I decided to make the manufacture of plumage in a separate part.
The goal is a simple weather-resistant bright plumage with good flight characteristics. For manufacturing, we need colored tape, aluminum tape, A4 paper. We cut the paper along the short edge to a width of 4 cm (4 * 21). We cut the aluminum tape 1 * 21 cm and fold it along the aluminum outward. 


We unwind the colored tape with a sticky layer up on a flat surface, lay the paper so that 5 mm is left on both sides, glue strips of aluminum tape on these places and again a layer of colored tape on top. With one such blank, 4 feathers are obtained. So there are a lot of them to do.
Further, from any material at hand, we cut out a template for the future pen, the shape is for an amateur, the optimal dimensions are 8-10 cm long, 1.5-2 cm wide.
Outlining ballpoint pen pattern, cut out the feather, not forgetting 1 cm of aluminum tape on both sides for further winding. Feathers are even more consumable than arrows, after successful shooting, the disheveled feathers on the arrows found can be cut off, the arrow cleaned with sandpaper and new feathers glued on! 


So, we take an arrow, peel off the protective strip from the pen and carefully glue the pen at a distance of 3 cm from the edge of the arrow, and so on three times! The strips should touch each other. Next, we take colored tape, put it on a flat surface, which is not a pity, with a sticky layer up, cut off a piece of about 10 cm with a clerical knife, cut this piece into 5 ribbons 1 cm wide, glue three strips between the feathers, cut off the excess tape with the same knife, the remaining two pieces wrap the feathers on top and bottom. Plumage is ready! 

Part six: tips. Theoretical.
About the tips. I will not quote what the law says about this, I will only say that the tips ordered a long time ago from the turner have rusted and disappeared somewhere. I did not put tips, an arrow without a tip (albeit from a compound bow) pierces a medium-sized head of cabbage through and through.
For those who like to shoot at each other, I can advise you to do<гуманизаторные наконечники>, are made simply, we take a strip of thick leather 1 cm wide, fold the strip in half, tie it to an arrow, then tie another strip crosswise, we wind a cross from the same leather on top. I myself have never done such a miracle.
Z.Y.
Well, I'll add my own. I myself have not yet had time to try out this technology: there is no turning around at home, and the workshop will be available only with the first warming. But the wait is not long and it pleases. If interested, I can post a report on the work done later.
And of course (since this is a copy-paste) I give
I started archery and bow hunting when I was young. I shot with my old bow, chased deer in the woods of New Hampshire. But with age, this occupation faded into the background.
And now, during the holidays, it suddenly occurred to me to make a bow. I have read a lot of literature on this subject. And now I would like to offer my instructions to everyone who wants to read and use it.
So, let's begin!
This bow was not the first. The first bow to be made according to the specifications in Popular Mechanics. It turned out not very powerful, the tension level is 9 kg. So I started doing further experiments and found a description of Luke's pyramid. I used the dimensions I found in Popular Mechanics and adjusted them to fit the 9kg load using the Solidworks program. Then I changed the parameters of the bow in the program so that the size and bend of the product did not change, but it could withstand a load of 23 kg.
Step 2: Choosing wood
The easiest choice to start with is red oak wood. It can be freely purchased at any store specializing in the sale of lumber. I chose the straightest 25 x 75 x 2500mm board with the widest growth rings and the heaviest weight in the store section. You will have to sort through a lot of material, you may need to visit several stores, but it's worth it. If there is a bad tree, then the bow will turn out bad.
Step 3: Marking out the wood for the bow
Start looking at the wood. Check for any chips, cracks, knots, if you can work without hitting them, that's good. If not, you may need another board. Mark 2.5 cm from one end, and then cut off the 175 cm part so that 62.5 cm remains. Take the 175 cm part. The largest piece will be the onion itself. Mark the center of each end, draw a line between these centers along the board, then mark the center of the board itself. The bow should be symmetrical.
The handle is 10 cm long, 2.5 cm wide in the center.
"Wedges" - the difference in width from the handle to the shoulders - 5 cm in length.
Shoulders - 75 cm in length, thinning towards the ends to a width of 1 cm.
Step 4: Cut and make the shoulders
I used a table saw to cut off the marked extra edges - I spent no more than two seconds on the whole action. Now you need to reduce the thickness of the board to approximately 11 mm. This can be done using an electric planer, or a hand planer (this will be more difficult), or a desktop circular.
Do not cut out the shape of the handle yet!
Step 5: Handle
Now the ends are too thin. In this form, you can not use the bow, otherwise it will break. Therefore, you need to make them thicker but with a smooth transition to the shoulders. Now let's take the 62.5-centimeter remaining part, saw off 23 cm from it. Then, using circular saws, we cut out along a smooth transition in thickness (the photo shows, look carefully how this is done).
The resulting part is glued to the base of the bow and left to dry for a day. The next day, we begin to cut out the handle.
Step 6: Now the scariest part of the job
Now you have an object resembling a bow and you need to make a normally functioning bow out of it. First you need to cut about two centimeters at all corners along the workpiece - this will prevent the fibers from “flaking” and causing serious splinters when bent. We make small wedges from scraps and tie them tightly at both ends of the bow.
We make a bowstring and move on to the next step.
Step 7: The Serious Stage

Many are interested in the question of how to make a bow with your own hands. There are already many photos, videos, various diagrams and drawings on the Internet that will help you find the answer to this question.
This is not surprising, because archery is one of the most interesting and exciting types of sports. sports games. It does not oblige you to practice this sport professionally.
You can also hunt various animals. You can shoot not only adults, but also children at the same targets made by yourself at home (targets can be downloaded). Shooting from a homemade bow - good way entertain your child.
What parts does it consist of
The bow is one of the most ancient types of throwing weapons.
It is used to shoot at a target with arrows.
They hunt animals of any kind and size.
Nowadays, the main function of this weapon has lost its relevance, now it is used mainly for sports and for competitions.
Sizes of bows and arrows according to arm span:

Note: in order to undertake to make a bow, it is worth noting that you cannot make it in one day. It takes patience and a lot of endurance so that you can reach the final goal.
The material, or to be more precise, the tree that will be used for the manufacture of this weapon, is prepared in advance. The weapon that you want to make with your own hands has one drawback.
Over a short period of use, wood can lose its elasticity. This causes the bow to not shoot as well. It just becomes unusable.
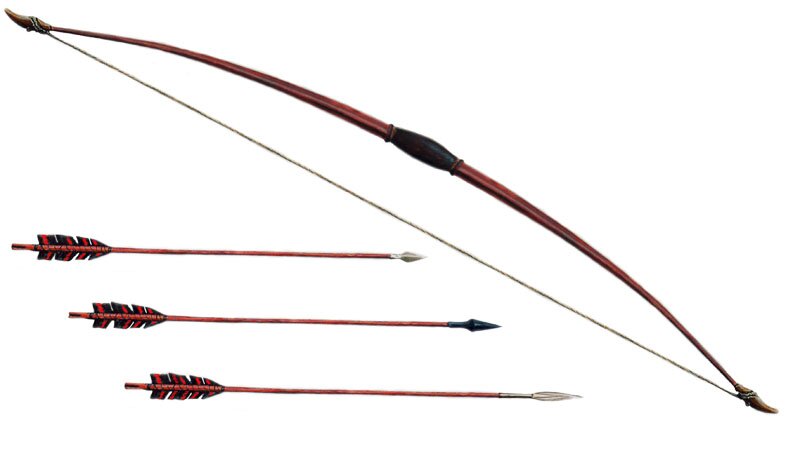
The classic version includes:
- the main part (handle or kibit);
- shoulders;
- bowstring (elastic rope, necessary for the bow to bend during shooting).

Expert Note: the classic version includes three main parts, but there is also a reverse thrust or block weapon. Despite the fact that the components can be supplemented with different details, the principle of using these weapons does not change.
To make homemade, you need to use a stick, the basis of which will not be pronounced. It should be noted right away that such a mechanism can be used in hunting no more than six times. After that it becomes unusable.
Classification

Classified according to various parameters:
Depending on sizes:
- large (adult);
- small or mini (children's);
- gift (decorative).
Depending on the type:
- simple;
- difficult.
Depending on the form:
- straight;
- curved.
Depending on the material:
- wood;
- metal;
- created on the basis of fiberglass (or plywood);
- combined.
Depending on the location of the arrows:
- central;
- peripheral.

compound bow
Depending on the design:
- solid;
- collapsible;
- block.
Depending on application:
- hunting;
- combat;
- children;
- for shooting indoors and outdoors;
- for long range shooting.
Material
 There is a lot of material for the manufacture of the classic version.
The most common material suitable for making a quality bow is maple, acacia, ash or birch.
When making a bowstring, it is necessary to build on the fact that the material must be strong and elastic, and besides, it must withstand a very large load.
The most commonly used synthetic material is polyamide. They also use lavsan, kevlar, kapron, dacron and other synthetic fiber threads.
Historical data indicate that earlier animal hair, tree bark and much more were used for bowstrings.
Master's advice: for the base, it is necessary to choose a material of high strength. In order to make the shoulders, you need to select a material that can bend and spring well.
Manufacturing technology
 It is worth remembering that a real bow is always composite.
In length, all three parts should not be longer than two meters.
If the size of the weapon is more than two meters, the accuracy and power of the bow decreases accordingly.
Instructions on how to make it with your own hands:
- Blanks must be cleaned and dried. Wood is dried for about 2-3 months in an upright position at an average temperature of 22-24 degrees.
It is important to know: Drying blanks in the sun is prohibited!
- Further, all the components must be planed using sharp knife and continue to dry. And then give the final look. After the blanks have acquired the desired shape, you can begin to dry them in the sun.
- The basis is kibit. It serves as a certain frame for attaching the remaining parts. Details are glued to the kibit with a special store-bought glue.
- Kibit must be soaked with melted animal fat or cedar resin.
- The joints of the kibiti and other parts must be pulled together with a strong cord that has good flexibility.
- After it can be sanded until it becomes smooth.
Arrow making
 Which arrow material to choose depends on the animals that will be hunted when it comes to hunting bows.
If the animal is small, use spruce, pine, birch, if larger - oak, acacia or ash. A good bow should come with at least four arrows. For manufacturing, you will need slats, boards, the thickness of which is not more than four centimeters. The length of the arrows must be at least 80 cm (see size chart above).
Note: the length of the arrows should be the same as the length of the bow itself, and also correspond to the magnitude of the bowstring tension. That is, if the bow is in a stretched position, the arrowhead should at least protrude two centimeters beyond the bow (the base of the bow is “kibit”, which serves as a frame for attaching the main parts).
Manufacturing steps:
- With a planer, you need to measure up to two centimeters of the thickness of the board.
- From the end, mark the board in squares and saw it into arrows.
- Sand the shaft into an oval or round shape. To make the arrows beautiful, you can attach three feathers to each. However, archers prefer to make notches for fingers instead of feathers, as they consider this a more practical option. The iron tip should be in the shape of a triangle.
Care
 You will learn traditional tips on how to extend the "life" of a homemade bow in this section.
Care does not present any difficulties.
It will be very easy for the person himself and without problems to perform the following points:
- Stored exclusively vertically. It is most practical to store in a special case.
- The bowstring should only be worn while shooting.
- Before you start shooting, the bowstring must be developed (pumped).
- Store only in a dry place.
- Drag is prohibited.
You can even make it from a stick, the most important thing is to know the scheme according to which the bow you made will be as functional as possible in use.
It doesn’t matter which one (elven or Russian, Asian or short, or maybe even skis) you want to do, the main thing is to strictly follow all the instructions and then you will succeed. See detailed video do-it-yourself wood manufacturing techniques:
Make a bow with your own hands
Well at the end I add in full another instruction for making a bow with my own hands, which I could find.
For the manufacture of a simple bow, almost any tree growing in middle lane our mother Russia. Recommended: maple, juniper, hazel, birch, ash, oak, elm, verest.
The proposed workpiece must be cut in winter, in frost ~ 10-15 degrees.
The workpiece should not have large knots (growths, mechanical and thermal damage). The length of the blank should be 30 cm longer than the length of your future bow (15 cm on each side for drying cracks, the occurrence of which is not excluded). DO NOT REMOVE the bark from the resulting "log"! Cover the ends of the workpiece with oil paint. Drying of wood should be even, in order to avoid the appearance of internal defects in the material. If this is not done, then the bow will not last long. Dry the processed workpiece in a vertical position at room temperature. The air should not be too dry, otherwise the wood will dry out and the labor will be wasted. Drying time 2–5 months, depending on conditions.
Primary processing
The resulting blank is a log "Figure 1". Our task is to get a board from this log. How to achieve this? There are several options, each of which is quite historical: processing, with an ax, using a saw, by splitting with wedges (from more solid wood). The thickness of the board is equal to the width of the bow being made in the handle (for a Slavic bow, about 3 cm). After receiving the board we need, it is necessary to mark it. Visually check it for the presence of an oblique layer and other defects. According to the results of the inspection, make adjustments to the thickness of the bow at the site of the defect in the material (increase it). Further on "Figure 2" the markup scheme is shown. Please note that we did not remove the bark from the workpiece. Do not damage the outer part of your future bow!
Picture 1
Figure 2
The excess part is separated from the bow by means of an ax, and then a knife and a planer. With this treatment, you get the side profile of the bow. After separating the bow, begin the formation of its frontal profile "Figure 3". The ratio of the width of the handle to the width of the end of the shoulder is approximately 3/2. At these stages of work, be extremely careful. It depends on the accuracy and accuracy of your work whether the limbs of the bow will work equally evenly or one will be more elastic than the other. At these stages, the bow cannot be bent - this can lead to splitting of the workpiece and its damage. The section of your bow will depend on the thickness of the log you have prepared. It can vary from lentil to almost rectangular "Figure 4".
Figure 3

Figure 4
Steaming onions
At this stage, the bend of the bow is formed. Some manufacturers resort to soaking the workpiece in various infusions and solutions. The wood treated with water vapor has all the properties we need. Why steam onions? There are several reasons to be aware of the manufacturing process:
If the wood dries out during the drying process (therefore, it is not recommended to bend the onion before steaming).
In the case where your primary blank was not straight (which is not uncommon, and nothing to be afraid of. The frontal profile of your weapon does not have to be straight at all. This will not affect the effectiveness of shooting, unless it will be inconvenient for another person to use your weapon.)
If you are making a relatively short weapon (Slavic version 1 - 1.3 m).
If you intend to make a bow with a reverse bow.
In the case when you are making a "light" (for example, game) bow.
In order to give an aesthetic appearance.
At the beginning of the stage, your workpiece is the following: "Figure 5". You need, for example, to get such a bend: "Figure 6". To do this, you need to steam the shoulders of the bow (the element being steamed becomes plastic and easily takes the bend that you set. Steam the shoulder of the bow until you can easily bend it for captivity). The following parts are steamed, shown in white "Figure 7".
Figure 5
Figure 6
Figure 7
It is best to steam at the same time, so that then the onion shoulders dry out simultaneously and evenly. After steaming the shoulders, the bow is drawn into a special slipway “Figure 8” prepared in advance for this particular bow. Black color shows wooden bars, between which a “hot” bow is forced. The number, shape and location of the clamping bars depends on the shape of the bow you need. In such a slipway, the onion dries up to 1 week. After that, it is removed from the slipway, the ends of the bow are formed for the subsequent putting on of the bowstring (a place is being prepared for horn / bone tips or a “step” is simply cut out under the bowstring loop).

Figure 8
Note that we did not remove the bark from the “back” of the onion! When steaming and captivating in the slipway, part of the bark will peel off from the back of the onion. Separate it with a fingernail or wooden knife. ATTENTION! Do not damage the fibers on the back of the bow! If part of the bark remains, do not worry, gently sand it with sandpaper to a smooth state and your bow will take on a decent appearance.
The bow is almost ready. For the longevity of the bow, it must be protected from drying out or moisture. If you adhere to the historical and reconstructive direction in your work, then it is recommended to impregnate the onion with hot wax or melted fat (do not overdo it! The impregnation should be no more than 3 mm in depth, otherwise the onion will lose its elasticity). Otherwise, you can use varnish, modern paints or mastics.
Making a bowstring
For a bowstring, threads made from strong artificial fibers, such as Kevlar (very strong, but also expensive), nylon, lavsan, are best suited, and silk is also suitable. A good bowstring is obtained from a thin fishing cord in reels (not a fishing line, but a cord). The main thing is that the thread does not stretch and is very strong and resistant to chafing. The thickness of the threads does not really matter, just depending on this, the number of turns will change. The string is made as follows:
Step 1. First you need to make a "winding machine", that is, a simple device with two or four pins, where the bowstring will be wound. L3 (string length) = L1 + L2, with L1 = 15x20 cm. "Figure 9". But there is a simpler way out - to wind the thread around the legs of the stool. Various options winding can be achieved in almost any length, although it may be slightly inaccurate. The ends of the thread are tied with an Achilles knot.

Figure 9
Step 2. On the ears of the bowstring, that is, in the place where it is put on the bow, it is necessary to make a protective winding. This will prevent abrasion. For this, the option with four pins is convenient. Well, in other cases, you can use a spacer. You need to wind it tightly, lay the turns as tightly as possible arcs to each other.
“Figure 10” The winding is done from both ends of the bowstring, approximately 15 cm each. Moreover, on one side, the turns begin in such a way as to hide the knot obtained after step 1.

Figure 10
Step 3. Now we make an eye loop, tightly rewinding its base “Figure 11”.

Figure 11
Step 4. Next, approximately in the middle of the bowstring, you should also make a winding 10 × 15 cm long. This is the place where the fingers will lie. It is also useful to make a “saddle” - a thickening under the arrow shank so that it does not move out “Figure 12”.

Figure 12
Arrow making
Let's start with the manufacture of the shaft. The shaft for an arrow can be made from wood, this is the easiest way. You can go into the forest and cut down a tree, cut boards, etc. You can buy a board and cut an arrow. You can use ready-made square-section wooden slats or even a regular bead, processing them to a round section with a diameter of 8-9 mm. The main thing is to choose the slats as straight as possible and without knots (and hitches J). Now we need to make the sticks round, I did it with a planer. Next, the workpiece must be sanded, first with large, and then with fine sandpaper. To do this, you can use a drill at low speeds, holding the workpiece in its chuck.
Please note that the more even the shaft of the arrow turns out, the more accurate its flight will be. And even better if you manage to find ready-made round slats. For example, used for chopiks (wooden nails) in carpentry.
Arrow Length Determination: (See "Table" and "Figure 13")
Table


Figure 13
Now we need a tip. You can do it simply: hammer in a nail and wrap that place with copper wire. But this is not a very good design. It is better to make such a tip: "Figure 14". It can be cut from steel with a thickness of 1.5 - 2 mm. You can cut it with a knife. At the end of the bow, you need to make a slot, and attach the tip to the glue there, then wrap it with thread.
Next you need to make a shank. For example, like this: "Figure 15". You need to insert a bowstring into the slot, notches - so that your hands do not slip off.
Figure 14

Figure 15
Now you need to make plumage. It can be made from bird feathers. Two or three plumages can be cut from one bird feather (depending on its length). The length of the plumage is in the range from 5.0 to 9.0 cm. The best feathers for arrows are from the wings of a turkey, swan, eagle and goose. The feather is cut with scissors along the trunk, and then pieces of a given size are cut from it.
For plumage, the best part of the feather, closer to the base of the trunk, should be used. Feathers can be dyed before gluing desired colors. The plumage trimmed with scissors has a barrel that is uneven in structure, which must be processed so that it can be glued to the arrow. Processing of the plumage barrel is carried out either on an emery wheel (when it rotates), grinding the core of the barrel, or by grinding with sandpaper. The last way easier and more error-proof.
Grinding is done as follows: the plumage is compressed between two metal plates with a thickness of about 0.5 × 0.7 mm. The part of the pen barrel remaining outside is sanded along the emery cloth, which is located on a flat board. Since the plates are held perpendicular to the board, after grinding the end of the plumage will be pressed against the arrow evenly. The side faces of the plumage rod are also polished. The feathers made in this way are glued to the arrow.
The selection and sticker of plumage on one set of arrows must be made from feathers of the wing of the same name. Incorrectly glued feathers (for example, taken from different wings) can lead to differences in the flight of the arrow compared to other arrows. The feathers glued to the arrows are fired with red-hot wire to give them certain form for which a special machine is used. At present, archers use feathers purchased from various companies, which are of high quality made for any arrows and various kinds shooting. Feathers can be wound with strong threads (silk, nylon, etc.) "Figure 16"

Figure 16

Put on the string shortly before shooting, and take it off immediately after.
Sew a cover for the bow so as not to damage it during transportation and storage.
Store onions in a room with room temperature and moderate humidity in an upright position.
Shoot your bow at least once a month so that he doesn't get used to shooting.
From the book Finishing and repair for a thrifty owner author Blaze Iosif SamuilovichDo-it-yourself furniture Stained-glass windows in the doors Doors with glass inserts - stained-glass windows look spectacular in the apartment. For such stained-glass windows you will need colored glass. There are several ways to color them. Glass can be painted with conventional oil paints, varnishes, enamels or
From book 3000 practical advice for home author Baturina Anna Evgenievna From the book Decoration of Bottles, Glasses and Candles author Preobrazhenskaya Vera NikolaevnaMaking candles with your own hands Oval candle You will need Cinders of old candles or ordinary household candles, wax crayons, 100% cotton threads, a candle mold with a small hole in the middle for the wick, a stick for stirring wax, a stick for
From the book Fence, fence, gate at their summer cottage [We build with our own hands] author Nikitko IvanChapter 2 We make a fence with our own hands Preparatory work Most fences are a structure based on supporting pillars, logs and a crate attached to the logs (Fig. 2.1). The most maintainable fencing option is the presence of blocks
From the book We sew soft toys, pillows and bean bags author Ivanovskaya Tatyana VladimirovnaOWN HANDS BAG CHAIR Making a pear-shaped bean bag will not be particularly difficult, but the interior of the room will change significantly with such a comfortable and beautiful accessory. You can not deny yourself the pleasure of becoming a designer of your own furniture,
From the book DIY furniture author Onishchenko VladimirDo-it-yourself furniture You can learn how to make furniture with your own hands in a short time and at any age, for this it is not necessary to have any special training. The main thing is desire and patience. Where to start, what should be the first steps? For example, first
From the book How to make a country house cozy and comfortable author Kashkarov Andrey Petrovich1.22. Do-it-yourself double-glazed windows installation in a village house It may seem like a difficult task to install double-glazed windows instead of old frames, but I assure you that anyone can solve it. And such a seemingly unbearable thing is available today even to a housewife
From the book Country Encyclopedia of Experienced Advice author Kashkarov Andrey Petrovich From the book Country House Design author Kashkarov Andrey Petrovich2.1. Do-it-yourself creative design, or do-it-yourself laying out tracks country cottage area in front of the house “looked” or played with new colors, they are trying to give its landscape an original, or, as it is now fashionable to say, creative, design. There is also a "special"
From the book Modern Apartment Plumber, Builder and Electrician author Kashkarov Andrey Petrovich From the book Do it before the child grows up. Adventure, games, experiences author Rizo Elena Alexandrovna From the book Repair. Right! Cheap! Fast! author Kriksunova Inna Abramovna From the book Wardrobes, hallways, slides, walls, shelves, chests of drawers and other prefabricated furniture author Podolsky Yuriy FedorovichDo-it-yourself wardrobe room A wardrobe room is the dream of every housewife. This is a spacious wardrobe for outerwear, and comfortable shelves for underwear, and a place to store many household items, and additional mezzanines for backpacks and suitcases. And also this
From the book Entertaining Electronics [Non-template encyclopedia of useful circuits] author Kashkarov Andrey Petrovich1.4. Do-it-yourself sensitive audio and video amplifier This material will be useful to those who are involved in the use of video monitoring circuits in a limited area. touching options security in enclosed spaces, I noticed that it is not always cost-effective
From the book Cosmetics and Soap self made author Zgurskaya Maria PavlovnaRules for making cosmetics with your own hands 1. Prepare a separate dish that you will use only for the manufacture of cosmetic preparations. These should be enameled, glass and plastic bowls of different sizes and pans with a double bottom.
From the book Managing and configuring Wi-Fi in your home author Kashkarov Andrey Petrovich