Drawing Gzhel in the senior group is phased. Abstract of the GCD on drawing in the senior group of the kindergarten "Introduction to the art of Gzhel painting
Drawing master class for children 5-7 years old "GZHEL" with a felt-tip pen in stages with a photo
Sredina Olga Stanislavovna, educator, head of the art studio of MDOU CRR d.s. No. 1 "Bear cub", Yuryuzan, Chelyabinsk region
Purpose:
Creation of study papers
Materials:
Paper A3 white, felt-tip pens, wax crayon, brushes, water.
Goals:
Acquaintance with the blue Gzhel
Tasks:
Learning how to draw Gzhel patterns
Education of patriotism
Development of curiosity, fantasy and imagination
Preliminary work:
1 - Acquaintance with Gzhel (presentation, story about the fishery)
2 - View presentation
Birds:


Landscapes:


Blue Gzhel looks great in any materials. These are embroidery on fabric, felt boots, ribbon embroidery, wood painting, appliqué, stained glass, tiles, quilling.
Variations on the theme of Gzhel:


Literary application:
Poems about Gzhel
A simple pattern of shades of paint,
White clay, porcelain - the attributes of a fairy tale!
Like a child's hand on pieces of clay
I painted blue pictures in three strokes.
Cups round sides painted in rings,
In petals and clouds - tiles for the stove,
Blue lace, cobalt frost,
As if a blizzard had swept curlicues of lines.
I stuck blue figures for the game,
For fun, children have hares and whistles.
Hidden in the lightness of the stroke is the secret of the miracle - clay.
Ancient craft lives in Russia for centuries.
Generations of masters of white and blue Gzhel -
Magicians of two colors, our Botticelli!
Svetlana Ledkova
From time immemorial to the present day,
Through the efforts of skilled craftsmen,
Russia decorates the miracle Gzhel
Blue pattern in white dresses.
Spring will decorate the morning
Wonderful Gzhel delicate bouquets,
And as if by a light breeze,
It will blow on us in the hot summer.
Sometimes autumn in bright colors
Nature's sweet creation,
Gzhel comes to us like a snowy fairy tale,
Winters, anticipating the approach.
Well, in winter, cold, blizzard,
The fireplace will warm us with fire,
In which, the hot flame is friendly
With blue pattern.
Practical work:
Gzhel is a Russian folk craft of ceramics production and a type of Russian folk painting. Getting to know the elements Gzhel painting. This is a mesh, a droplet, a smear with a shadow, various borders. We draw them with a brush, and then we take felt-tip pens in our hands.

1 - jug

We circle the jug along the contour through carbon paper (for the older group). Pupils preparatory group circle the cardboard blank on their own.

We draw the lines of demarcation. We separate the spout, lid, bottom and handle from the body.

We decorate the bottom and lid with a “mesh” pattern. We draw patterns on the handle and spout


I'll start drawing the bird's body. We draw the head, crest, beak, paws.


Add two ovals. These are future wings. We draw a ponytail.

Strengthen the tail with additional feathers. We decorate the wings with a mesh pattern.

At the ends of the wings draw feathers. Continuing the crest, draw over the bird decorative flower.


Children's work:
(preparatory group)
Some jugs depict not a bird, but a fish. Drawing a fabulous fish is even easier than drawing a bird.


2 - cheese board


Birds are drawn a little easier on the cheese board. Their wings are folded. The main decoration is a big tail. The hole on which the board hangs becomes the center of a fabulous flower. Children decorate the edges of the cheese board in their own way, using familiar painting elements. The background is shaded with wax crayons. We draw easily, keep the crayons flat.
Children's work:
(senior group)


3- Gzhel landscape


To get the effect of a brush stroke, we will apply a partial blur to the picture. The felt-tip pen will “flow” a little, but a clear edge will remain.

We draw a tower
Draw the main rectangle. Then we add an extension to it. We build on the acute-angled and obtuse-angled roofs of the tower.


We decorate the roofs, draw a balustrade, depict logs with horizontal stripes.


We place a small hut on a hillock. We draw a roof with a pipe.
Adding Clouds, Trees and Bushes


Blurring the drawing.

Children's work:
(preparatory group)

"The blue-eyed dishes - vases, teapots and dishes - shine brightly from there, like native skies."
Gzhel drawing- it's incredible and unique folk art painting.
Origin story
Initially, "Gzhel" was the name of the area in the south-east of the Moscow region, rich in clay. The inhabitants of these villages were excellent masters of pottery, so over time folk art, which came out of this region, was named after this place. Such drawings (Gzhel majolica) are mentioned in the ancient documents of the Grand Duke Ivan Danilovich Kalita. In those days, Gzhel drawings were in color. The Gzhel people painted household items: plates, dinner sets, mugs, jugs, toys, etc. In the XIV century, the Gzhel area became the center of ceramic production in Russia. With the advent of new technologies, in the 18th century, the production of porcelain products and the so-called "semi-faience" was founded, which was painted by masters. blue paint, which later became symbol of Gzhel products(Initially, golden tones predominated in the painting of porcelain products).

AT late XIX– the beginning of the 20th century The industrial crisis in Russia had a negative impact on Gzhel creativity, but in the middle of the last century this direction was restored. The recovery period was marked by the development new design - blue painting on a white background. The basis of the paint for the Gzhel pattern was high-temperature cobalt. During this period, the Gzhel association was born, which brought together the best masters of art. In the late 1980s, the best artists of this trend were awarded the Repin State Prize. Today, Gzhel unites several dozen villages and villages of the former Gzhel volost. This region is one of the largest pottery centers throughout Russia.
The subject of Gzhel drawing
The theme of the Gzhel drawing in the past was the result of the creativity of people, as a rule, illiterate, but talented. In most cases, Gzhel potters reproduced in paintings the world. They could combine in their art observations of nature, urban and rural life, impressions from architecture and icon painting, as well as the fruits of their own imagination. More often than other images there are architectural landscapes and nature motifs: birds, plants and animals.
To date, the subject of Gzhel drawing is divided into 3 types:
- vegetable(grass, cereals, berries, twigs, flower garlands, etc.);
- ornamental. First of all, these are "checkers" (several rows of blue-white squares along the side and a layering belt also along the side). These include Gzhel nets - “combs” (in the form of spruce), “droplets”, “pearls”, “antennae”.
- stories(nature and seasons).
The product without painting is called "linen", and blue painting on white - "cover".

painting technique

The Gzhel drawing technique has two main features:
- applied only by hand;
- the use of paint in 3 primary colors: white (the background of the product), blue and cyan (the drawing itself). There are more than 20 shades of blue color which is obtained after firing. Old Russian Gzhel (majolica) was painted "five-flowered"- white enamel (base), green (copper salts), yellow (antimony salts), cherry (manganese salts), blue (cobalt salts).
Tools Gzhel painter: brushes, a glass palette, a spatula for mixing paints, a jar of black mixture(cobalt oxide). The Gzhel drawing is considered underglaze (first, the fired product is painted, and after the drawing is applied, the product is dipped into the glaze, and then sent back to the oven, where the cobalt changes color).
The main secret Gzhel drawing - smearing, which have always been considered a generic sign of art. The correct technology of the Gzhel pattern implies the correct ratio of blue and white flowers, as well as the difference of each subsequent stroke from the previous one. This technique is called "the alphabet of strokes".
Compliance with the rules of Gzhel painting technology allows you to create unique things.
Given Toolkit will introduce your child to the history and traditions of Gzhel art. Studying the features of this type of art, the child will master the basic principles of constructing an ornament and the laws of composition. The lessons on the pages of the album will teach your child to reproduce the elements of the pattern traditional for Gzhel: nets and lines, dots, strokes and borders, as well as to feel the play of light, shadows and shades of colors.


Target. Acquaintance with the traditional Russian art craft - "Gzhel ceramics" and development simple elements murals (straight lines of various thicknesses, dots and nets).
Organization of the lesson.
This is an introductory lesson in which children get the most general idea of this type of folk craft, its history and stages of development. Before proceeding directly to drawing, you should tell the children about the craft, show illustrations or products of Gzhel masters, use materials from ov, slides, posters, postcards. It is good if there is an opportunity to take the children to the museum of applied arts.
Completing a task.
First, children on a separate piece of paper learn to receive various shades blue, diluting the paint with water and white. Then they complete the task in the notebook - they learn to draw straight parallel lines, draw dots and circles, repeating and completing the proposed patterns. For this work, it is better to use a thin brush. (№ 20-4).

Target. Mastering a simple Gzhel ornament-mesh.
Organization of the lesson.
Children should be told what is the difference between a large beautiful dish for festive feasts from everyday utensils that people use every day. Then the children carefully examine the pattern on the dish and try to catch the pattern of the ornament's location.
Completing a task.
Children should, having caught the pattern of the arrangement of the ornament, finish the design of the dish. All elements of the ornament are drawn immediately with a brush, without applying a preliminary drawing with a pencil, while the brush must be held with three fingers perpendicular to the surface of the sheet. The sheet () can be safely rotated so that the hand with the brush is in a natural and comfortable position.

Target. Mastering traditional Gzhel ornaments and borders.
Organization of the lesson.
Children carefully examine the presented samples of ornaments, listen to the teacher's story about the principles of constructing an ornament in folk art.
Completing a task.
Children perform exercises to repeat the main elements of the Gzhel painting. All elements of the ornament are drawn immediately with a brush, without applying a preliminary drawing with a pencil.

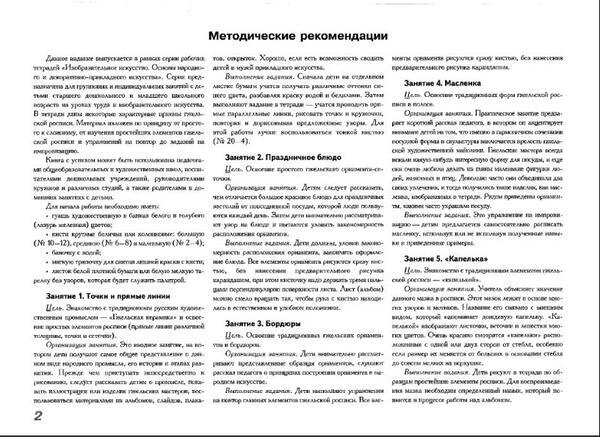
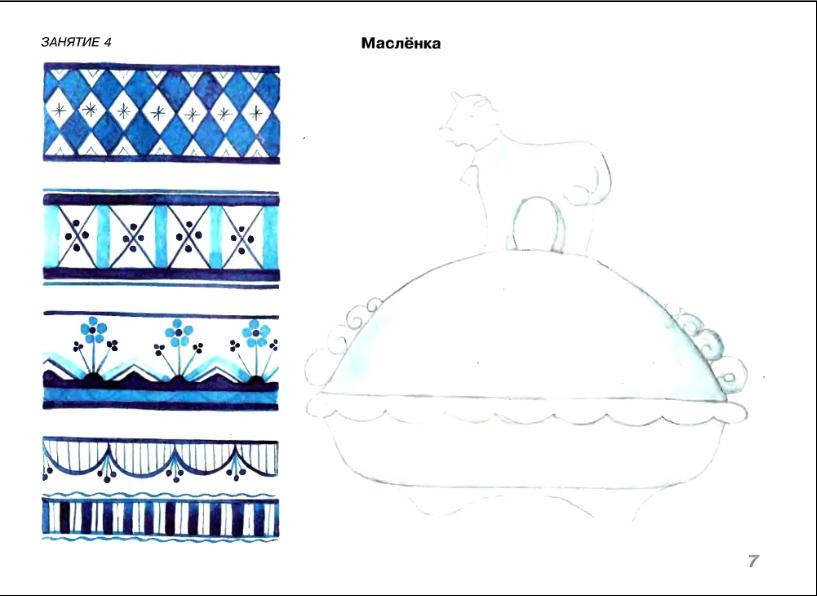
Target. Development traditional forms Gzhel painting in the strip.
Organization of the lesson.
The practical lesson is preceded by a short story of the teacher, in which he focuses the attention of the children on the fact that it is in the harmonious combination of the ware form and sculpture that the beauty of the Gzhel artistic majolica lies.
Gzhel craftsmen were always looking for some interesting form for dishes, and they also loved to make small figures of people, animals and birds out of clay. Quite often, they combined their two hobbies, and then products such as the butter dish depicted in the notebook were obtained. Nearby are ornaments, which were often used to decorate dishes.
Completing a task.
This is an improvisation exercise - children are invited to paint an oil dish on their own, using or not using the acquired skills and the examples given.
Target. Acquaintance with traditional element Gzhel painting - "drop".
Organization of the lesson.
The teacher explains the meaning of this stroke in painting. This stroke underlies many patterns and motifs. Its name is associated with appearance which resembles a raindrop. "Droplet" depict leaves, twigs and petals of many flowers. “Droplets” located on one or both sides of the stem look very nice, especially if their size varies from large at the base of the stem to very small at the top.
Completing a task.
Children draw the simplest elements of painting in a notebook according to samples. To reproduce a stroke, a certain skill is required, which will appear in the process of working on it.

Target.Mastering the simplest types of floral ornaments.
Organization of the lesson.
Children get acquainted with the options for constructing simple ornaments in a rosette using “droplet” strokes.
Completing a task.
Children decorate central part saucers, choosing arbitrarily any of the three role models, or come up with their own pattern.

Target. Acquaintance with the traditional technique of the Gzhel brushstroke - a brushstroke with a shadow.
Organization of the lesson.
This stroke presents a particular difficulty in mastering it and requires certain skills. The shadow stroke is a special tonal stroke in which the transition from dark to light shade of blue is clearly visible. Very important for getting a good stroke is the correct distribution of paint on the brush - it should be more towards the edge, and less towards the middle.
Completing a task.
Children try to reproduce the proposed line patterns, paying special attention to the transition of tone within the stroke. For this work, it is best to take thick brushes (No. 8, No. 10) with blunt, rounded spatula ends. The brush is gently applied to the paper, and then the corresponding line is applied with a confident movement of the hand.

Target. Mastering the technique of Gzhel writing - a brushstroke with shadows.
Organization of the lesson.
Very often, Gzhel masters used dishes to paint real paintings on their favorite topics. And they loved to depict various architectural structures along with animals and birds. It is not difficult to find a variety of buildings, bridges, palaces, huts, temples on the products of the masters.
Completing a task.
In this case, the artist painted a fabulous tower, and its left half is a mirror image of the right. Children must complete the drawing and restore the fairy-tale tower.

Target. Mastering the brushstroke technique of Gzhel painting. Traditional image of a flower.
Organization of the lesson.
The blue rose is one of the main motifs of Gzhel ceramics. Children carefully look at the pictures various types flowers in the products of Gzhel masters. The basis of their image is, as a rule, a smear with a shadow or a tinted smear, in another way - “agashka”.
Completing a task.
For stroke painting, a medium-sized brush (No. 6-No. 8) is used. Children learn to smear first in one direction, then in the other. The painting of the flower itself must be started from the middle, then two strokes on the left and two strokes on the right are applied, during operation it can be rotated so that it is convenient to apply strokes.

Target. Mastering the traditional motif of Gzhel brush painting - a flower.
Completing a task.
Children, using as an example the painted cup and sugar bowl depicted on the right side of the sheet, paint the teapot in the same way. The image of a Gzhel rose is applied using the traditional technique learned in the previous lesson.

Target. Acquaintance with the traditional technique of decorative image of Gzhel birds.
Organization of the lesson.
The bird is one of the favorite motifs of Gzhel masters. Masters depicted them in various poses, standing or sitting, pecking and fluttering, it is rare to find a landscape in which birds were not depicted. Masters vividly grasped and conveyed the postures and habits of birds.
Completing a task.
Children take a blank sheet of paper and try to reproduce the Gzhel bird on it.

Target. Mastering the main motive of the Gzhel folk craft - birds.
Organization of the lesson.
"Blue bird" - the bird of happiness. The teacher tells the children about the role of birds in Russian mythology, about the symbolism and superstitions associated with birds.
Completing a task.
Children are offered a frame in which each of them can draw their bird of happiness. The finished drawing can be presented to mom or grandmother.

Target. Using previously acquired knowledge and skills, independently choose a composition and beautifully paint a kumgan.
Organization of the lesson.
In this lesson, all previously acquired skills and knowledge are applied. Children are invited to paint the kumgan on their own. Kumgan is a drinking vessel with a spout, a handle and a lid.

Can be used in work various methods and techniques, it is not difficult for a teacher to pick up visual material: dishes, albums, illustrations, photographs, transparencies, posters, postcards, but not everyone succeeds in showing the drawing technique and brush writing techniques correctly. Today we will try to remember and master the alphabet of hand painting using the example of Khokhloma, Gzhel and Zhostovo painting. We will learn to draw flowers - the most beautiful, common and complex element of the pattern.


Secrets of the masters Before we start drawing a flower, let's practice writing strokes. To make the strokes beautiful, neat in brush painting, masters use special brushes: round squirrel or kolinsky 1, 2.3 - in Khokhloma painting, 2, 3 and 6 - in Gzhel and Zhostovo. The tip of the bristle of the brush should be very thin. At the beginning of training, it is important to hold the brush correctly. It must be in a strictly vertical position relative to work. The brush in the hand is held by three fingers: thumb, index and middle, so that the direction of movement of the brush is carried out by the middle finger.


The alphabet of brush strokes Flat stroke (brush 6) - we draw the whole pile straight and sharply raise the brush from the middle of the pile. Let's practice in different directions from left to right, from right to left and from top to bottom, from bottom to top. Let's combine several flat strokes in the shape of an oval and we will get the first element in the painting "crown", used as the upper part of the flower. Drop smear. We put the brush vertically, press to the middle, move the brush down and go to the tip. We draw the second stroke along with the first one on the right side - we get the first simple “heart” element. A comma stroke is done in exactly the same way as a flat stroke, but rotated to the left or right. If you draw two or three strokes together, you get an element of a flower pattern - a “petal”.

We start the “zigzag” stroke from the tip of the brush, turn the brush in one direction, press it to the middle and turn it in the other direction, finish the stroke with the end of the brush. Let's try to draw the "stalk" element - two "zigzag" strokes together. A stroke “in the plane” is a two-color stroke, on the brush we pick up colored paint on one side, remove the excess and take white on the other side. We put a smear so that two colors are obtained on the sheet at once. We practice drawing strokes “flat, droplet, comma and zigzag”. Let's try to execute the leaf element. To do this, we take two colors yellow and green on the brush and draw two “commas”, so that there is one color of paint in the center of the leaf.

Secrets of Gzhel painting Smear "penumbra". We pick up the paint with a half-wet brush from the palette and make a few strokes. After drawing 2-3 strokes, the brush must be washed and the paint drawn up again, then you get a stroke that is dark on one side and lighter on the other. Borders. The ornament is wide and uses the elements of dots, strokes, arcs.


We draw flowers based on Gzhel painting Materials. We use watercolor paint cobalt, brush 1, 3, 6, White paper and a sheet of exercise paper. Bud. We begin to draw the upper unopened part of the rose "bud" - we draw two strokes of the "comma" similar to the "cup". And two petals from the bud in the same way from top to bottom. We turn the brush down to the left and to the right, draw straight short strokes of the “droplet” - two more petals of the bud. We start with the tip of the brush and end with the base. Then we take brush 3 and on top of the bud we lay the same strokes, we get a shadow. With brush 1, we finish drawing the “mesh” element inside the bud - with strokes tilted to one and the other side and decorate with a “whisker” on top. We draw a thin stalk and leaves "droplets".


Flower. We arrange strokes “commas” horizontally to make an oval. Beneath it, there are still wide strokes of the same kind, similar to the "bowl" element. Now we draw the petals, like a bud, only three on each side. Draw a deep shadow. We draw a thin, long stem, finish with a “droplet” stroke. We decorate the flower with "antennae" and "berries". Leaves. We draw with a brush 6, 3 - strokes of "droplet". We finish the grass. Grass "fern". First, draw a long stalk rounded at the end. Stepping back from the bottom edge, draw strokes of “droplets” parallel to each other in descending order in size.


Secrets of Zhostovo painting Double stroke. A feature of a double stroke is color and shade, for example, white and red, white and blue, green and yellow. Dip the brush into the red paint, remove the excess, and then draw white on the tip and draw and draw a stroke. Stages of work. On a black background, they first draw spots of flowers and leaves, their silhouette is called “underpainting”, then “shade” - they draw the darkest colors - shadows, bright colors are applied on top - this is a “laying”. And then the “glare” - highlights, animations, flowers become like real ones. The last to apply white strokes - called "drawing" and draw stems, antennae - "binding". Final stage. They draw a border - decorate with a thin pattern, along the edge with yellow - gold.


We draw flowers based on the Zhostovo painting Materials. Gouache, brush 6, 1. palette, black paper with a diameter of 20 cm, exercise sheet. Bud. We use the "double stroke" technique. We take colored paint on the brush, remove the excess, and white on the tip. First, draw a vertical stroke "comma", the second - a "zigzag" next to it and go to the "comma". We close the bud with long leaves, with “zigzag” strokes - on the left, right, front and back (the color of the stroke is green-yellow). We outline the base of the bud with a “comma” stroke. We finish drawing a thin stalk with spikes with a brush 1. We draw leaves with a brush 3 - two “comma” strokes together. We apply "flare" and "drawing".


Flower. Draw a circle with the whole brush, twist the brush in one place. We pass to the lower petals of the flower. The first petal is vertical, similar to the "heart" element. The second from the left and right under the circle. Still others are longer and lean down. Let's move on to the top petals. We circle the circle with two strokes of “commas”, in the middle of the circle we draw a “droplet” and next to it two strokes of “commas”. We apply "flare" and "drawing". Leaves. The first large, large ones from 1 to 3. Draw the outline of the “heart” with the end of the brush. With a double stroke, we further draw the veins of the leaf - from top to bottom from the middle of the leaf we apply “commas” strokes to each other. We apply "flare" and "drawing". Additionally, we decorate with grass - "binding". Grass. On a thin long stalk, strokes “zigzags” are applied in parallel and in descending order. Complement the "drawing".


Secrets of Khokhloma Khokhloma painting is divided into three main types: “horse” or “grass”, “under the background” and “kudrin”. A feature of Khokhloma painting is a curl, from which all elements curl and use four colors: red, black, yellow, green. Brush painting training begins with the implementation of the elements of "grass" on a sheet of paper - sedges, drops, curls, antennae, bushes. Distinctive feature strokes in that they begin and end with the end of the brush, and the movements are always rounded. Grass pattern. “Sedges” and “antennae” are drawn with the end of the brush, “blades of grass” and “curls” - by pressing on the middle of the pile of the brush, they begin and end with the tip of the brush. "Bush" you can start drawing from the bottom up or from the top down.


We draw flowers based on Khokhloma painting Materials. Gouache, brushes 1.3 yellow paper with a diameter of 20 cm, exercise sheet. Bud. We draw, opposite each other, two strokes of “grass” to make a “heart” element, starting from the tip of the brush and ending with a jerky movement of the hand. On the left and right, we draw petals similar to the “stalk” element - a double “comma” stroke, we always start from the tip of the brush. At the bottom we put a point with the “leg” of the brush. Decorate with black drops.


Flower. We draw a vertical stroke "droplet". On the one hand, there is a double stroke “comma”, which is longer than the “droplet” and goes around it. On the other side of the "droplet" is the same element, but longer. We also draw on the left, then on the right a triple stroke and the last one on the left is the same. Let's start drawing the lower petals of the flower. To the right and left of the lower part of the flower we draw petals similar to a "crow's foot", they should be long. Then the same petals, first one in the middle, then two between them. We decorate all the petals with black "droplets". Bush. We start on one side of the bush to draw “sedges” 2-3, then “blades of grass” 1-2, a large “curl” and finish with “droplets”. Symmetrically draw the same strokes on the other side of the bush. We decorate with black "antennae".


